WordPress Internal Server Error 500 for Uploaded Images

After upgrading WordPress on my Windows Server 2008 to version 3.4.1, I encountered a quite strange behavior. Using the Add New Post functionality, images, uploaded by multi-file-uploader have not been displayed anymore, neither in the editor nor in the post itself.

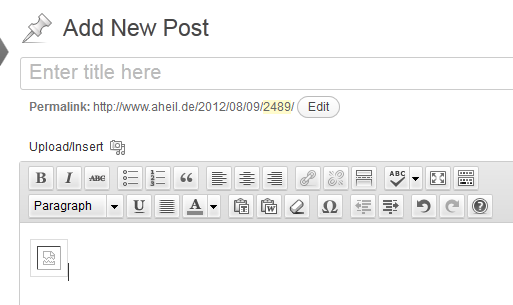
Add New Post Editor

Once you finished your article, your blog will end up with a Internal Server Error 500. However, all thumbnails created by WordPress can be requested without any problems.

500 - Internal Server Error Message

Eventually, I started to do some research on this issue, ending in a quite exhaustive digging down to the metal of Windows, however, with a quite surprisingly outcome. In this article I’ll try to give an overview of this issue, explaining why this occurs on Windows and how to solve this with almost a  single click.

There are quite a lot of blog entries and stackoverflow answers about this topic with more or less useful steps. If you are just looking for the quick answer, without the need of understanding what causes this particular problem, here it comes:

Change the system’s default temp folder (C:\Windows\temp) rights by granting rights for IIS_IUSRS user and you are probably done.
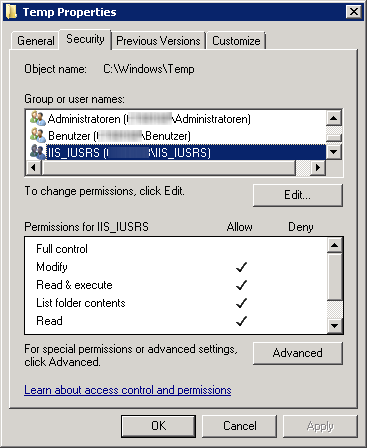
Temp Properties

The WordPress image upload is using the standard PHP functionality, using the temporary upload folder specified in your php.ini file.  By default, PHP is using the system’s temporary directory (e.g. c:\windows\temp) for uploading the initial image.

php.ini File Uploads Settings

Eventually, using the system’s temp folder is the root cause of the issue described in this article. When uploading the image to the temp folder, the file is initially created on the system. Consequently, the file is inheriting the folder’s security settings. After uploading, the original file is copied into the destination folder, e.g. \wp-content\uploads\2012\08.  Here all thumbnails are generated from the original file. As they are being created in the destination folder, they will inherit the security settings from this folder resulting in two different sets of permissions applied to the original file and the thumbnails. This explains why you will only receive an error with error code 500 for the original file, while all the thumbnails can be requested without any problems. 

In case you have already images the destination folder causing an error code 500, you can reapply the actual rights of the wp-content folder which will probably fix the problem.

In case changing the permissions of the system’s temp folder does not fix the issue, check your php.ini file if another upload folder is specified in the file uploads section. Baer in mind that PHP will use the system’s temp file for uploads also as backup in case PHP has no access rights for the folder specified in the php.ini  file. 

If you consider granting IIS_IUSRS as a security risk to access the system’s default temp folder you might want to specify an alternate upload folder anyway.
Wo sind meine Signaturen in Outlook 2010 hin

Ein anscheinend weit verbreitetes Problem mit Outlook 2010 scheint eine Fehler mit dem Signatur-Editor Signatures & Stationary zu sein, der es eigentlich ermöglicht Signatur-Dateien für E-Mails zu erstellen und zu verwalten. Der Editor öffnet sich nicht und der Benutzer kann daher keine Signaturen anlegen oder gar auswählen. Speziell für den Geschäftsverkehr sind Signaturen jedoch unerlässlich. Dabei gibt es grundsätzlich zwei Wege an den Dialog zu gelangen.

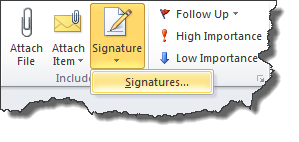
In einer Nachricht kann über die Schaltfläche Signatures / Signatures… der Editor geöffnet werden.

Signaturen in Outlook 2010 aus Mails bearbeiten

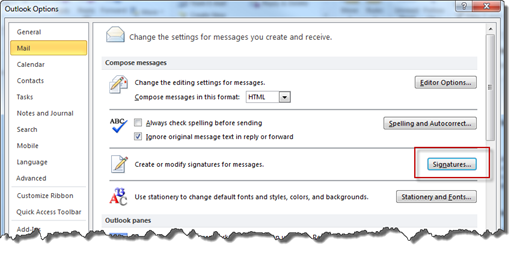
Alternativ kann dies auch über das Backstage von Outlook unter dem Menüpunkt File / Options / Mail / Signatures … geschehen.

Signaturen in Outlook 2010 aus den Einstellungen bearbeiten

Aus unerklärlichen Gründen kann es nun passieren, dass trotz wiederholtem Betätigen der Schaltflächen nichts passiert. Es erscheint kein Dialog, keine Fehlermeldung kein Nichts. Warum? Man weiß es nicht. Muss die Signatur bei jedem Geschäftsbrief von Hand eingefügt werden, steigt der Frustfaktor recht schnell an und Outlook fällt schnell in Ungnade.

Überwiegend lässt sich dieses Phänomen auf Systemen mit einer 64-Bit-Version von Windows 7 und einer 32-Bit-Version von Office 2010 beobachten. Lösen lässt sich das Problem mit wenigen Handgriffen.

Zunächst öffnet man den Registry Editor (regedit.exe) und navigiert zu

HKEY_LOCAL_MACHINESOFTWAREClassesWow6432NodeCLSID{0006F03A-0000-0000-C000-000000000046}LocalServer32

hier ersetzt man den Wert für Schlüssel Default den Wert

C:Program Files (x86)Microsoft OfficeOffice14Outlook.exe

ein. Nun wiederholt man das gleiche für

HKEY_LOCAL_MACHINESOFTWAREClassesCLSID{0006F03A-0000-0000-C000-000000000046}LocalServer32

Nach einem Neustart von Outlook sollte dann der Dialog zum Editoren von Signaturen ohne Widersprüche starten und das Wochenende ist gerettet.

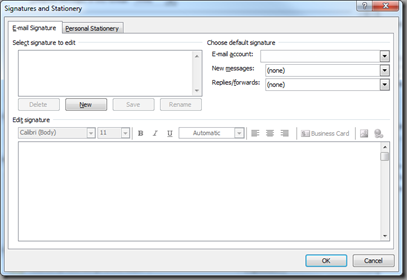
Signatures & Stationary Dialog von Outlook 2010

Dell D830 – The Missing Touchpad Driver

Since moving forward to Windows 7 x64 on my Dell Latitude D830, I had to live with the default behavior of the Touchpad and Pointing Stick of the D830 as there are no 64-bit drivers for Windows 7.

Finally, I found the right drivers for my system. You can pick it up at the Dell drivers and download page for the Dell Latitude D430. The is no explicit Windows 7 driver, however, the 64-bit driver for Windows Vista worked fine for me.

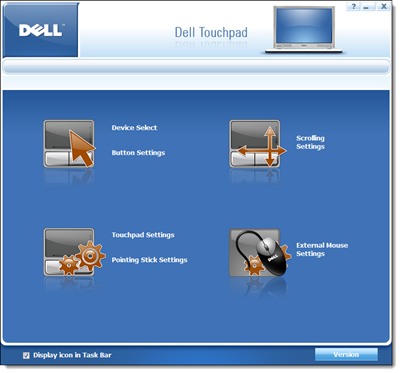
Dell Touchpad on D830 with  Windows 7 x64

To make sure you oick up the right driver, the file name is R157047. The driver gives you full access to the Touchpad and Pointing Stick functionality, including the click feature of the stick.

R157047.exe - 64-bit Driver working on Windows 7

Download: Drivers & Downloads for Latitude D430

Huge Visual Studio Find and Replace Dialogs

Every time I reopend the Find and Replace dialog box (CTRL+H) in Microsoft Visual Studio 2010,  the width of the dialog box grew by several pixels. I was looking through various settings in Visual Studio, however, I haven’t thought of a bug in Visual Studio at all.

Finally, Alex Zeitler pointed me to a hotfix  for this issue. The Knowledge Base entry KB2268081 explains the issue in details. The issue affects the following products:

  • Microsoft Visual Studio 2010 Shell (Integrated)
  • Microsoft Visual Studio 2010 Shell (Isolated)
  • Microsoft Visual Studio 2010 Ultimate
  • Microsoft Visual Studio 2010 Professional

In case you use the Find and Replace dialog quite often, you might download and install the hotfix from the connect site.

Master Pages and XHTML

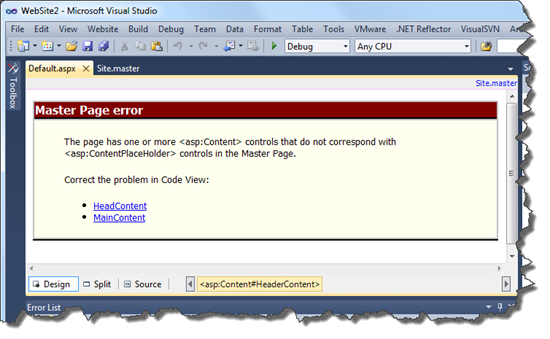
Today, we encountered a really interesting issue with Visual Studio 2010, ASP.NET and Master Pages. Actually Visual Studio denied the design view for all of the pages within the solution except to the master page.

The page has one or more <asp:Content> controls that do not correspond with <asp:ContentPlaceHolder> controls in the Master Page.

No doubt you would check all the pages as well. After verifying that all pages have been correct, the ID as well as the ConteptPlaceHolderID tags are set correctly, you might see that the issue is till persistent.

Master Page Error

In this case check your HTML source code of the Master Page. In particular check for all HTML tags with self closing syntax. Referring the W3C Recommendation for XHTML section C.3 there are some tags that should be not used with self closing syntax.

Given an empty instance of an element whose content model is not EMPTY (for example, an empty title or paragraph) do not use the minimized form (e.g. use <p> </p> and not <p />).

Eventually, you now will review again your source code for any XHTML tags in their minimized form.

<html xmlns="http://www.w3.org/1999/xhtml" xml:lang="en">
<head runat="server">
    <title />
    <link href="~/Styles/Site.css" rel="stylesheet" type="text/css" />
    <asp:ContentPlaceHolder ID="HeadContent" runat="server">
    </asp:ContentPlaceHolder>
</head>
...

In the example above change the title tag to

<title></title>

and the issue will be fixed. Even better would be of course to give your page a title.

While most browsers are quite forgiving here, the Visual Studio designer quits his job. Unfortunately, the error displayed is misleading and you might waste some time in reviewing Master Pages and ASP.NET controls that are obviously correct. Whether this is a bug or Visual Studio designer doing the right job and failing just for those tags based on the W3C Recommendation – it does of course not help a lot if Visual Studio does provide a misleading error message to the developer.

KB967723 vs Windows Server 2008

I recently experienced issue installing security update KB967723 for Windows Update on a Windows Server 2008 (32-bit). This seems to be a very common issue with Windows Server 2008 resulting in a error code 80070490.

KB967723 important update was not installed

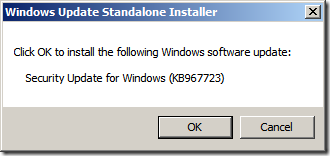
The easiest way is getting the update from the Microsoft Download Center for 32-bit or for 64-bit directly. Once you get the update you can execute the standalone installer to install the security update manually. This should do the job.

KB967723 Standalone Installer

Once installed you can start Windows Update again, it should now show Windows being up to date. Let me know if this worked for you.

Windows up to date

Error TF30224 – The First Project on TFS 2010 is the hardest

While setting up Microsoft Team Foundation Server 2010 Beta 2 one might into an non obvious issue with user rights. The error observed would look the following:

New Project TFS Error TF30224

The TFS installation considered is a single machine installation with SQL Server Reporting and Analysis services and SharePoint Services installed during the TFS installation.

The full descriptions of the error is:

Error
TF30224: Failed to retrieve projects from the report server. Please check that the SQL Server Reporting Services Web and Windows services are running and you have sufficient privileges for creating a project.

Explanation
The Project Creation Wizard encountered a problem while creating reports on the SQL Server Reporting Services on http://coruscant/ReportServer/ReportService2005.asmx. The reason for the failure cannot be determined at this time. Because the operation failed, the wizard was not able to finish creating the SQL Server Reporting Services site.

User Action
Contact the administrator for the SQL Server Reporting Services on http://coruscant/ReportServer/ReportService2005.asmx to confirm that the SQL Server Reporting Services server is running and you have sufficient privileges to create a project . Your user account on SQL Server Reporting Services must have Content Manager permission to create a new project. Also, you might find additional helpful information in the project creation log. The log shows each action taken by the wizard at the time of the failure and may include additional details about the error.

A wild guess might be checking all rights for SQL Server, SharePoint sites, SQL Server Reporting Services etc. Pat Ramadass comes up with the right hint that origins from the previous TFS version.

First of all do not look for the Reporting Service Configuration Manager. Go straight to http://localhost/Reports/ (logged in on your TFS server machine with administrator rights). You will get the SQL Server Reporting Services site. Select the Properties page and click on New Role Assignment.

SQL Server Repoting Services - Home

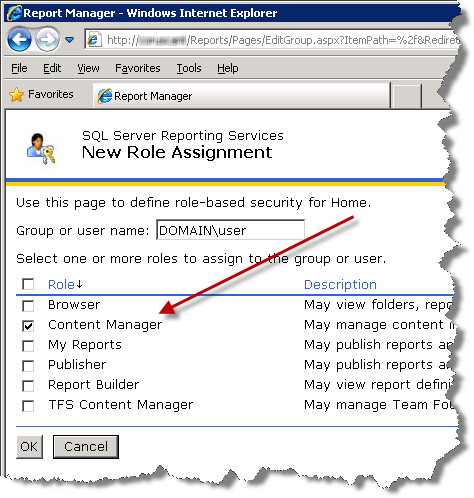
Now add exactly the user (or group) you tried creating the TFS Team Project with. Select at least Content Manager and confirm by pressing OK.

SQL Server Reporting Services - New Role Assignment

Go back to you local machine and try to create the TFS Team Project again. The users should now have sufficient rights to create the project.

How to use Google Calendar Sync with Microsoft Outlook on Windows 7

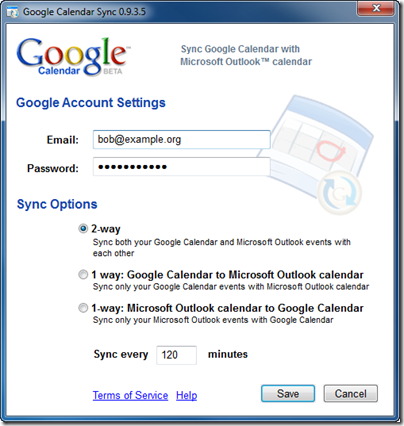
There is an urban legend that Google Calendar Sync would not run on Windows 7. Indeed, if you follow the installation instructions Google Calendar Sync will first ask you for your credentials and consequently fail to connect to Google Calendar. In the following you’ll find an solution how to use Google Calendar Sync with Microsoft Outlook 2007 on a Windows 7 system that that is provided under a works on my machine premise.

Google Calendar Sync 0.9.3.5

Once saved, Google Calendar Sync will try to connect but fail with error 2006. There is not many information about this error beside various frustrated users ranting about this and some statements that the current version of Google Calendar Sync (0.9.3.5) is not supported under Windows 7 yet.

Google Calendar Sync Error 2006

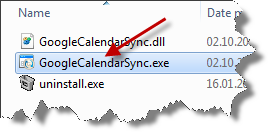
In the current case we will even run Google Calendar Sync on a Windows 7 64-bit system. Before you continue, make sure you exit Google Calendar Sync. First of all open a Explorer window and navigate to C:Program Files (x86)GoogleGoogle Calendar Sync or C:Program FilesGoogleGoogle Calendar Sync on a 32-bit Windows 7 system.

GoogleCalendarSync.exe

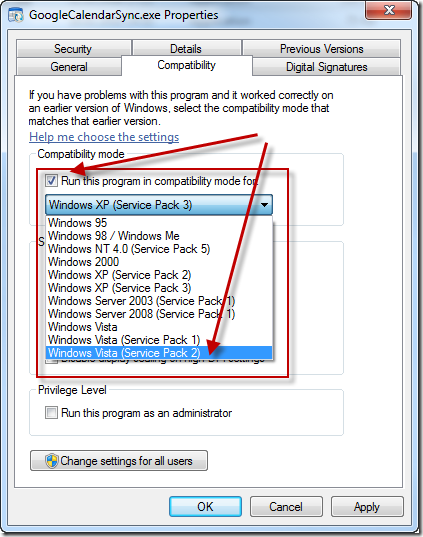
Right click on GoogleCalendarSync.exe and select Properties. Now select the Compatibility tab, check the Run this program in compatibility mode for and choose Windows Vista (Service Pack 2) from the drop down list. Click on OK and restart Google Calendar Sync either from your desktop icon or from the start menu entry.

GoogleCalndarSync.exe Properties - Compatibility Tab

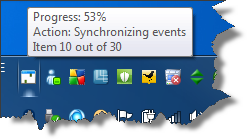
Once restarted you can happily sync Google Calendar with Microsoft Outlook 2007 on (even a 64-bit) Windows 7 system.

Google Calendar Sync running on Windows 7

The Compatibility mode of Windows is a great feature to make usage of legacy programs that have not been or will never bee updated to the latest Windows version. Since Windows 7 even mode modes (including Windows Server) back to Windows 95 are supported. The number of supported versions might vary depending on the Windows 7 version you use, however, the Vista and XP mode should always be available.

Fixing Wrong USB Devices in Windows 7

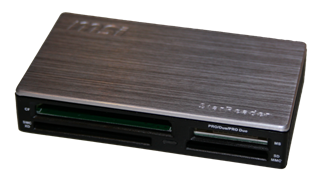
If you experience issues with a USB device not being recognized under Windows 7, there might be a simple solution to solve this. For example the MSI USB 2.0 All IN 1 Card Reader aka MSI StarReader is recognized as eHome Infrared Receiver (USBCIR) using Windows 7. The device works great using Windows Vista or even the Windows 7 pre-release versions. Unfortunately, with the final Windows 7 the device just won’t work.

MSI USB 2.0 All IN 1 Card Reader A quick look into the Device Manager will show that the device is recognized as eHome Infrared Receiver (USBCIR). When connecting the first time Windows 7 won’t give any notice that the installation of the driver failed or that the device is not ready to use. It will simply not work.
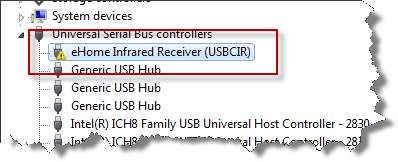
Device Manager

This seems to be known problem, however, there is no need to wait for a Software Update from Microsoft. The solution is to manually choose the device.

  1. Start Device Manager
  2. Right-click the eHome Infrared Receiver (USBCIR) entry
  3. Select Update Driver Software
  4. Choose Browse my computer for driver software
  5. Choose Let me pick from a list of device drivers on my computer
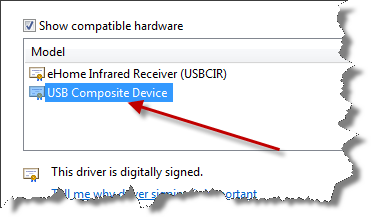
  6. Make sure the Show compatible hardware box is checked
  7. Select the USB Composite Device and you are done

Show compatible hardware

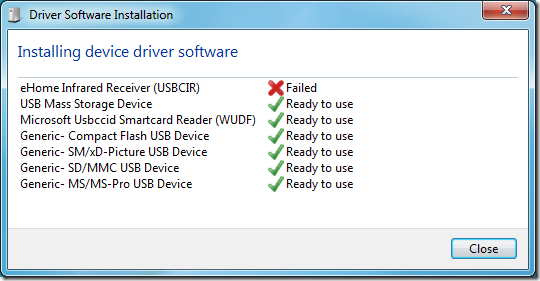
After a few seconds the driver should be installed and the device should be ready.

Driver Software Installation

Broken VMware Workstation Network Adapter

After upgrading Windows Vista to Windows 7 you might encounter an issue with VMware Workstation and its network adapter.

VMware Workstation Error Message


When setting up a NAT or bridged network connection in VMware Workstation it shows a message telling

The virtual network drivers on the host are incompatible with the installed VMware application. Expected version 5. Please reinstall the product. Failed to connect virtual device Ethernet0.

Make sure all your virtual machines are powered off and quit VMware Workstation. Open a command shell as administrator and follow the steps below.

First cd %windir%system32drivers, check for the file vmnetadapter.sys, right-click it, select Details and check its version. It should be 4.0.2.0. If the file is not there,

cd “%ProgramFiles(x86)%VMwareVMware Workstation”

rundll32 setupapi,InstallHinfSection VMnetAdapter1.Install 128 %CD%netadapter.inf

vnetlib — install devices

This will install the required adapters and devices. Do again a cd %windir%system32drivers and check for the First cd %windir%system32drivers, check for the file vmnetadapter.sys file.

vmnetadapter.sys

After a reboot of the host system, the NAT settings for the VMware network adapters should work again. Switching to bridged mode will probably result in another message.

VMware Workstation Error Message

Reason for the message saying

The network bridge on device VMnet0 is not running. The virtual machine will not be able to communicate with the host or with other machines on your network.
Failed to connect virtual device Ethernet0.

might be the missing VMware Bridge Protocol on the according host network adapter.

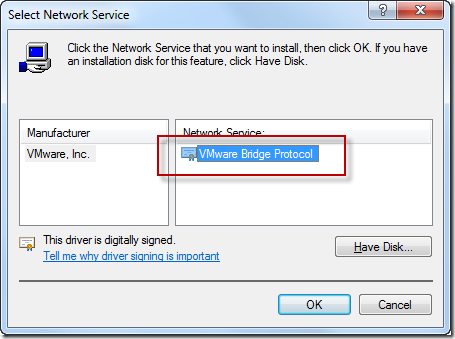
Got to Network and Sharing Center and select Change adapter settings. Choose the network connection you want to use with your VMware network adapter, right-click, select Properties, Install, Service and finally Add. This will allow you to select the VMware Bridge Protocol. In case the entry is not listed, select Have Disk… and navigate to %ProgramFiles(x86)%VMwareVMware Workstation.

VMware Bridge Protocol

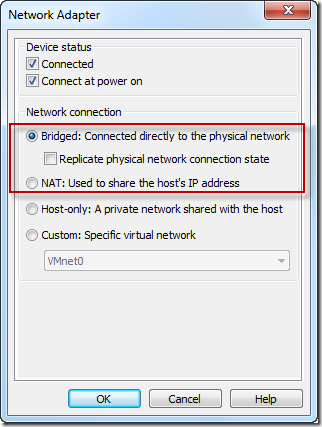
After installing the VMware Bridge Protocol restart the VMware Workstation and choose the bridged mode for the network adapter.

VMware Network Adapter