Fixing Podlove Cron Jobs in WordPress Docker Containers

While we were publishing the first episode of our Podcast, I came across some issues with WordPress, though.

First of all: We are using the Podlove Publisher and therefore WordPress to host our Podcast.

Unfortunately, I encountered an issue with the required cron jobs. The Podlove WP Cron Diagnostics showed, that there was nothing set up.

PHP Constant
ALTERNATE_WP_CRON: not definde
DISABLE_WP_CRON: not defined

As a result, any attempt to connect to running cron jobs failed. After checking Google I found a helpful hint here. All you have to do is to add

define('ALTERNATE_WP_CRON', true);

in your wp-config.php.

And here the fun begins. I am using the official WordPress Docker container and Ansible to deploy it on my servers. So you need a way to add this line to a wp-config.php file on your server using an Ansible script… I think you get it. Some years ago, you would have simply logged into your server, changed the line in the file and eventually restart your webserver.

Now everything becomes more difficult. First of all I try such things manually. To do so (as well as to verify the changes on the server) I bash into the running WordPress container

docker exec -i -t {containerId} /bin/bash

just to realize there is neither vim or even vi on this container available. Also less did not work. At least I was able to read the file using more.

Again I looked for some hints and found a great hint on Stackoverflow:

You can make use of the WORDPRESS_CONFIG_EXTRA environment variable to define any other config values in the wp-config.php file.

With this environmental variable, you can literally add anything to your wp-config.php file in the prebuild WordPress image without fiddling with own containers and so on.

environment:      
  WORDPRESS_DB_HOST: db:1234
 WORDPRESS_DB_USER: wp
 WORDPRESS_DB_PASSWORD: topsecret
 WORDPRESS_CONFIG_EXTRA: |
   define('ALTERNATE_WP_CRON', true);
    define( 'DISABLE_WP_CRON', true );

Looking into your wp-config.php now should reveal the following line:

// WORDPRESS_CONFIG_EXTRA
 define('ALTERNATE_WP_CRON', true);
 define( 'DISABLE_WP_CRON', true );

Also running the diagnostics in the Podlove plugin now should come up with some better news:

Fighting Qt Creator develpoing for SailfishOS

Prologue

For some days, I fight quite an epic battle with Qt Creator. A battle, I am losing right now. I recently started developing a SailfishOS app though. A spare time project which actually drives me mad. To be fair, one should say SailfishOS is quite at an early stage compared to other platforms. However, the SDK, the tool chain, including Qt Creator, VirtualBox integration, build and deploy process already work as a charm. It works out of the box. Even for someone like me, pampered by Visual Studio, Eclipse and corresponding platforms existing for a decade and more.

There are some shortcomings in documentation, though. As a developer myself, I know how hard it is to get some good documentation in place. Therefore, kudos for everything available already. Although, I spend 95% percent in digging the darkest places of the internet to find some information. I have to move out of my comfort zone, which is good. I learn a lot by digging around, which is even better. However, I do not get my project out of the starting blocks, which is bad.

Teh Facts

Following the tutorials available, I tried to create a SailfishOS dialog with two text fields as below.

import QtQuick 2.0
import Sailfish.Silica 1.0

Dialog {
    id: addDeviceDialog
    property string deviceName
    property string deviceIdentifier 

    anchors.fill: parent

    DialogHeader {
        title: qsTr("Add a Device")
    }

    TextField {
        id: deviceNameField
        placeholderText: qsTr("Device Name")
    }

    TextField {
        id: deviceIdentifierField
        placeholderText: qsTr("Device ID")
    }

    onDone: {
        if (result == DialogResult.Accepted) {
            deviceName = deviceNameField.text
            deviceIdentifier = deviceIdentifierField.text
        }
    }
}

Qt Creator, however, responds with

Could not resolve the prototype ‘TextBaseItem’ of ‘TextBase’. (M301)

I encounter this issue wit both, TextField and TextArea.

M301

I can remove this issue by adding

import QtQuick.Controls 1.0

But then Qt Creator responds with

Qml module not found

Modules seem to be installed and paths are set. I probably miss something over here or I do deal with the IDE in a terrible wrong way.

QtQuick.Controls 1.0I will dig further and contact the SailfishOS mailing list, looking forward to get some help there to update this article soon.

[Update, 13.07.2014]

There was an almost instant reply on my request on the mailing list, though. You can completely ignore this issue. Gt Creator will build and deploy without any issues. In my very case, I had an additional issue, where I forgot to set the width property of the text field. Once I did this, I was able to see the text field on my deployed app.

Removing Failed Thecus Moule Installations

For whatever reason it might happen, a module installation on a Thecus NAS Server won’t succeed. In such a case even removing the module might fail. In my case, I had to troubleshoot my Thecus N4200PRO with the latest 32-bit firmware 5.03.01.

Symptoms

Symptoms included a module which did not start at all with the message

Module[Mail Server]: Enable Fail.

and uninstalling the module stopping with the message

Module[Mail Server]: Uninstall Fail.

Even worse, re-installing the module was not possible as the server assumed the module already was installed and uploading the module manually failed as well.

To solve this kind of Mexican standoff you probably need to dig somewhat into the Thecus, though.

Prerequisitees

First of all make sure the SSH module (HiSSH) is installed and enabled.

HiSSH Module

You need to log in via the user root using the same password provided for your admin user, though.

macbookpro:~ andreas$ ssh 192.168.1.254 -l root
root@192.168.0.101's password:
root@127.0.0.1:~#

Cleaning Up

Depending what failed during your installation, only some of the following steps might be necessary to clean up the module.

Files related to the module might be found in the following three directories and need to be removed.

/raid/data/module/cfg/module.rc/
/raid/data/module/
/img/htdocs/module/

In case anything related to your module can be found there (such as Mailserver in my very case), you can remove them with one of the following commands.

rm -rf "/raid/data/module/cfg/module.rc/Mailserver.rc"
rm -rf "/raid/data/module/Mailserver"
rm -f "/img/htdocs/module/Mailserver"

Once all related files have been removed, you now head for the database and clean up the two affected tables. As sqlite won’t give any feedback about succeeded operations, makew sure entries are there before cleaning up and are gone afterwards.

root@127.0.0.1:~# /opt/bin/sqlite /raid/data/module/cfg/module.db "SELECT * FROM module WHERE name = 'Mailserver'"
Mailserver|2.00.02|Mail Server|No||md_mailServer.png|User|www/index.htm|User

root@127.0.0.1:~# /opt/bin/sqlite /raid/data/module/cfg/module.db "DELETE FROM module WHERE name = 'Mailserver'"

root@127.0.0.1:~# /opt/bin/sqlite /raid/data/module/cfg/module.db "SELECT * FROM module WHERE name = 'Mailserver'"

If the deletion works well, you should experience some delay after the delete statement was executed.

root@127.0.0.1:~# /opt/bin/sqlite /raid/data/module/cfg/module.db "SELECT * FROM mod WHERE module = 'Mailserver'"
Mailserver|1|type|Install
Mailserver|1|ModuleRDF|Install
Mailserver|1|ModuleRDFVer|1.0.0
Mailserver|1|Name|Mail Server
Mailserver|1|Version|2.00.02
Mailserver|1|Description|Mail Server
Mailserver|1|Key|Mailserver
Mailserver|1|Authors|Davide Libenzi
Mailserver|1|Thanks|XMail by Davide Libenzi
Mailserver|1|WebUrl|http://www.xmailserver.org/Readme.txt
Mailserver|1|UpdateUrl|
Mailserver|1|Reboot|No
Mailserver|1|Icon|md_mailServer.png
Mailserver|1|Mode|User
Mailserver|1|HomePage|www/index.htm
Mailserver|1|MacStart|
Mailserver|1|MacEnd|
Mailserver|1|Show|0
Mailserver|1|Publish|1
Mailserver|1|Login|1
Mailserver|1|UI|User
Mailserver|4|type|NAS
Mailserver|4|TargetNas|Thecus
Mailserver|4|NasProtol|N7700
Mailserver|4|NasVersion|5.00.00.12
Mailserver|5|type|NAS
Mailserver|5|TargetNas|Thecus
Mailserver|5|NasProtol|N5200
Mailserver|5|NasVersion|5.00.00.12
Mailserver|6|type|NAS
Mailserver|6|TargetNas|Thecus
Mailserver|6|NasProtol|N4100PRO
Mailserver|6|NasVersion|5.00.00.12
Mailserver|8|type|DependCom
Mailserver|8|DependName|MySQL_5
Mailserver|8|DependVer|2.0.0
Mailserver|8|DependUrl|

root@127.0.0.1:~# /opt/bin/sqlite /raid/data/module/cfg/module.db "DELETE FROM mod WHERE module = 'Mailserver'"

root@127.0.0.1:~# /opt/bin/sqlite /raid/data/module/cfg/module.db "SELECT * FROM mod WHERE module = 'Mailserver'"

Once both tables are cleaned, you might want to reboot the NAS.

Conclusion

The Mail Server module failed for me, as I did not install the MySQL Module before. Unfortunately, the installation did break somewhere in the middle leaving some tries in the database for me without the files being copied to the corresponding directories. Therefore, the uninstall.sh script was missing to get rid of the bricked module. As the Thecus user interface won’t let you re-install the module nor uninstalled it due to the missing script, there is only litte you can do without knowing about the internals of the server. With the few steps provided above, unblocking most of the modules should work as long as you are able to install the SSH module on you NAS.

sa-update

SpamAssassinFor quite a while my SpamAssassin installation for Windows won’t update anymore. It simply quit with some exit code 4. Unfortunately, SpamAssassin is running on this server for quite some time and often one simply forgets about systems that are up and running until they fail. Having a closer look at the error message it appeared that sa-update had some problems with some of the preconfigured channels.
C:\SpamAssassin>sa-update.exe -v --nogpg --channelfile UpdateChannels.txt
channel: no 'mirrors.khop-bl.sa.khopesh.com' record found, channel failed
channel: no 'mirrors.khop-general.sa.khopesh.com' record found, channel failed
channel: no 'mirrors.khop-sc-neighbors.sa.khopesh.com' record found, channel failed
Update failed, exiting with code 4

C:\SpamAssassin>if NOT EXIST .\share\3.003001\updates_spamassassin_org.cf EXIT /B 1

A look at the sa-update documentation reveals there might be a problem with downloading and extracting the updates.

An exit code of 4 or higher, indicates that errors occurred while attempting to download and extract updates.

As the sa-update.bat refers to a file called updatechannels.txt you probably find the failing channel entries there.

# see http://khopesh.com/wiki/Anti-spam#sa-update_channels
# for more information

updates.spamassassin.org
khop-bl.sa.khopesh.com
khop-general.sa.khopesh.com
khop-sc-neighbors.sa.khopesh.com

Digging a little bit deeper showed that the channels provided by Adam Katz at http://www.khopesh.com/ became unmaintained. Therefore, the easiest way to get rid of the failures is to remove the entries from the file for good. Eventually, this will leave you with only the official channel at updates.spamassasin.org.

Ubuntu: Setting up Oracle JDK

Since Oracle’s Java SDK is not part of Ubuntu, there are some steps required to get Java set up on a Ubuntu system. Especially running a 64-bit version of Ubuntu requires one tiny additional step driving you crazy in case do not speak Ubuntu fluently.

There are quite some scripts and tutorials out there how to get Oracle’s Java working on a Ubuntu system, however, there are only a few steps necessary to do so:

Pick the bits from Oracle’s download site and extract the archive using tar. In my case we use the 32-bit version of the JDK

tar -xvf ~/Downloads/jdk-7u15-linux-i586.tar.g

Create a folder and move all the stuff over there

sudo mkdir -p /usr/lib/jvm/jdk1.7.0 
sudo mv jdk1.7.0_15/* /usr/lib/jvm/jdk1.7.0/

Now set up the symbolic links for java, javac and javaws.

sudo update-alternatives --install "/usr/bin/java" "java" "/usr/lib/jvm/jdk1.7.0/bin/java" 1
sudo update-alternatives --install "/usr/bin/javac" "javac" "/usr/lib/jvm/jdk1.7.0/bin/javac" 1
sudo update-alternatives --install "/usr/bin/javaws" "javaws" "/usr/lib/jvm/jdk1.7.0/bin/javaws" 1

Now, create a Bourne script to set the JAVA_HOME variable and update the PATH variable. In case you haven’t used Vim yet, get it using

sudo apt-get install vim

and then create the file

sudo vim /etc/profile.d/java7.sh

edit the file file and add the following export statements

export JAVA_HOME=/usr/lib/jvm/jdk1.7.0
export PATH=$PATH:$JAVA_HOME/bin

Finally execute the script

source /etc/profile

and try to call java. If you run a freshly set up Ubuntu such as mine, you probably will end up the system telling you

bash: /usr/bin/java: No such file or directory

What happened? Actually, we installed a 32-bit version of the JDK, however as mentioned at the beginning running a 64-bit version of Ubuntu and therefore we come back to this very tiny bit missing. One additional package is required to run the 32-bit version: libc6-i386.

“This package includes shared versions of the standard C library and the standard math library, as well as many others. This is the 32bit version of the library, meant for AMD64 systems.”

Said that, get it

sudo apt-get install libc6-i386

and try to run java one more time. It should work now fine.

Confluence Math Formula Macro

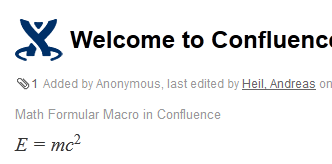
As we are dealing quite a lot with mathematics in our current development and using Atlassian’s Confluence as our documentation system, we were looking for a elegant way to document our mathematics in any better way than E=mc^2.

We found the Math Formula macro originally written and tested against Confluence version 3.5, not playing well with the latest Confluence version, we are using.

After following the installation steps there it was, the incompatibility note:

“There are user macros without any metadata configured in their template. They have been highlighted below. For these macros to be available for use in content they require parameter information. See the Guide to User Macro Templates.”

Check out the highlighted macros, and click Edit.

Installed User Macros

In the Template field add the following as the very first line of the template:

## @param size:title=Font Size|type=int|default=150|desc=Font size for formulas in percentage

Within the template, the the font size is referred as $paramsize, however, in the metadata description you denote the param just as size.

Once these changes are made, you can use the macro to create your formulas…

Math Formular Macro


Handbrake Xbox 360 Streaming Error 69-C00D10E0

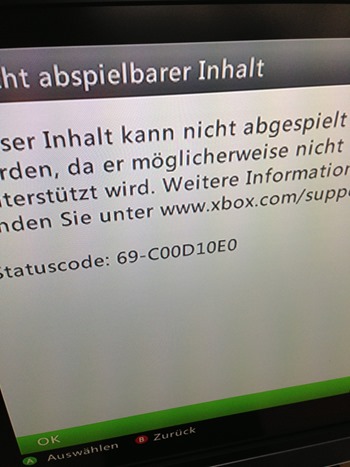
Recently, I started to convert some of my old media files using Handbrake to be streamed using a TwonkyMedia Server to my Xbox 360. After converting some of the files, I realized my Xbox won’t play the files due to a status code 69-C00D10E0:  

Statuscode: 69-C00D10E0

The Xbox support forum provides an entry exactly for this issue, however, the information given there is not quite helpful. That’s what they say (to be honest, that’s what I already had in mind):

Error code 69-c00D10E0 is preceded by the following message:

Unplayable Content
Status Code: 69-c00D10E0

Problem

If you’re seeing this message and error code, it means that the file is too large for streaming, the file may be corrupted, or the codec needed to play the file is missing.

More helpful would be a list of supported video and audio codecs, a list of not supported combinations or similar. Therefore, I had to dig somewhat deeper and to figure out how to work around this issue.

Choosing the Right Preset

I used a earlier version of Handbrake before, providing a dedicated Xbox preset. Version 0.9.8 of Handbrake does not provide such an default preset anymore. Instead you can chose Normal or High Profile from the Regular section for playback with Xbox 360.

Handbrake Presets

Normal should work fine with he Xbox 360 System Player. If you are looking for a better video quality, choose the High Profile, though. Using High Profile, by default, the checkbox for Large file size is enabled. Eventually, that’s the problem, Xbox 360 System Player cannot play the streamed file as files generated with this flag contain 64-bit pointers, allowing a file size larger than 4GB, which the player simply cannot deal with. Therefore, just uncheck this one to generate Xbox 360 System Player compatible files.

Lage file size disabled

Choosing the Right Audio Track Order

Another issue with the Xbox 360 Player is its inability to let you choose the audio track to play. I was wondering quite a while, why some encoded videos where played using the wrong audio track and – even worse – Xbox does not let you choose another track.

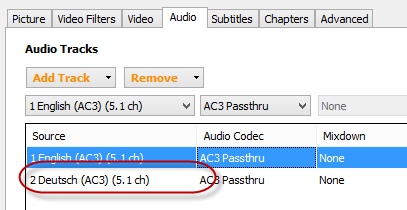
After some trial and error, I figured out, Xbox is playing the last track in the list of audio tracks encoded by Handbrake. You maybe haven’t realize this at all as native speaker only interested in the English track anyway.

Audio Tracks order

Eventually, the secret how to use Handbrake to encode media files or you Xbox is to put the audio track you want to play on Xbox System Player on the very bottom of the list.

Keeping these two settings, you generate perfectly streamable media files to be played with Xbox 360’s System Player.

Fixing ASP.NET MVC 4 Web API 404

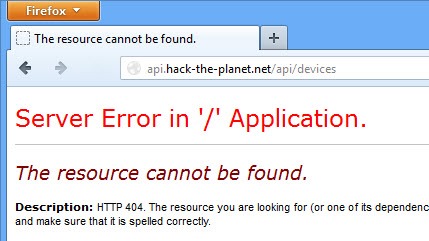
For a Web Service providing some REST-style URIs to access the data, I decided to use the ASP.NET MVC 4 Web API. Once developed, tested and deployed I experienced a mysterious 404 on my production server.

ASP.NET Web API 404

The Web API started originally as WCF Web API at CodePlex and is finally fully integrated within the latest .NET framework:

“ASP.NET Web API represents the joint efforts of the WCF and ASP.NET teams to create an integrated web API framework. You can get the bits and find articles, tutorials, samples and videos on the new ASP.NET Web API home page. All you have to do is to..”

The tutorials and examples for the ASP.NET Web API are overall easy to understand and you probably get  access to the technology very quickly. After I set up my first Web API, which worked absolutely perfect on Windows 8, developed using Visual Studio 2012 and tested with the IIS Express, I was not able to get the bits executed on the deployment server. It’s a Windows Server 2008 R2, IIS 7.5 and a whole bunch of stuff installed using the Web Platform Installer.

Make sure the .NET Framework is installed, probably you missed to install the 4.5 framework on the deployment server. As IIS is set up already, once again it is necessary to register ASP.NET for the latest framework using

C:\Windows\Microsoft.NET\Framework\v4.0.30319>aspnet_regiis.exe -i

Even now, I got the 404. Eventually, I got the tip to check out how the routing of extensionless URLs work in ASP.NET. By adding

<system.webServer>
    <modules runAllManagedModulesForAllRequests="true" />
    ...
</system.webServer>

to the web.config file of my Web API  the routing seems to work fine now.

MacBook Pro’s Bluetooth Gone Fishin’

Today, I spend literally hours in trying to fix a hardware problem on my MacBook Pro as the Bluetooth suddenly went fishing without saying anything to me. Said that, I run Apple’s Booot Camp with Mountain Lion and Windows 7 which makes troubleshooting sometimes easier, sometimes harder. As I turned on my MacBook Pro this morning my Microsoft Wireless Notebook Presenter Mouse 8000 (great device but a way too long name) mouse was – let’s say – working but not working. Left and right button and mouse movements worked fine but the mouse wheel as well as the middle button did not work at all. I followed some simple debugging rules from David Agan’s book Debugging The 9 Indispensable Rules for Finding Even the Most Elusive Software and Hardware Problems how to analyze faults in systems.

For the Impatient Ones

Jump to the very end of this article, do not learn anything, do not improve your analytic skill by one but see how to fix it.

Check The Plug

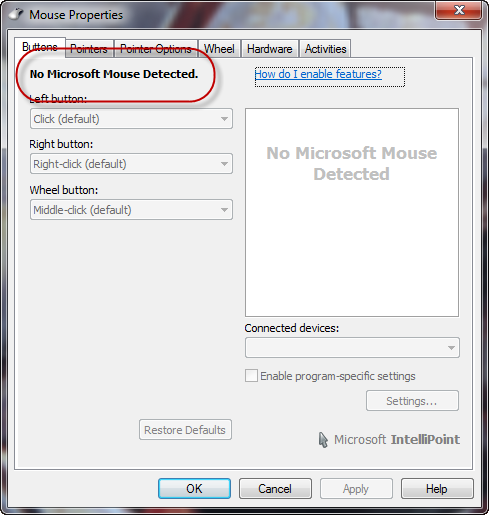
First, I checked the Microsoft IntelliPoint software (Still working? Latest version?) and it said there is no Microsoft Mouse connected.

No Microsoft Mouse Detected

Next step, I checked Windows Device Manager telling me here is a unknown device. Maybe Windows did not know, but I was pretty sure the device Windows did not want to know anymore today was the MacBook Pro’s Bluetooth chip.

Unknown Device

I checked the device properties and found that

“Windows has stopped this device because it has reported
problems. (Code 43)”

What kind of problems, you’ll probably never known.

Unknown Device Properties

If you dig a bit you’ll probably come along the TechNet entry for Error Code 43 saying

“A device driver notified the operating system that the device failed.”

With some years of experience in this kind of business, I tried of course

  • kicking the laptop (most of the time works quite fine with other people’s hardware)
  • rebooting several times
  • un- and re-installing the device drivers
  • running Windows’s Hardware and Device troubleshooting

Make it Fail

As nothing worked out for me, I rebooted into OS X to figure out if the device fails here as well and found a similar situation – Bluetooth went into its weekend saying

“Bluetooth: Not Available”

Eventually, that’s no driver issue, that’s definitely a hardware problem. One machine, two operating systems, different drivers (well module in OS X) resulting in a similar failure. Saturday noon and a not that satisfying Apple Store density in Germany, there is little one could do before next Monday. Hardware dies; usually at the most unpleasant moment you can imagine and nothing you can do about that.

Bluetooth: Not Available

Get a Fresh View

I did not follow the debugging rules in their given order, but I always try to keep the rule Get a Fresh View in mind. Often one is biased by some ideas in ones mind, some posts read while doing research or personal previous experience.

Eventually, I remembered what I have learned about power cycles during studies and realized that rebooting nowadays is not a hard reset of your machine anymore – there have been times (I do still remember) when PCs provided a (at least by me frequently used) reset button causing the device to hard reboot by turning the power of and on again.

So what’s the difference by rebooting the laptop several times, or booting into another OS? Right, this is no cold start and probably all devices keep their previous (faulty) state even after the reboot. As a consequence, plug out the power source, turn of the machine – leave it for a few seconds and turn it on again. Bluetooth is up and running again for both, Windows and Mac OS.