I See Clouds of White

For several years, I run my own local server as well as a root server hosted online. I run all kinds of services, some of them I used on a regular base, some of them I used from time to time and others I just set up to learn and experiment. However, the time I set up most of these, was a time when there where not many choices if you wanted to host something online. So I run my local repository, Microsoft Team Foundation Server, my own mail server online, my FTP and Web Server and many other services.

As maintaining all these services became almost a full time job, I finally decided to move anything in to the Cloud – or at least somewhere online. In some way, this is an experiment as I try to achieve to run anything I need (or lets say I want) somewhere online while staying within the budget of my Web and local server.

For the local server I calculate $42 for maintenance and electricity a month while the monthly  rent for the Web server is $70. All together I face yearly costs of nearly $1.350 average fixed costs a year not included software licenses and time invested to maintain and update the servers.

Step by step I now move my services to various online services (free and paid). First of all I moved my blog to wordpress.com. That was a rather easy decision as I already switched to the WordPress software several moths ago on my own server. Exporting and importing the content therefore was quite an easy job. Finally, I picked domain mapping for http://www.hack-the-planet.net which is about $12 a year.

To keep track of stuff to do, I use remember the milk for quite a time now. $25 a year is not that cheap for a simple list of todos, however, I get the Web application, a fine app for iPhone and iPad as well as GMail and Google Calendar Gadgets synced all over the place.

A critical step, however, are my source code repository. I maintain all code I’ve ever written in CVS and Subversion for ages. Without your own server it’s not that easy to grant rights on repositories for friends and colleagues you work with. Here, I decided to move to two different platforms. First of all, I started a new project called aheil code (to keep the corporate identity in sync with aheil blog) at CodePlex. That’s the place I plan to share anything under Ms-PL license. Closed source however, I go to store with Assembla. They provide a limited but cost free program for private repositories which should be sufficient for my needs.

Instead of using my own FTP to exchange files between machines (and people), DropBox appeared to be a great solution. I joined DropBox at a very early beta state and I am still very happy. (If you don’t have an DropBox account yet, follow http://db.tt/kNZcbyI which gives you and me 250MB of extra free space). I use about 4GB of space at the moment for free. However, once you need more there is always the possibility to switch to a paid account. The client is available for almost any platforms and I use it for various scenarios across many of them including Web, Windows, Mac and iOS. Before I used Microsoft Live Mesh, however, canceling the beta, changing the name, running two Microsoft services (Mesh and SkyDrive) at the same time you were not able to combine and finally changing the software drove me finally to DropBox.

I terms of productivity tools, I completely switched to Google Calendar as it syncs nicely with iPhone and iPad and even iCal on my Mac. I used (and really liked) Outlook for many years, but the lack of syncing with third party online services seem to be an epic fail in 2011. I can tell you that you won’t notice this fact within Microsoft (living in a happy Exchange and SharePoint equipped world), but out there in the World Wild Wide Web, connectivity is all that counts.

Also, I joined Evernote to sync, copy and share notes and documents. Again, client software is available for all major platforms including iOS, Windows and Mac. I still try to figure out how to use Evernote on a daily base, but at the moment, the maintenance costs (manual sorting, organizing etc.) are beyond the benefit.

So far, I was not able to cover all services I need, for example I am still looking for a good (and secure) online backup solution, a way to host my IMAP server and Web server as well as a possibility for a local storage solution. At least the last point seems to be almost solved by my new router which allows you use a external HDD as network drive. Using my previous solution, I was able to connect to my local network from anywhere using OpenVPN in a very convenient way. Also here, I am looking for an alternative solution where maybe a router might take care of this.

So far, the experiment to move everything to the “cloud” was quite a success. I was able to migrate quite a lot of my services and only spent 3% of my available budget for services so far.
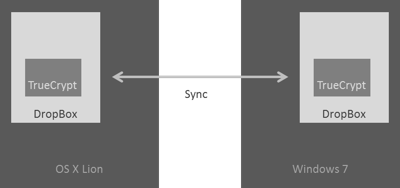
DropBox with TrueCrypt on Lion and Windows

After receiving my new MacBook, I wanted to sync a whole set of files between both systems. For convenience, I decided to use DropBox instead of a thumb drive and for security reasons, I decided to use TrueCrypt to encrypt some of my confidential data within the DropBox folders.

Using a TrueCrypt container within DropBox is quite convenient as I am syncing my DropBox folders with various machines (e.g. at work). However, I do not want to access these file there nor do I want that an admin might check out my “oooh so secret” files (not saying they would, though).

DroppBox with TrueCrypt on Lion and Windows

With my rusty Mac OS kung-fu, I had to install TrueCrypt first. Of course, this failed and being the first app I did install on Lion, this was somewhat demotivating. Before you have install a version from MACFuse. It seems that the official version is not up to date, however, there are rumors you might use the latest version provided at Tuxera.com.

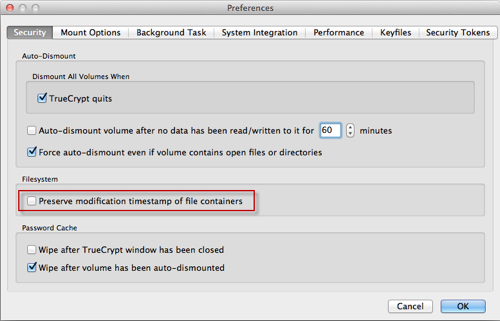
Once MACFuse and TrueCrypt are set up and the machine is rebooted, create a TrueCrypt container within DropBox. When creating on OS X Lion, you might want choose FAT for the containers file system so you can mount it on the Windows system as well. However, any change within this container will synchronize the container as a whole. Not being very efficient if this is a 256 MB file, it seems that one can turn of the timestamp of the TrueCrypt container to avoid syncing it. This will prevent that the container gets synced after files within the container are changes, however, the itself files are still updated. To turn it of, open TrueCrypt and select Settings / Preferences… chose the Security tab and uncheck the Preserve modifications timestamp of file container checkbox.

TrueCrypt Settings on OS X Lion

Of course, the same has to be done on your Windows system.

TrueCrypt Settings on Windows 7

Once both settings are applied, only the initial sync of the container will take some time. Thereafter, only the files within the container are updated. for me this seems to be a quite good solution to keep my boxes in sync and to avoid rubbernecks seeking through my private stuff. The setup is done quite easily, only the hassle with MACFuse was quite annoying.

Bookmark Backup

Today, TechCrunch reported about Yahoo shutting down the widely used bookmark  service del.icio.us.Right after this, a statement from Yahoo showed a possible alternate future of the service.

Many of you have read the news stories about Delicious that began appearing yesterday. We’re genuinely sorry to have these stories appear with so little context for our loyal users. While we can’t answer each of your questions individually, we wanted to address what we can at this stage and we promise to keep you posted as future plans get finalized.

However, who still wants to quick backup his/her boomarks could use curl following the tips from Martin Koser:

curl --user username:password -o DeliciousBookmarks.xml -O "http://api.del.icio.us/v1/posts/all"

Wo sind meine Signaturen in Outlook 2010 hin

Ein anscheinend weit verbreitetes Problem mit Outlook 2010 scheint eine Fehler mit dem Signatur-Editor Signatures & Stationary zu sein, der es eigentlich ermöglicht Signatur-Dateien für E-Mails zu erstellen und zu verwalten. Der Editor öffnet sich nicht und der Benutzer kann daher keine Signaturen anlegen oder gar auswählen. Speziell für den Geschäftsverkehr sind Signaturen jedoch unerlässlich. Dabei gibt es grundsätzlich zwei Wege an den Dialog zu gelangen.

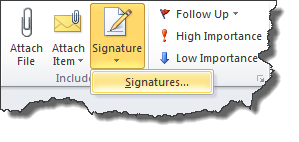
In einer Nachricht kann über die Schaltfläche Signatures / Signatures… der Editor geöffnet werden.

Signaturen in Outlook 2010 aus Mails bearbeiten

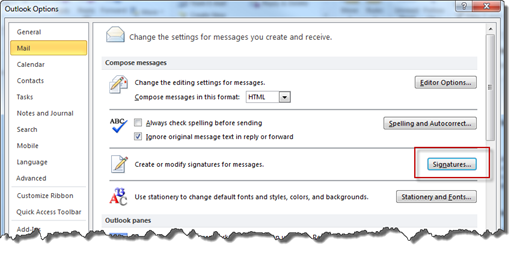
Alternativ kann dies auch über das Backstage von Outlook unter dem Menüpunkt File / Options / Mail / Signatures … geschehen.

Signaturen in Outlook 2010 aus den Einstellungen bearbeiten

Aus unerklärlichen Gründen kann es nun passieren, dass trotz wiederholtem Betätigen der Schaltflächen nichts passiert. Es erscheint kein Dialog, keine Fehlermeldung kein Nichts. Warum? Man weiß es nicht. Muss die Signatur bei jedem Geschäftsbrief von Hand eingefügt werden, steigt der Frustfaktor recht schnell an und Outlook fällt schnell in Ungnade.

Überwiegend lässt sich dieses Phänomen auf Systemen mit einer 64-Bit-Version von Windows 7 und einer 32-Bit-Version von Office 2010 beobachten. Lösen lässt sich das Problem mit wenigen Handgriffen.

Zunächst öffnet man den Registry Editor (regedit.exe) und navigiert zu

HKEY_LOCAL_MACHINESOFTWAREClassesWow6432NodeCLSID{0006F03A-0000-0000-C000-000000000046}LocalServer32

hier ersetzt man den Wert für Schlüssel Default den Wert

C:Program Files (x86)Microsoft OfficeOffice14Outlook.exe

ein. Nun wiederholt man das gleiche für

HKEY_LOCAL_MACHINESOFTWAREClassesCLSID{0006F03A-0000-0000-C000-000000000046}LocalServer32

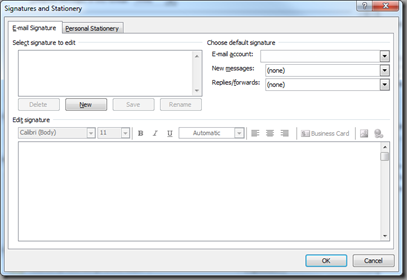
Nach einem Neustart von Outlook sollte dann der Dialog zum Editoren von Signaturen ohne Widersprüche starten und das Wochenende ist gerettet.

Signatures & Stationary Dialog von Outlook 2010

Deutsche Rechtschreibung im Windows Live Writer

Windows Live Writer dürfte auf der Windows Plattform derzeit eines der beliebtesten Blogging-Tools sein. Mit Anbindung an die meisten Blogging-Plattformen und zahlreichen Plug-Ins lässt das Tool kaum wünsche offen. Allerdings ist bisher keine deutsche Rechtschreibprüfung vorhanden. Anstelle dessen konnten unterschiedlichste English-Derivate (es gibt eben Englisch und Englisch) ausgewählt werden. Die Möglichkeit die deutsche Rechtschreibkorrektur zu aktivieren oder eine zusätzliche Sprache hinzuzufügen fehlt bisher gänzlich.

Die Lösung ist recht jedoch einfach. Vorausgesetz auf der betreffenden Maschine ist Office 2010 (32-bit) mit deutscher Rechtschreibkorrektur installiert. Ein Blick in den Ordner

C:\Program Files (x86)\Microsoft Office\Office14\PROOF

sollte Gewissheit verschaffen. Hier gilt es die Dateien

MSSP7GE.DLL
MSSP7GE.dub
MSSP7GE.LX

in den Ordner

C:\Program Files (x86)\Windows Live Writer\Dictionaries

zu kopieren. Nach einem Neustart von Windows Live Writer sollte nun unter Options / Spelling auch der Eintrag German (Reform).

Deutsche Rechtschreibung im Windows Live Write aktivieren

Cleaning Up the Explorer ‘New’ Menu

If you are using your Windows machine for a while, it is inevitable that you install a whole bunch of Software. Especially a developer machine might end up with a lot of application and tools, you use for work or evaluation. This is the first article in a series of steps how to clean up your Windows machine, and to optimize your personal workflow.

Some tool that come with support for a particular file extension might extend the Windows Explorer ‘New’ sub menu. In my case I currently ended up with about 20 entries, while I regularly use only two or three of them. Most if them I barely touch. To minimize noise and to speed up your personal workflow you might want to get rid of some of them and renaming others. E.g. all Office documents are usually prefixed with ‘Microsoft’ while you might just want to see them as ‘Word Document’  or ‘Excel Document’.

Insert New Menu


To modify these entries, you eventually would use the Registry Editor. Each entry is located in the registry using its own key at:

HKEY_CLASSES_ROOT.[fileExtension]ShellNew

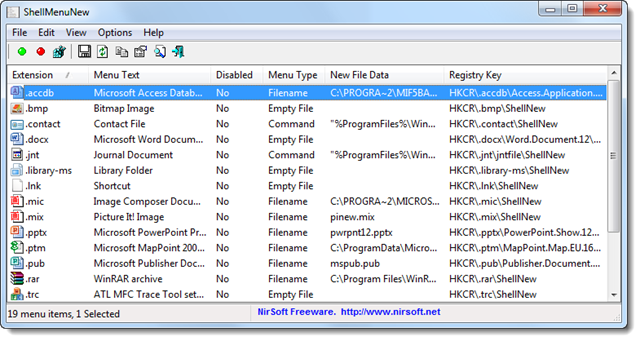
However, maintaining this list is rather time-consuming task and no fun at all.  After some investigation I found a very nice freeware tool called ShellMenuNew from NirSoft that eventually does the job for you. It’ is a small tool which does not need to be installed and can be used straight away.

ShellMenuNew

By right-clicking any of the entries you can select ‘Disable Selected Menu Items’. Once you open up the ‘New’ submenu in Windows Explorer the menu should be look much tidier.

In case you change your mind, you can always start ShellMenuNew again and enable the file extensions again. The tool worked nicely on my x64 Windows 7. Regarding the author’s website it should also work on Windows 2000, Windows XP, Windows Server 2003/2008, and Windows Vista. Solved this task,  the renaming of the entries is still pending.

Modified Windows Explorer 'New' File Menu

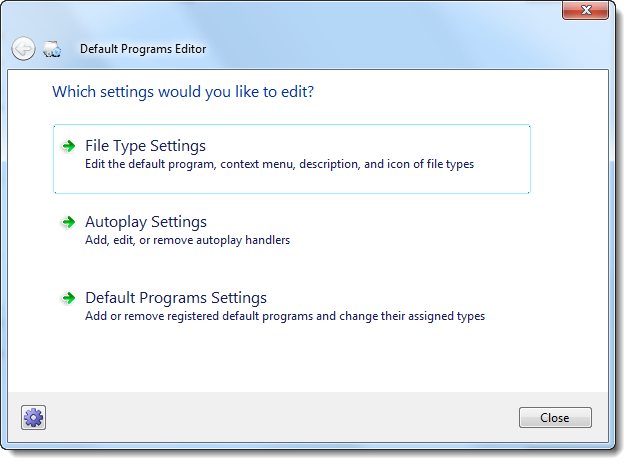
Also here a small freeware tool comes in handy. Default Programs Editor provides a set of functionality to edit file type settings, autoplay settings and default programs settings. Also this tool can be sued straight away and does not need any installation.

Default Programs Editor

Default Programs Editor lets you easily change any kinds of associations with respect to files extension. Using the ‘File Type Settings’ you can select the ‘Description’, search for the file type you want to rename and finally change the file type description.

Using those two tools it is possible to minimize noise in your working environment without hacking the registry manually.

How to use Google Calendar Sync with Microsoft Outlook on Windows 7

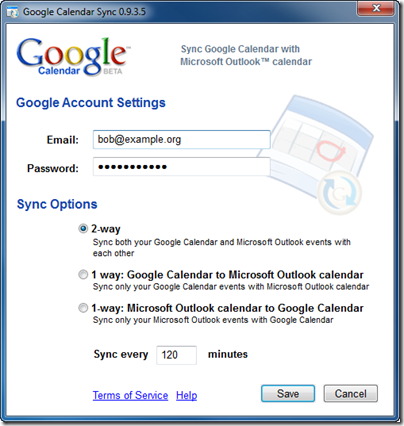
There is an urban legend that Google Calendar Sync would not run on Windows 7. Indeed, if you follow the installation instructions Google Calendar Sync will first ask you for your credentials and consequently fail to connect to Google Calendar. In the following you’ll find an solution how to use Google Calendar Sync with Microsoft Outlook 2007 on a Windows 7 system that that is provided under a works on my machine premise.

Google Calendar Sync 0.9.3.5

Once saved, Google Calendar Sync will try to connect but fail with error 2006. There is not many information about this error beside various frustrated users ranting about this and some statements that the current version of Google Calendar Sync (0.9.3.5) is not supported under Windows 7 yet.

Google Calendar Sync Error 2006

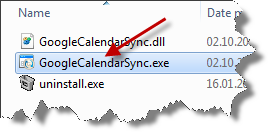
In the current case we will even run Google Calendar Sync on a Windows 7 64-bit system. Before you continue, make sure you exit Google Calendar Sync. First of all open a Explorer window and navigate to C:Program Files (x86)GoogleGoogle Calendar Sync or C:Program FilesGoogleGoogle Calendar Sync on a 32-bit Windows 7 system.

GoogleCalendarSync.exe

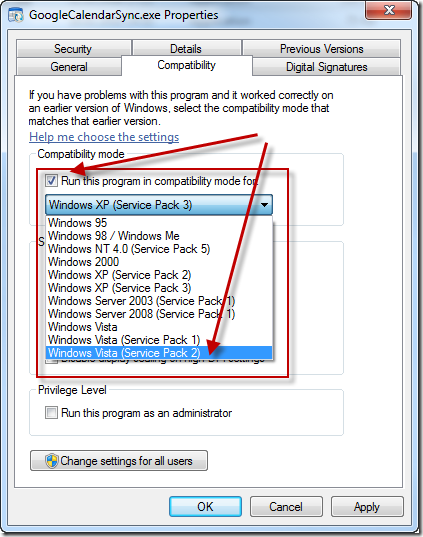
Right click on GoogleCalendarSync.exe and select Properties. Now select the Compatibility tab, check the Run this program in compatibility mode for and choose Windows Vista (Service Pack 2) from the drop down list. Click on OK and restart Google Calendar Sync either from your desktop icon or from the start menu entry.

GoogleCalndarSync.exe Properties - Compatibility Tab

Once restarted you can happily sync Google Calendar with Microsoft Outlook 2007 on (even a 64-bit) Windows 7 system.

Google Calendar Sync running on Windows 7

The Compatibility mode of Windows is a great feature to make usage of legacy programs that have not been or will never bee updated to the latest Windows version. Since Windows 7 even mode modes (including Windows Server) back to Windows 95 are supported. The number of supported versions might vary depending on the Windows 7 version you use, however, the Vista and XP mode should always be available.

Adobe PDF Preview for Windows 64-bit

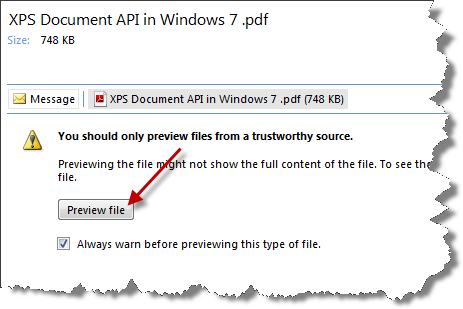
Microsoft’s Windows 7, Outlook 2007 and Adobe’s Acrobat just do not play well together on 64-bit systems. After receiving a PDF document via email, Outlook usually cannot display the PDF.

Outlook PDF Preview

When selection Preview File, you will simply get the message PDF Preview Handler for Vista (Vista!?) caused an error.

Outlook PDF Preview Handler for Vista


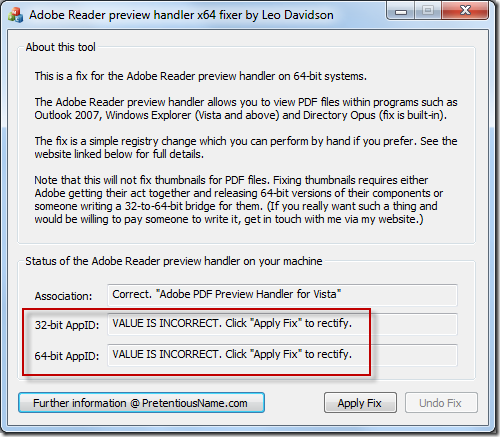
For now, the only way to view the PDF file is to open it in an external PDF reader. Leo Davidson provides a fix that finally solves this issue. Just get the fix, and run the Adobe Reader preview handler x64 fixer.exe which is included in the file.

Leo Davidson's Preview Handler Fix

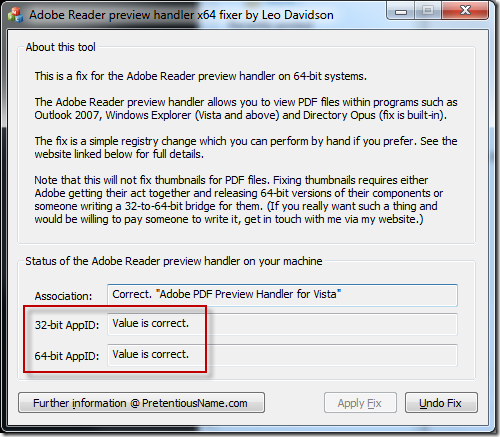
After applying the fix, both, the 32-bit AppID as well as the 64-bit AppID will show the value as correct.

Leo Davidson's Preview Handler Fix

No reboot required, just go back to Outlook (worked even without restarting the application) and et voilà.

Fixed Outlook PDF Preview

Thanks to Leo Davidson, who provides this outstanding fix. Well played.

ReSharper 5.0 can Visual Studio 2010 Metadata View

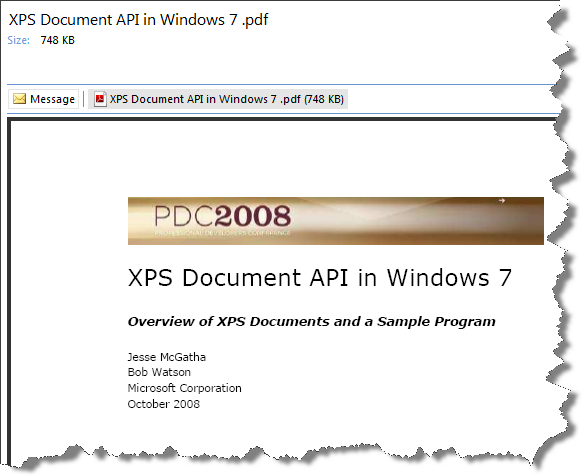
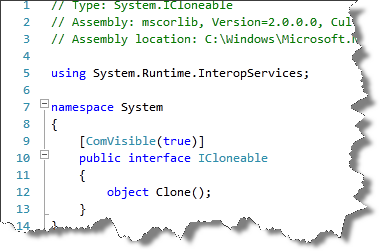
One major drawback of ReSharper 4.5 was the fact if one navigates back to a compiled class, ReSharper always opened the Visual Studio Object Bowser. However, personally I prefer the Metadata View of Visual Studio:
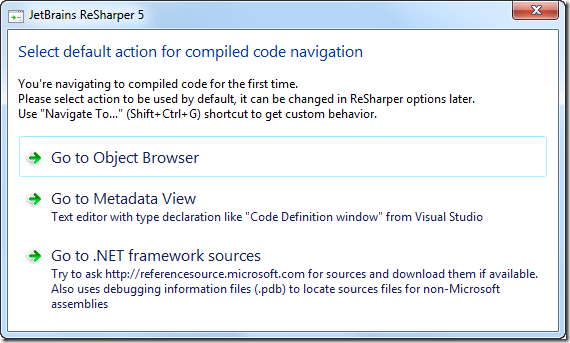
Visual Studio Metadata ViewWith version 5.0, ReSharper (currently available as EAP) comes a major improvement: The first time you navigate to a pre-compiled class, ReSharper offers you to choose your favorite view: Object Browser, Metadata View or directly the .NET framework sources.
JetBrains ReSharper 5.0

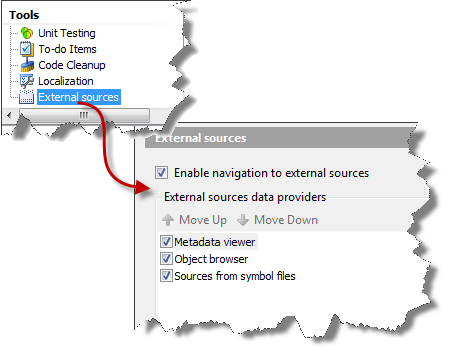
In case your change your mind (or the selected sources are not available) you might define the order for the code navigation within Visual Studio at the ReSharper options from ReSharper / Options… / Tools / External sources:

ReSharper Options: External sources

Quickstart with AWStats and IIS 7

AWStats is a free, Perl-based analyzer for log files. To get results quickly on a Windows Server 2008 with IIS 7 you only have to follow a few steps. These are not well documented in the AWStats documentation and require some time of research. This post will show you how to set up AWStats with IIS7 in only a few minutes.

  1. Install Perl, e.g. ActivePerl. There are 32-bit and 64-bit versions available. Make sure that Perl is added to your PATH environmental variable. The ActivePerl installer usually provides this option during the installation.
  2. Install AWStats. Remember the path AWStats is installed. Paths used below are based on the installation folder of AWStats. In this example we use c:awstats.
  3. Run the configuration script at c:\awstatstoolsawstats_configration.pl. Follow the on screen instructions. This will create a default configuration file in c:\awstatswwwrootcgi-bin e.g. called awstats.www.example.org.config. The site name www.example.org depends on whatever site name was provided while running the script. When asked for the Apache Web server path type in none.AWStats Configuration File
  4. Open the configuration file awstats.www.example.org.config with any text editor of your choice.
  5. AWStats already supports IIS, however, it is required to tweak the config file. First change the entry for LogFile. Log files for IIS might be found at c:inetpublogsLogFilesW3SVCNNN where NNN is a different number for each web site, IIS creates log files for. Change the entry toLogFile=”c:awstatstoolslogresolvemerge.pl c:inetpublogsLogFilesW3SVC1*.log |”

    This will merge all log files for a site provided by IIS. Adjust the paths corresponding to your installations and desired log file folders.

  6. The AWStats configuration file offers the possibility to set the LogFormat to IIS (LogFormat=2), however, the log entries provided by a standard installation of IIS 7 won’t match. The AWStats documentation recommends to change the settings of IIS. The change will take effect only after restarting the Web site and is only valid for entries after that particular moment. Consequently, this is not an option if you are going to analyze the logs of the last 12 months where the original settings were used. To make AWStats work with the standard log format of IIS 7 change the LogFormattoLogFormat=”%time2 %other %method %url %other %query %other %host %other %code % %other %other %bytesd”
  7. Change SiteDomain and HostAliases to meet the settings of your site.
  8. Change to c:awstatswwwrootcgi-binand runawstats.pl -config=www.example.org

    This will build the statistics database for AWStats.

  9. To create output runawstats.pl -config=www.example.org –output –staticlinks > …example_org_stats.html
  10. Not that example_org_stats.html is created one folder up. In case you do miss this, the output will not work correctly until you adapt the entries for DirCgi and DirIcons in the configuration file.
  11. The output file is now located in c:awstatswwwroot. You might want to create a Virtual Directory or set up a Web site to view the reports via the Web or your Intranet.AWStats Output

Repeat steps 3-7 fore each site you want to create reports for. Repeat step 8 and 9 every time you want to create a new report.