The Declarative Factory Pattern

Since I read “Design Patterns. Elements of Reusable Object-Oriented Software” by the GoF the very first time in 1999, I am a big fan of patterns at all. Making heavy use of factory patterns such as the Factory Method or Abstract Factory I came along with a useful pattern we call a Declarative Factory. A Declarative Factory is based especially on the Attribute construct in the .NET Framework and allows you to extend new classes with factory capabilities in a zero-effort manner. The idea behind this pattern is to extend your application with new constructs in form of extensions without touching already existing code. This is possible when your extensions are provided by container objects. The key element here is about the new elements which you are not aware in your code yet.

This pattern is much like a Abstract Factory, however, there is no need to create a concrete Factory class.
Also you add factory capabilities to a new class by only adding the corresponding attribute.
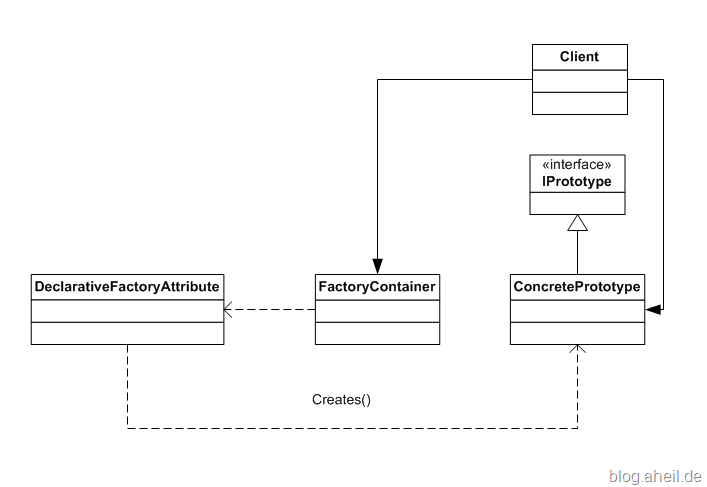
Declarative Factory Pattern

First we have a look at the actual container object. Here we tell the container object to provide factory capabilities to create ConcretePrototype instances. The FactoryContainer can be any class we are using within our application, as example this could be a sub-class of ListViewItem in a WPF-based application.

[DeclarativeFactory(typeof(ConcretePrototype))]
public class FactoryContainer { ... }

The declaration of the ConcretePrototype is also straightforward. The IPrototype is the common interface for all prototypes that can be created by the Declarative Factory. If this pattern is applied to a WPF-based object this could also something like a DependencyObject or a FrameworkElement. In this case the DeclarativeFactory cold provide factory capabilities for the corresponding types.

public class ConcretePrototype : IPrototype

The attribute itself looks as following:

DeclarativeFactory Attribute

The magic now, lies in the way how to invoke the factory method provided by the Declarative Factory.

FactoryContainer container = new FactoryContainer();

DeclarativeFactoryAttribute[] a_attrib =
   (DeclarativeFactoryAttribute[]) container.GetType().GetCustomAttributes( typeof(DeclarativeFactoryAttribute), true);

IPrototype prototype = a_attrib[0].Create() as IPrototype;

You just resolve the factory attribute and call the factory method. Very easy, isn’t it? However, you have to keep a few things in mind about this pattern. First of all, it makes no sense if you already know about the class you want to instantiate. So, there is absolutely no reason to apply the Declarative Factory to the class itself. In this case you should definitely stay with common patterns such as the Factory Method. If you are going to make you project extensible where new types are provided through container objects this pattern appears to be very handy .

The example source code for this pattern is licensed under MS-Pl.

You Have Created a Service

Sometimes, simple things end up as epic battles. If you try to MSN Search and Google for the nasty “You have create a Service” page for IIS hosted WCF services, you will and up with a lot of pre-release information and noise in the search results. Actually, you might spend days in finding some relevant information.

You have created a service

Yesterday, I was finally pointed to the right place in the MSDN documentation where you can find this specific information:

<serviceDebug httpHelpPageEnabled="Boolean"
    httpHelpPageUrl="Uri"
    httpsHelpPageEnabled="Boolean"
    httpsHelpPageUrl="Uri"
    includeExceptionDetailInFaults="Boolean" />

With the serviceDebug tag it should be possible to get rid of the page. It is easy to find as long as you know you have to search for the term HTML help page.

WCF, .NET 3.5 and HTTP Request Content

The new Web Programming Model of WCF and the .NET Framework brings some very useful features such as the WebGet and the WebInvoke Attribute and the capability to deal directly with HTTP requests. But how do we access the HTTP request in these methods? Dealing with HTTP requests and responses using the System.Net namespace is quite straight forward. Therefore, we have a look in sending and receiving a simple HTTP request:

HttpWebRequest request = (HttpWebRequest)HttpWebRequest.Create(myUrl);byte[] a_dataBytes = Encoding.UTF8.GetBytes(data);
request.ContentType = "application/x-www-form-urlencoded";
request.ContentLength = a_dataBytes.Length;

Stream requestStream = request.GetRequestStream();
requestStream.Write(a_dataBytes, 0, a_dataBytes.Length);
WebResponse response = request.GetResponse(); StreamReader responseReader = new StreamReader(response.GetResponseStream(), Encoding.UTF8); var content = responseReader.ReadToEnd();

Now we want to access the HTTP context within a operation with the following signature:

[OperationContract]
[WebInvoke(Method = "PUT", UriTemplate = "{uri}")]
bool Put(string uri);

Accessing the context of the incoming request is straightforward using the WebOperationContext class.

IncomingWebRequestContext context =
WebOperationContext.Current.IncomingRequest;

var length = context.ContentLength;
var type = context.ContentType;
var headers = context.Headers;

Since the documentation does not provide many example code, and the ORCAS samples do not cover this yet, I had to figure out how to access the content of the incoming request. After spending hours on MSN Search, Google and the MSDN Library I finally tried out something. In some general examples, either a Message or a Stream is passed over as single parameter to the operation. Hence, I changed the contract as follows:

[OperationContract]
[WebInvoke(Method = "PUT", UriTemplate = "{uri}")]
bool Put(string uri, Stream stream);

Reading the content then is easy:

var reader = new StreamReader(stream);string content = reader.ReadToEnd();

This solution however comes up with one major drawback: If you try to access your foo.svc via browser you will end up some error telling you “For request in operation Post to be a stream the operation must have a single parameter whose type is Stream.”. Also calling foo.svc?wsdl will end up in some exception in the WSDL export extension.

Last.fm ASP.NET Widget

The widgets offered by Last.fm are not really customizable. The latest Flash-based quilts are literally flashy and the image-based charts are quite unconvincingly to design. So I sat down wrote a small ASP.NET control to be used as Last.fm Widget with the goal to use it within my dasBlog installation. For that reason I made usage of the data feeds provided by Last.fm.

Last.fm ASP.NET Widget

Prerequisites

  1. You need a Last.fm account which you can create here.

  2. You might want to download any media player plug-ins from here to scrobble your music.

How to install on a ASP.NET Web Application

  1. Download the .zip file and unpack it’s content into your web application’s directory.

  2. Add the following line below your page tag to register the control with your ASP.NET web page:
    <%@ Register Src="LastFmControl.ascx" TagName="lastfm" TagPrefix="uc" %>
  3. At the place where you want to add the control similar to
    <uc:lastfm 
      id="Lastfm1"
      runat="server"
      Url="http://ws.audioscrobbler.com/1.0/user/aheil/recenttracks.xml" 
      User="http://www.last.fm/user/aheil/">
    </uc:lastfm>
  4. Change the username from aheil to your username unless you want to display my recently played music on your site.

How to install on a dasBlog installation

  1. Download the .zip file an unpack it’s content into your dasBlog installation directory.

  2. Open the hometemplate.blogtemplate file of your dasBlog theme and use the ASPNETControl makro to add the control on the page.
    <%newtelligence.ASPNETControl("LastFmControl.ascx")%>
  3. Open the LastFmcontrol.ascx.cs file and change the username at
     private string _url = "http://ws.audioscrobbler.com/1.0/user/aheil/recenttracks.xml";
      and
private string _user  = "http://www.last.fm/user/aheil/";

unless you want to display my recently played music on your blog.

How to Customize

The control makes heavy usage of several CSS div classes to be maximum customizable. The classes used are

.lastFmMain {}
.lastFmHeader{}
.lastFmItem {}
.lastFmItemTitle {}
.lastFmItemArtist {}
.lastFmFooter {}

Simply modify and add these div classes in your CSS file to make the control look seamless integrating into your web page.

The classes are used as following where the lastFmItem is repeating.

Last.fm Control CSS Usage

Download

Some Comments

I did not spent that much effort into this control. Writing this entry took longer that writing the control, not only since the pre-release Windows Live Writer version I am using crashed twice. There are several improvements, which could be done to this control, including reducing the parameters to only the user name, adding the Last.fm icon etc. If you are looking for a more sophisticated dasBlog makro, you might have a look at Alexander Groß’ Last.fm makro.

Disabled MenuItems in WPF

Maybe this is a bug: Creating a ContextMenu as child of a Canvas, the event handlers CanExecute and Execute have never been executed? This took me almost two hours to figure out why. Basically, I do my command binding like

CommandBinding exitCmd = new CommandBinding(DesignerCommands.Exit);
exitCmd.CanExecute += new CanExecuteRoutedEventHandler(exitCmd_CanExecute);
exitCmd.Executed += new ExecutedRoutedEventHandler(exitCmd_Executed);
CommandBindings.Add(exitCmd);

To me, it looks like there is a minor problem in command binding whilst using command binding this manner in controls which never get the focus (such as a Canvas). Since the handlers are never fired. An easy workaround is to add additional command binding within your XAML code.

<ContextMenu.CommandBindings>
 <CommandBindingCommand="e:MyCommands.Exit" CanExecute="exitCmd_CanExecute" Executed="exitCmd_Executed"/>
</ContextMenu.CommandBindings>

I checked a couple of web sites and found one site, where the problem is described a bit more in detail. Also Aaron describes a second work around that requires some lines of code.