.NET Core on Mac OS X

After MSFT started to open source .NET Core, it eventually found its way on my Mac OS as well.

The easiest way seams to be installing the .NET Execution Environments using Homebrew based the instruction given at Github.

sudo brew tap aspnet/dnx
sudo brew update
sudo brew install dnvm
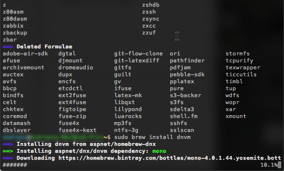
Installation von .NET Core via Homebrew

Afte registering dmvm via

source dnvm.sh

one now should be abel to install .NET core using the following dnvm commands

dnvm upgrade -u
sudo dnvm install latest -r coreclr -u

For whatever reason I permanently run into issues such as

Installing to /Users/andreas/.dnx/runtimes/dnx-mono.1.0.0-beta6-12004
find: /Users/andreas/.dnx/runtimes/dnx-mono.1.0.0-beta6-12004/bin/: No such file or directory
chmod: /Users/andreas/.dnx/runtimes/dnx-mono.1.0.0-beta6-12004/bin/dnx: No such file or directory

First of all, I tried tried to update dmvm itself and again run into issueS:

foo@mac-pr:~/.dnx$ dnvm update-self
~/.dnx/dnvm/dnvm.sh doesn't exist. This command assumes you have installed dnvm in the usual location and are trying to update it. If you want to use update-self then dnvm.sh should be sourced from ~/.dnx/dnvm 
andreas@mac-pro:~/.dnx$ 

Trying so create the missing folders and links manually

sudo mkdir ~/.dnx/dnvm; 
sudo ln -s /usr/local/Cellar/dnvm/1.0.0-dev/bin/dnvm.sh ~/.dnx/dnvm/dnvm.sh

as well as sourcing dnvm.sh directly from the ~/.dnx/dnvm location did not help.

Every time running

dmvm update-self 

ended up in something like

Downloading dnvm.sh from https://raw.githubusercontent.com/aspnet/Home/dev/dnvm.sh 
Warning: Failed to create the file /Users/andreas/.dnx/dnvm/dnvm.sh: 
Warning: Permission denied

As very last attempt, I tried to run all these stuf as su. Unlike on Linux systems, root is not enabled by default on MAC OS though. Therefore it was necessary to enable the root user following these steps.

Now you can run su in any terminal, though.
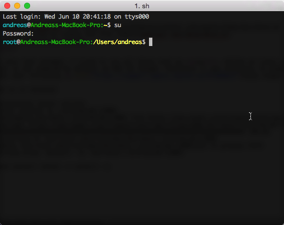
su on Mac OS

Determining latest version
Latest version is 1.0.0-beta6-12004 
Downloading dnx-mono.1.0.0-beta6-12004 from https://www.myget.org/F/aspnetvnext/api/v2
Download: https://www.myget.org/F/aspnetvnext/api/v2/package/dnx-mono/1.0.0-beta6-12004
######################################################################## 100.0%
Installing to /var/root/.dnx/runtimes/dnx-mono.1.0.0-beta6-12004
Adding /var/root/.dnx/runtimes/dnx-mono.1.0.0-beta6-12004/bin to process PATH
Setting alias 'default' to 'dnx-mono.1.0.0-beta6-12004'

Eventually, you now can run and successfully complete

dnvm install latest -r coreclr -u

and write and run your first .NET application on Mac.

Unfortunately, all bits installed are only available for root once you followed the above instructions.

The Right Moment to start over with Visual Studio and .NET

Yesterday, Somasegar, corporate vice president of the Developer Division at Microsoft announced Microsoft is going to open source the .NET platform. Since I left Microsoft in 2011, this is one of the moments I am most stunned. There is a fully featured community edition of Visual Studio, Android emulator, .NET open sourced under the MIT License, support for Linux and Mac OS X. Further background information can be found on my former colleague Immo’s post over here.

I went from Windows to Mac once I left, dug into Python, Java, a lot of Apache projects and somewhat C++ and JavaScript, developing for the new Jolla and Sailfish OS and contributing to the IoT project  OpenHAB. Anyway, I never really was that overwhelmed by the dev ecosystem as I was with Microsoft.

It does not look like the Microsoft I left at all, however, with these major changes, I will be definitely one of the first nailing .NET on my Mac OS X.  I am looking forward for this. For today, I will install the new Visual Studio Community 2013 on my virtual Windows, though.

Fixing ASP.NET MVC 4 Web API 404

For a Web Service providing some REST-style URIs to access the data, I decided to use the ASP.NET MVC 4 Web API. Once developed, tested and deployed I experienced a mysterious 404 on my production server.

ASP.NET Web API 404

The Web API started originally as WCF Web API at CodePlex and is finally fully integrated within the latest .NET framework:

“ASP.NET Web API represents the joint efforts of the WCF and ASP.NET teams to create an integrated web API framework. You can get the bits and find articles, tutorials, samples and videos on the new ASP.NET Web API home page. All you have to do is to..”

The tutorials and examples for the ASP.NET Web API are overall easy to understand and you probably get  access to the technology very quickly. After I set up my first Web API, which worked absolutely perfect on Windows 8, developed using Visual Studio 2012 and tested with the IIS Express, I was not able to get the bits executed on the deployment server. It’s a Windows Server 2008 R2, IIS 7.5 and a whole bunch of stuff installed using the Web Platform Installer.

Make sure the .NET Framework is installed, probably you missed to install the 4.5 framework on the deployment server. As IIS is set up already, once again it is necessary to register ASP.NET for the latest framework using

C:\Windows\Microsoft.NET\Framework\v4.0.30319>aspnet_regiis.exe -i

Even now, I got the 404. Eventually, I got the tip to check out how the routing of extensionless URLs work in ASP.NET. By adding

<system.webServer>
    <modules runAllManagedModulesForAllRequests="true" />
    ...
</system.webServer>

to the web.config file of my Web API  the routing seems to work fine now.

Understanding Average Performance Counter in .NET

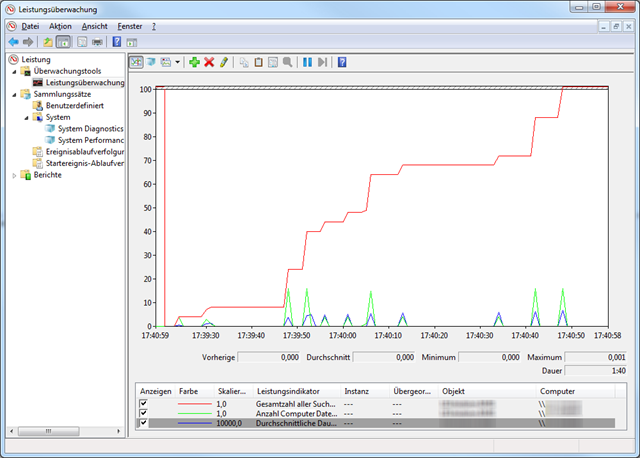
For the current project I am working on, I recently had to implement a way of easy adding and using Performance Counters in .NET. While working on the code base, I implemented various counters as examples how to use the new infrastructure and how to implement counters in the code base.

While investigating in performance counters, I’ve seen quite a series of posts and articles describing the usage of the AverageTimer32 and AverageTimer64 classes. However, all the examples there seemed to be wrong. One of these examples was a question I have answered on stackoverflow.com, leading to this post.

Basically, all the examples I have seen propose to throw a set of measurements into the mentioned expecting that the counter provides the average of these measurements. The AverageTimer32/64, however, does not calculate the average of all measurements you perform. Instead it provides the ration of your measurements to the number of operations you provide.

To understand how the AverageTimer32/64 works, it might be helpful to understand the formula behind it. This also answers why one needs an AverageBase to use an AverageTimer32/64.

The formula the AverageTimer32/64 is based on is as following:

((N1 - N0) / F) / (B1 - B0)

given
N1 current reading at time t (provided to the AverageTimer32/64)
N0 reading before, at t – 1 (provided to the AverageTimer32/64)
B1 current counter at t (provided to the AverageBase)
B0 counter before, at t – 1 (provided to the AverageBase)
F Factor to calculate ticks/seconds

In a nutshell the formula takes the current time in ticks and subtracts the previous one provided. The result divided by the factor F gives you the time you operation run since the last measurement taken at t-1. Usually, this factor should be 10.000.000 ticks per second.

Now you divide this by the current base counter minus the previous base counter provided. Usually, this might be one. As a result you have the average time of your operation for a single measurement.

Using the AverageBase you now can step over various measurement points. Think of a case where you can set the counter only every tenth operation you perform. Since your last measurement you would increment the AverageTimer32/64 by the new time measurement for all ten operations while incrementing the AverageBase by ten. Eventually, you will receive the average time for one operation (even if you have measured over all ten operation calls).

In most examples, a set of timespans are provided  for this counter to calculate an average value. Let this be a series of numbers like 10, 9, 8, 7 ,6 while increasing the AverageBase by 1 every time providing one of these figures.

For the second measurement you will receive the following result:

(9 – 10) / F / (1 – 0) = -1 / F / 1

With F being 1 for simplicity you will get -1 as result. Given measurements that provide most of the time similar results, for a large number of experiments you will end up with am average value near zero.

Based on the previous example, the correct values to submit, however should be 10, 19, 27, 34, 40.  Again the same example we will show a different result.

(19 – 10) / F / (1 – 0) = 9 / F / 1

With F being 1 again, you will have an average time of 9 for your second measurement. As you can see from the formula, the every value measured needs to be greater than the previous one to avoid the effect previously showed.

You might use a global Stopwatch to achieve this goal. Instead of starting it new, you might use use Start() – not Restart() for each measurement. As seen above, the counter will calculate the difference time internally. That way you will get correct measurements.

public void Compute()
{
_stopwatch.Start(); // do not restart the Stopwatch used for average counters


// code to be measured
// ...


_stopwatch.Stop();


_avgTimeCounter.IncrementBy(_stopwatch.ElapsedMilliseconds);
_avgTimeCounterBase.Increment();
}

PerformanceCounterDe

Even if called AverageTimer32/64, this type of counter is not strictly restricted to time. You can think of using this counter for a variety of measurements. For example 404 responses in relation to the total number of HTTP requests,  disk transfer rations  and so on.

Clean Interface Inheritance

Recently, I had a interesting conversation about interface inheritance with one of my colleagues. Reason was a decision necessary how to implement basic behavior based on a set of interfaces for a number of classes. At first, I was not comfortable to  let one interface inherit from another. I was quite biased from the design of the code base I am currently working on.

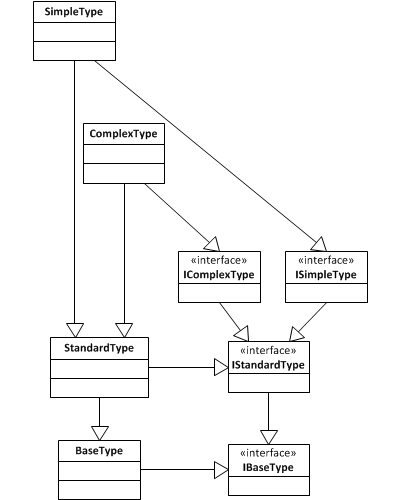
Generally spoken, each class inherits from its very own interface. In addition the inheritance scheme of classes is reflected in the interface inheritance as seen in the example below. Why would one come up with such a design at all?

Complexe Interface Inheritance

To understand this design (it’s still a design) some more context is required. In the particular codebase a dependency injection container is used to resolve instances of a particular type. To do so a unique identifier is required. This could be a string but also an interface. E.g. the Microsoft Extensibility Framework (MEF) makes usage of interfaces for resolving. Using MEF it is quite easy to get a set of components implementing a particular interface (e.g. some kind of IPlugin interface).

The issue I’ve seen, there are only few common interfaces in the codebase . Instead of collecting all types of a particular interface, dedicated interfaces are used to resolve particular instances of types. However, by using interfaces this way, the focus is to identify types by their interfaces not using interfaces as contracts.

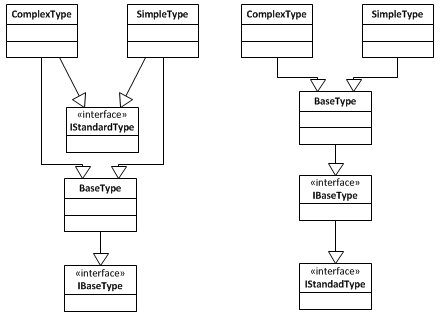
Back to the issue how to design the interface inheritance, we came up with two alternate approaches, both valid indeed, but with very different design goals.

Implementing or Inheriting interfaces

In the left hand approach two types inherit from the same base type implementing a particular interface. Both types also implement another interface, i.e. both types fulfill the same contract. In the right hand approach we see both types inheriting from the same interfaces as well. While at the end both approaches will end in the same a similar result, there is a significant difference in the semantic.

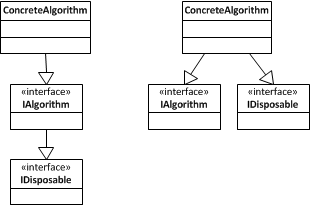
Based on both approaches, we came up with two possible solutions for a .NET implementation. While this might seem quite academic to you, there is quite a difference how one might use these types.

Inheriting Interfaces vs Implementing Interfaces

As in the example before, both approaches will end up in two classes implemented identically, however, both implementations show semantic differences best seen when considering the usage of these classes. In the left hand example one could iterate through a typed list of IAlgorithm calling a Dispose method required by the IDisposable interface. This implementation is obviously contravariant. Following the right hand scheme, you might still iterate through the list, however,  before accessing the Dispose method it is required to cast the concrete instance to IDisposable. While being still contravariant, it is not implicitly possible.

The question now, is to decide when to use the fist or the second approach. Interfaces inheriting from other interfaces is absolutely valid once you can answer the question if your type is some kind of with yes. In the given example each algorithm is an IDisposable. No exception, no excuse. Choosing the second approach you should be able to answer the question whether your type needs to fulfill a particular contract with yes. If only a few algorithms need to be fulfill the contract given by the IDisposable interface, and an algorithm is not a IDisposable by default, the second approach might be the right to choose. While each algorithm is still an IAlgorithm, only some of them could implement the IDisposable interface.

Maybe this seems obvious to you, however, I still see quite experienced developers having significant problems in choosing appropriate inheritance structures. From avoiding inheritance at all to the point of using the most complex inheritance structures you might have ever seen in your programmers life. There is no right or wrong but there might be a best solution suitable to your problem. So never hesitate questioning your current design looking for a better approach. 

Heavy WPF Commands – Part I

Recently, I had a conversation about how much logic a WPF command in .NET might provide and how few implementation it should contain. Basically, this conversation was triggered by different understanding of the semantics of WPF commands. I realized that there is a lot misunderstanding how to implement and use commands in WPF that causes trouble in understanding the program flow and hard to maintain code in the long term. Therefore, I decided this is definitely worth some research on WPF commands and their usage. This is the first articles in a series, I will focus on the usage of WPF commands, their meaning, various implementations and best practices.

The intention of commands are pretty clear described in the Commanding Overview MSDN article:

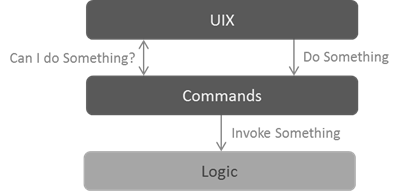
The first purpose is to separate the semantics and the object that invokes a command from the logic that executes the command.

Therefore, commands allow you to reuse parts of your application logic for different targets of of application while separating this logic from the actual user experience (UIX). Regardless whether implementing the logic using the code behind approach in WPF with RoutedCommands, following the MVVM pattern using RelayCommands or building composite applications using DelegateCommands and CompositeCommands, the concept behind commands stays always the same.

All this is made possible by the ICommand interface with its two method declarations CanExecute and Execute. Basically, this allows your UIX to ask if a certain action can be performed and of course to trigger this action. The one who asks for this is called command source. If the command tells it cannot execute this action, is usually disables itself.

The Idea behind WPF Commands

Which logic to perform is not within the concern of the command source. The command maps the “Do Something” call from the command source to the actual logic and invokes this logic on behalf of the command source. Consequently, the logic to be invoked should not be implemented at an instance of the command itself. Any command serves simply as a protocol between application logic and UIX and allows you to separate both from each other.

In a following articles, I will focus on various best practices how to implement commands before having a look in the different possibilities how to use them in common WPF as well as in composite applications.

xUnit and xUnit.BDDExtensions using ReSharper 5.1

Wer von MSTest auf xUnit (derzeit 1.6.1.1521) und ggf. xUnit.BDDExtenions umsteigt wird schnell die integrierte Unterstützung innerhalb von Visual Studio vermissen. Mit ReSharper alles kein Problem, denkt man. Die aktuelle Version 5.1 von ReSharper (ich verwende derzeit Build 5.1.1727.12) macht hier allerding ein paar Probleme, die sich innerhalb weniger Minuten jedoch lösen lassen.

Laut der Plug-In-Seite von ReSharper bringt xUnit.net Contrib die gewünschte Unterstützung mit sich. Hier ist s jedoch erforderlich derzeit auf die Version 0.4.1 alpha auszuweichen. Dabei sollte man sich nicht davon abbringen lassen, dass die angegebene Version einen speziellen ReSharper-Build adressiert.

Die Installation bedarf es lediglich eine Reihe von Schritten aus der readme.txt zu befolgen. Zunächst muss der Inhalt des Ordners xunitcontrib.runner.resharper.5.1 aus dem Archiv in das Verzeichnis

C:Program FilesJetBrainsReSharperv5.0binplugins

oder auf 64-Bit-Maschinen

C:Program Files (x86)JetBrainsReSharperv5.0binplugins

kopiert werden. Wurden auf dieser Maschine zuvor noch keine ReSharper-Plug-Ins installiert, muss der Ordner plugins manuell angelegt werden.

Nun ist der die Datei xunit.xml aus dem Ordner resharper.external.annotations nach

C:Program FilesJetBrainsReSharperv5.0binExternal Annotations

bzw. dem entsprechenden Ordner auf 64-Bit-Maschinen

C:Program Files (x86)JetBrainsReSharperv5.0binExternal Annotations

zu kopieren.

Im letzten (optionalen) Schritt gilt es das Live Template zu importieren. Hierüber lassen sich xUnit-Code-Snippets nutzen. Dazu über das Menü ReSharper / LiveTemplates… den Templates Explorer starten und über das Import-Icon entweder die Datei xunit-ae.xml oder xunit-xe.xml aus dem Ordner resharper.live.templates auswählen.

Der Unterschied der beiden Live Templates ist lediglich  ist ob die Code-Snippets mit dem Buchstaben a oder x aufgerufen werden können.

ReSharper Live Templates

Nach der Installation (und einem Neustart von Visual Studio) lassen sich die xUnit-Tests direkt über den ReSharper Unit Test Explorer ausführen. Eine positive Überraschung war, das die xUnit.BDDExtenions ebenfalls sofort über den Unit Test Explorer ausgeführt werden konnten. Zuvor habe ich lediglich die xUnit.BDDExtensions gegen die aktuelle xUnit-Version (1.6.1.1521) kompiliert.

ReSharper Unit Test Explorer

Dem Testen mit xUnit innerhalb von Visual Studio steht damit nichts mehr im Weg.

Starting BDD

Immer wieder einmal taucht der Begriff Behavior Driven Development oder BDD auf. Obwohl das verhaltensgetrieben Entwickeln einige interessante Vorzüge fällt der Einstieg oftmals schwer. Dabei basiert BDD auf den Techniken im Test Driven Development. Das größte Problem scheint eine vor allem das Fehlen einer für Einsteiger verständliche Einführung in BDD zu sein. Im Folgenden werden daher einige Grundprinzipien des BDD zusammengetragen, die den Einstieg erleichtern sollen.

Test Driven Development (TDD) ist eine Entwicklungsmethode die seit einigen Jahren immer mehr Verbreitung findet. Dabei geht es hauptsächlich darum, Tests vor der eigentlichen Implementierung zu entwerfen und zu schreiben. Eine Möglichkeit stellen hierzu Unit-Tests dar, die i.d.R. auf die kleinste zu testende Einheit (Unit) angewendet werden. Da  das Konzept prinzipiell vielversprechend ist, haben sich Unit-Tests auch in der Clean-Code-Developer-Bewegung eingefunden. Das bekannteste Werkzeug zum Erstellen von Unit-Tests in der .NET-Welt ist derzeit NUnit, das ursprünglich von JUnit portiert und für die .NET-Plattform angepasst wurde. Ein noch immer gutes Buch für den Einstieg in die NUnit ist Pragmatic Unit Testing in C# with NUnit von Andy Hunt und David Thomas.

Während in der Theorie alles wunderbar klingt, hat sich bei zahlreichen Gesprächen mit Kollegen und Freunden immer wieder eine Reihe von Frage gestellt.

Wo fange ich überhaupt an zu testen?  Was soll ich jetzt testen? Wie soll das ich testen? Wann höre ich endlich auf zu testen?

Im Bestreben möglichst viele Tests zu schreiben und eine 100%ige Code-Abdeckung zu erreichen schleichen sich jedoch schnell Trivial-Tests (z.B. für einfache Properties) ein, denn diese sind einfach und schnell zu schreiben, schlagen nie (oder zumindest selten) fehl und erwecken den Anschein, dass der Code aufs Ausführlichste getestet sei.

Ein alternativer Ansatz, der zumindest einige der Fragen beantwortet, ist das Behavior Driven Development (BDD). Ein guter Einstiegspunkt ist der Artikel Introducing BDD von Dan North. Als Ausgangspunkt dient hierbei die Beschreibung einer User-Story.

As a [ROLE]
I want [GOAL]
so that [MOTIVATION]

Im Laufe des Artikels wird die Verhaltensbeschreibung der Implementierung weiter in ein Given-When-Then-Muster ausgebaut.

Given some initial context (the givens),
When an event occurs,
then ensure some outcomes.

Bei BDD ist durchaus die richtige Wortwahl für entscheidend. Anders als beim reinen TDD stellt sich jedoch nicht die Frage, was getestet werden soll, sondern wie sich das System verhalten soll. Verwendet man Dan Norths Einstiegspunkt As-I-So, kann man das Verhalten aus Nutzersicht beschreiben, und dadurch Test auf Basis von User-Storys schreiben.

Konzentriert man sich darauf, nur die für den Test benötigte Funktionalität zu implementieren hilft das unter anderem dazu den Fokus nicht zu verlieren und Feature Creep zu vermeiden. Code der nicht benötigt wird um das Verhalten zu erreichen ist vermutlich nicht notwendig, egal wie viel Spaß es vermutlich macht ihn zu schreiben. In diesem Sinne unterstützt BDD das YAGNI-Prinzip. Im Artikel Getting started with BDD style Context/Specification base naming von Jean-Paul Boodhoo finden sich einige Spezifikationen, die einen ersten Eindruck geben, wie diese aufgebaut sein könnten.

Ein wenig verwirrend ist die Tatsache, dass nur wenig klare Beschreibungen bezüglich des Vorgehens bei BDD sind. Ein Blick beispielsweise in den Code Magazine-Artikel Behavior-Driven Development zeit einige der Grundkonzepte von BDD auf.

Eine gemeinsame Sprache (Shared Language/Ubiquitous Language) ist die Grundvoraussetzung zur Erstellung von Spezifikationen (Specifications) beispielsweise nach dem As-I-So Ansatz. Das Ergebnis hiervon ist eine Reihe von Akzeptanzkriterien die zur Abnahme der gewünschten Funktionalität zu erfüllen sind. Dabei könnte die Granularität der Spezifikation wie folgt verfeinert werden: User Story (Akzeptanzkriterium) –>  Kontextspezifikation –> Code (Ausführbare Spezifikation). Die Kontextspezifikation (Context Specification) besteht aus dem Tripel Concern – Context – Obersvation.

Die Beobachtung (Observation) beschreibt was der eigentliche Test überhaupt macht bzw. was überhaupt getestet wird. Die Organisation von Tests sollte dabei nach dem Concern erfolgen, wobei mehrere Beobachtungen pro Belange (Concern) möglich sind. Im dotnetpro Artikel Die Gleiche Sprache Sprechen von Stefan Lieser (Ausgabe 11/2009) findet sich ein recht gutes Beispiel, dass dies verdeutlichet. Der Kontext (Context) beschreibt Systemzustände (oder Voraussetzungen), die mehreren Beobachtungen gleich sind.

Im Gegensatz   zu TDD sollte die Benennung von Tests keine technischen Details kommunizieren sondern das gewünschte Verhalten auf Basis der gemeinsamen Sprache (Shared Language) wiederspiegeln. D.h. nach dem Hinzufügen des ersten Kunden in eine Kundenliste anstelle der Test-Methode IsNotNullTest könnte in BDD eine Beobachtung ContainsOneCustomer lauten.

Der Mechanismus dahinter (gleichgültige welche Werkzeuge verwendet werden) ist immer noch TDD, allerdings wird nicht mehr die kleineste Funktionseinheit getestet sondern (im optimalen Fall) ein in sich abgeschlossenes Teil-Verhalten des Systems. Natürlich schließt der Einsatz von BDD der Einsatz von TDD nicht aus.

Grundsätzlich kann jedes TDD-Framework für BDD genutzt werden. Dariusz zeigt diesem Artikel wie BDD mittels MSTest aussehen könnte. Vorteil ist ganz klar, dass alles innerhalb der Visual Studio-IDE stattfindet, die Code-Abdeckung berechnet werden kann und die Tests mit nur wenigen Handgriffen ausgeführt werden können. Reine TDD-Frameworks werden jedoch das Problem auf, das sich die Sprache der Spezifikation nicht ohne weiteres ändern lässt.

Eine Alternativen sind z.B. die auf xUnit.net basierenden  xUnit.BDDExtensions von Björn Rochel, die auch von Alex Zeitler in Behavior Driven Development (BDD) leicht gemacht mit ReSharper und XUnit.NET verwendet werden.

Master Pages and XHTML

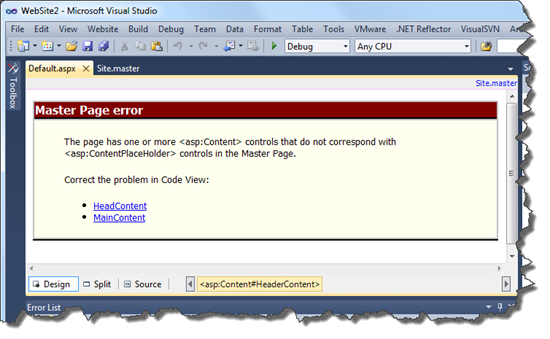
Today, we encountered a really interesting issue with Visual Studio 2010, ASP.NET and Master Pages. Actually Visual Studio denied the design view for all of the pages within the solution except to the master page.

The page has one or more <asp:Content> controls that do not correspond with <asp:ContentPlaceHolder> controls in the Master Page.

No doubt you would check all the pages as well. After verifying that all pages have been correct, the ID as well as the ConteptPlaceHolderID tags are set correctly, you might see that the issue is till persistent.

Master Page Error

In this case check your HTML source code of the Master Page. In particular check for all HTML tags with self closing syntax. Referring the W3C Recommendation for XHTML section C.3 there are some tags that should be not used with self closing syntax.

Given an empty instance of an element whose content model is not EMPTY (for example, an empty title or paragraph) do not use the minimized form (e.g. use <p> </p> and not <p />).

Eventually, you now will review again your source code for any XHTML tags in their minimized form.

<html xmlns="http://www.w3.org/1999/xhtml" xml:lang="en">
<head runat="server">
    <title />
    <link href="~/Styles/Site.css" rel="stylesheet" type="text/css" />
    <asp:ContentPlaceHolder ID="HeadContent" runat="server">
    </asp:ContentPlaceHolder>
</head>
...

In the example above change the title tag to

<title></title>

and the issue will be fixed. Even better would be of course to give your page a title.

While most browsers are quite forgiving here, the Visual Studio designer quits his job. Unfortunately, the error displayed is misleading and you might waste some time in reviewing Master Pages and ASP.NET controls that are obviously correct. Whether this is a bug or Visual Studio designer doing the right job and failing just for those tags based on the W3C Recommendation – it does of course not help a lot if Visual Studio does provide a misleading error message to the developer.