Put your own Search Providers into Internet Explorer 7

Another nice feature, unrevealed in Internet Explorer 7: Adding your own search providers is quite easy. When you select the drop down menu at your search box, you can select your currently installed search providers.

Search Providers Menu

To add more, select Find More Providers… from the menu.

Add Search Providers to Internet Explorer

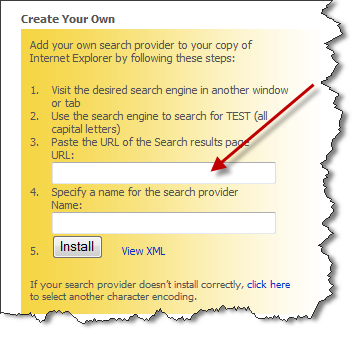
Now, go to your favorite search engine and perform a search for TEST. I did this for the Beolingus translation provider. Paste the URL from the previous source and specify a name for your new search provider.

Create your own Search Provider

That’s the XML used for the installation. Press install and can directly access this search provider using the search box in IE 7.

<OpenSearchDescription xmlns="http://a9.com/-/spec/opensearch/1.1/">
  <ShortName>Beolingus</ShortName>
  <Description>Beolingus provider</Description>
  <InputEncoding>UTF-8</InputEncoding>
  <Url type="text/html" template="http://dict.tu-chemnitz.de/dings.cgi?lang=en&service=deen&opterrors=0&optpro=0&query={searchTerms}&iservice=&comment=" />
</OpenSearchDescription>

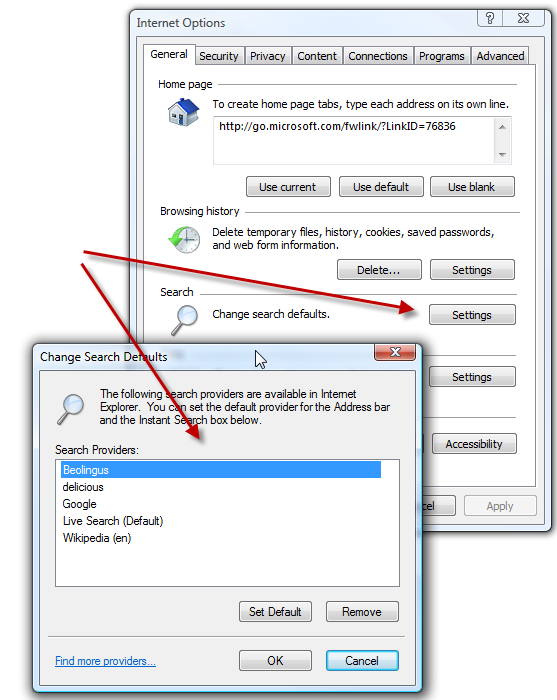
If you want to modify the settings later, you can do so using Tools / Internet Options / Change Search Defaults Settings.

It was the first time I played with these settings of Internet Explorer and I am quite surprised in a positive way about it.

Change Search Defaults Dialog

Data Mikgration Kit for Xbox 360 60GB HDD

We just spend this afternoon trying to upgrade a Xbox 360 to a 60GB HDD with a friend, called “The-one-without-a-Web-presence”. Without success, yet. Somewhat frustrated, I started doing some research on this to understand. Some background information might be helpful.

I just upgraded my Xbox 360 to 120GB. That went quite well. After fighting an epic battle with the blister box, I obtained three essential pieces as reward: the HDD, some kind of odd cable and a green CD/DVD. One end of the cable to the Xbox, the other one to the back of the Xbox. There is only way how it fits, so its quite idiot-proof. Then you insert the disc.
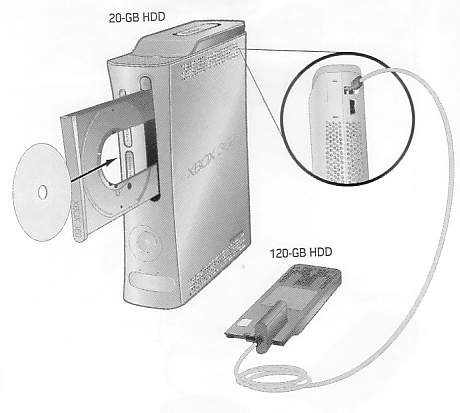
Data Migration Kit

The next few steps are shown on the screen. Confirm the transfer and, depending on the amount of data on your old hard disc, the transfer might take up to 1 hours 30 minutes from the 20 GB disc. Transfer works from one way only. This means, once the transfer is completed, your old disc will be wiped out. It will be a plain disc, just with the XNE (or dashboard if not updated, yet) on it. No profiles, no save games.

The trasfer seems to work only from a smaller to a larger disc. This means

20GB –> 60GB
20GB –> 120GB
60GB –> 120GB

I was also told that the the same size of a HDD is supported. This means the following might also work (not confirmed):

20GB –> 20GB
60GB –> 60GB
120GB –> 120GB

Said that, my friend “The-one-without-a-Web-presence” bought the 60GB Live Starter Kit. That’s a quite fair deal including a 60GB HDD, a head set and three months of gold subscription and a Ethernet cable. He was never live before, so the three months of gold subscription was a reason to buy this kit as he wants to start playing live (Do you get it? Live Starter Kit? For those who want start being live?). Besides this, he gains much more reward for fighting the blister box.

What’s not included in this package is a Data Migration Kit (containing the odd cable as well as the CD/DVD). So he asked me, if we could use my kit. After several attempts we finally figured out: Yes, we could use my kit, however, it does not work. What went wrong at the end? Everything was connected properly, we tried several permutations in connection orders and we read through a whole bunch of support articles.

The simplest way is contacting Microsoft Support and asking for the Data Migration Kit. To do so you simply have to follow the steps indicated in this support article. Obviously we already have an Data  Migration Kit from my 120GB disc that does not work.

The answer seems pretty simple: At the time when the 120GB disc was released, there was no 60GB disc available.  That way, the software does only support the copy process to a 120GB disc. It seems this as a known issue and meanwhile Microsoft released a newer software that also supports this process to 60GB discs.

this means, the software only can process the following transfers:

20GB –> 60GB
20GB –> 120GB
60GB –> 120GB

However, you might be not in luck and you end up with a old software version indeed. Having a newer version this will be no problem at all. How can you tell what version you have?

Hard Disc Transfer Disc

Check out the number on the right bottom of the green CD/DVD being part of your Data Migration Kit. Does it end with “–01”?  Bad luck then. That’s the old version only supporting 120GB discs. Give a call to your local Microsoft support and ask for a newer version or ask your friends if anybody has the newer version. Now you should be able to identify the right disc.

Personally, I would recommend to ask if anybody of your friends has the disc and the odd cable. You’ll need this cable/software only once and ordering it for a single transfer is a waste of resources. As there is no way back now cable will be of no use after the transfer other than giving it to a friend.

Why this confusion? The 60GB Live Starter Kit does not include a cable/software as it is meant to be for Xbox 360 Arcade users who want to migrate. So It might be called “Xbox 360 Arcade 60GB Upgrade Kit” to avoid some confusion for those how want start with Xbox live using the “Xbox 60GB Live Starter Kit”.

Creative Commons Add-In for Office 2007

The Creative Commons Add-in for Microsoft Office 2007 allows you to embed Creative Commons licenses directly into PowerPoint, Word as well as Excel.

“This add-in enables you to embed a Creative Commons license into a document that you create using Microsoft Office Word, Microsoft Office PowerPoint, or Microsoft Office Excel. With a Creative Commons license, authors can express their intentions regarding how their works may be used by others. The add-in downloads the Creative Commons license you designate from the Creative Commons Web site and inserts it directly into your creative work.”

Once installed, you’ll find a new tab at your ribbon called Creative Commons. The License button allows you to create a new license for the document.

Creative Commons License Add-in

For me, it was always a pain to browse through the CC licenses to find the appropriate one. The add-in allows you to step through all options:

Select license type dialog

Allow commercial uses dialog

Allow modification dialog

Jurisdiction dialog

Finally, you select the license and assign it to the document. Visuals will be added automatically by the add-in and the license is then downloaded fro the CC web site.

Add/remove license functionality

Added license

Quite nice add-in that gives you some boost in productivity, especially when you deal often with Word and PowerPoint documents you hand out to the public.

Keep Your Blogroll Up-to-date

It’s quite annoying to keep the Blogroll on your weblog up-to-date while using offline readers. Using RSSBandit and dasBlog brings a quite handy solution to you. First of all, open your dasBlog configuration and check the ‘Enable Config Web Service’ option.

Enable Config Web Service

Now open the ‘Options’ dialog of RSSBadit and select the ‘Remote Storage’ pane. Here check ‘Use remote storage’, select ‘dasBlog’ from the drop-down list and fill out the required login credentials. Your API usually is located at something like http://YouBlog/ConfigEditingService.asmx’.

RSSBandit Options

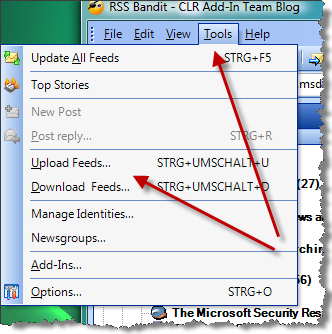
To sync, simply select the ‘Upload Feeds…’ or ‘Download Feeds…’ command from the tools menu.

Upload and Download Feeds Option

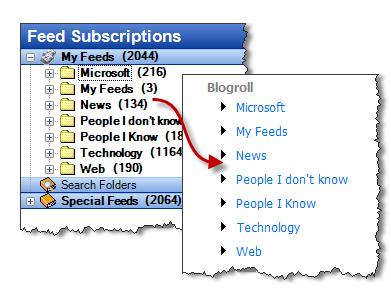
No idea, why I haven’t seen this, yet. But this option finally allows my keep my online Blogroll up-to-date with a few mouse clicks.

Sync'ed blogrolls

Synthing Your Photos

Since Photosynth was announced the very first time, I was keen to try out this technology. Finally, Photosynth became public and you can create your own synths.

After installing the Browser plug-in you select “Create your Synth” on the Photosynth Web site.

Microsoft Live Labs - Photosynth

To sign in you’ll need a Windows Live account – probably you have a messenger account. You’ll start a synth by selecting a set of photos.

Photosynth - Start new synth dialog

The dialog is quite self-evident. Don’t forget to select the license you want to use for the synth. That’s quite important as each and every synth is public available.

Photosynth - Create synth dialog

Select “Synth” and then just wait…

Photosynth - Generating synth dialog

You’ll probably get a good “synthy” rate.

Photosynth - Synth completed dialog

And that’s what you finally get:

Source: http://www.photosynth.net/

Fight Spam – Mercury/32 New Release

Since running my own mail server I am bombed with SPAM. With the newly released Mercury/32 v4.61, I also decided to install SpamHalter. If you have never worked with this before, you might be as lost as I was in the beginning. So, here a few tips to get started easily.

After installing the latest Mercury/32, the setup will probably ask you to install SpamHalter among other plug-ins. To get it running quickly, get the words4.zip file from the SpamHalter web site. Start the SpamHalterTools.exe from the Mercury directory and import the database.

SpamHalter: Merge Word Database

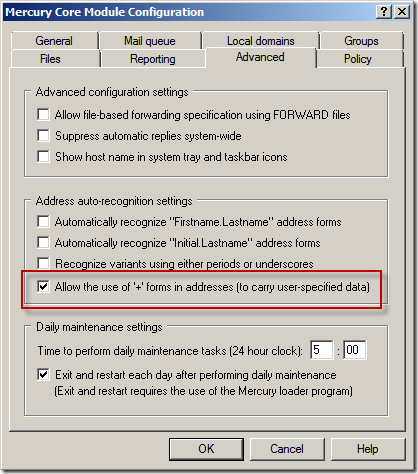
At first you have to enable the ‘+’ forms within Mercury. You’ll find this option at the ‘Advanced’ tab at the ‘Mercury Core Module Configuration’.

Mecury Coe Module Configuration

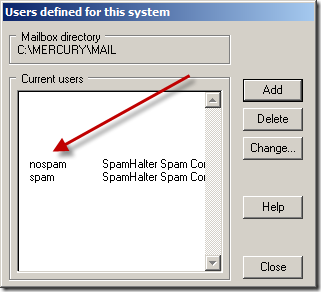
Now, you define two local mailboxes for SPAM and NOSPAM corrections:

SPAM/NOSPAM Correction Mailbox

The correction mailboxes must be specified within the SpamHalter settings on the ‘Basic Setting’ tab.

SpamHalter Basic Settings

I actually was not sure, so I created also the corresponding aliases for those two mailboxes: Maybe this might work without, but since I am running this mail server for multiple DNS entries, I wanted to be sure.

If SPAM is detected by SpamHalter, you’ll get the corresponding header information that can be evaluated, e.g. using Rules within Microsoft Outlook.

Message Header Information

The mailboxes you’ve created before are used to correct false positives or missed SPAM. Some accidentally as SPAM classified mail can just be forwarded to the NOSPAM mailbox created before to teach the system about this mail. Not recognized SPAM mails are sent to the SPAM mailbox to get processed. Simply add the password you have chosen before to enable the remote

Correct False Positives

Following these steps you get a quite reliable system within a few minutes. After sending couple of SPAM mails to the system it already started to recognize German SPAM.

There is much more to tweak on the system, but this should be enough to get a fast start with SpamHalter. To get a more detailed instruction read the original documentation and the web page.