Visual Studio 2012 Upper Case Menus

I am probably the last person in the .NET community who figured out how to disable the Visual Studio 2012 Metro design upper case menus. I haven’t had a chance to work a lot with Dev11 yet, so I was not bothered too much by the new design. After working a couple of hours with the new IDE, I was quite annoyed by the new upper case menus.

Visual Studio 2012 Upper Case Menus

It seems that Richard Blanks was the first who figured out how to disable the upper case menus in VS 2012, looking nice and capitalized.

Visual Studio 2012 Capitalized Menus

As I love to do things automatically when possible and hate to fiddle with the Registry Editor, I set up the registry key to change in a small script. Just rename it to .reg and double click the file.

Windows Registry Editor Version 5.00
[HKEY_CURRENT_USER\Software\Microsoft\VisualStudio\11.0\General]
"SuppressUppercaseConversion"=dword:1

If you create the file manually, keep mind to save it in ANSI encoding, as Unicode scripts are not merged at all.

The XBOX Blackout

After dealing with a RROD a couple of years ago, a few weeks ago, my replacement Xbox also went down to the dogs. No replacement this time. Actually, it seemed some solder joint was broken.

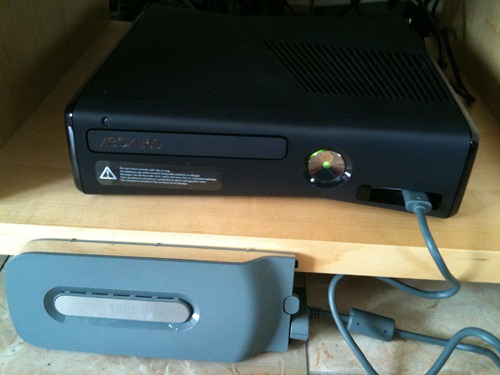
With a new box, this time a Xbox 250GB Slim, I was confronted with the data migration issue. Luckily, the new Xbox already has the drivers for the migration kit build in, which means you can connect your old HDD directly to the new box. Therefore I made use of my old Data Migration Kit.

XBOX 360 Data Migration Kit

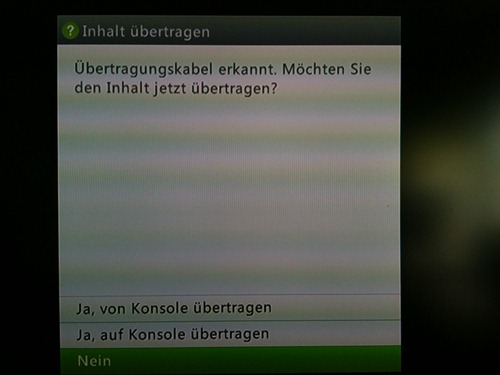
To make the process of upgrading easier, first set up your new box with a temporary account. Connect the old HDD to the Data Migration Kit and plug in the kit to the new Xbox. It will recognize the kit and ask whether to copy from or to the new console.

Copy Content to XBOX

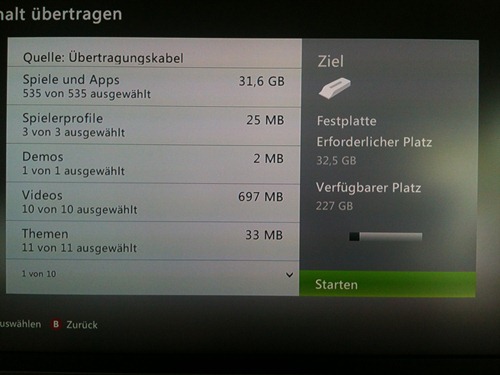
Afterwards you can select what copy. The only drawback is you cannot copy already installed games from disc. These you have to reinstall at a later point in time.

2012-08-31 14.30.19

Once started this process might take quite a while. I haven’t found anything on the Xbox site about data migration to a 250GB disc or the new boxes. However, luckily the guy in the following video pointed out how it works and that the software/drivers a re part of the new Xbox. 10 minutes worth watching.

Once accomplished, it might be necessary to transfer the rights on digital content to your new Xbox following the steps on http://www.xbx.com/drm.

O’Reilly Books on Your Finger Tips

O’Reilly’s camel book was one of the programming books, I bought quite some years ago. Since then  I am a big fan of O’Reilly books. Eventually, O’Reilly started to provide books in various digital formats. As owner of various e-book readers, I was quite pleased when O’Reilly stated to offer their books for download. Purchasing books not only from O’Reilly rather from a whole bunch of publishers, downloading, updating and copying the books from all these websites became almost  day job over time.

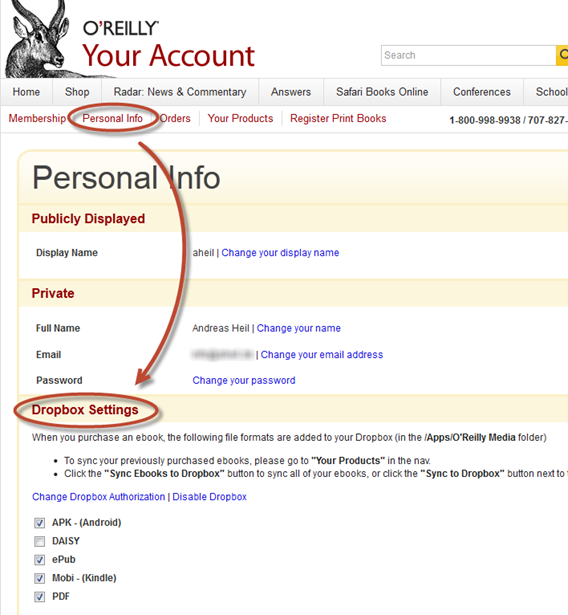
Even more, I was pleased by O’Reilly recently offering a beta service to synchronize purchased books to your Dropbox account. In your Personal Info area, you’ll find the Dropbox settings. Once authorized and the file formats selected to sync, you can start syncing your books.

O'Reilly Dropbox Settings

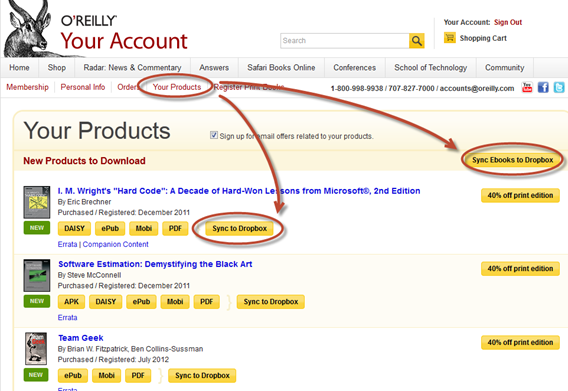
While newly bought books will synced automatically, previous purchased need to synchronized manually. Therefore, you’ll find a Sync to Dropbox button in the Your Products area to select which previously purchased e-books to download.

Sync to Dropbox

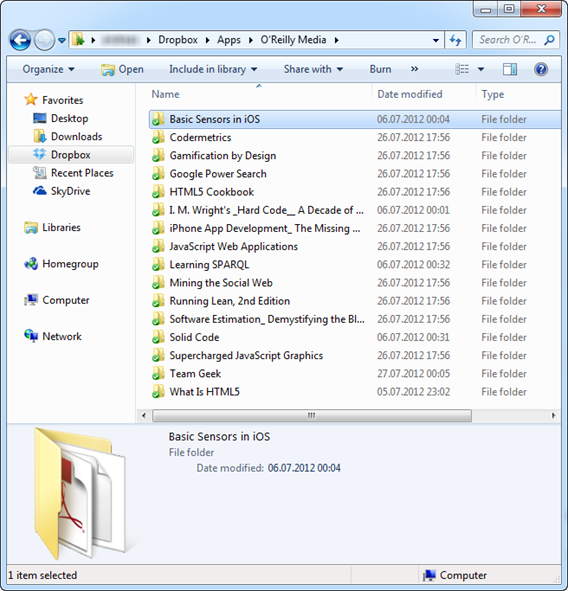
After Dropbox has finished, you have all your selected books as well as future purchases in your local Dropbox\Apps\O’Reilly Media folder. No worries if you delete one if these files, you can initiate the synchronization again as described above.

O'Reilly Media Folder in Dropbox

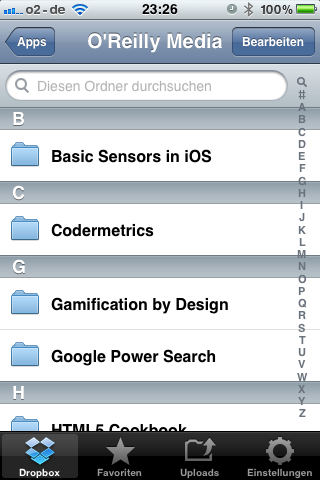
Not only that your e-books are synced to your computer, once available in Dropbox, the files are also available on all devices supported. Eventually, this means you can easily access your books on iPad, iPhone or Android devices. As Dropbox even supports Kindle Fire,  this might be a good reason to pick up this device. Based on rumors, this might be available early September. Until then, the Kindle stays the last device I have to copy my books manually. However, due to the fact they a re synced to a dedicated folder, it is easy to pick them up.

O'Reilly Media on iOS

Actually, I am that pleased with this great kind of integration, that I have asked Manning (also a publisher, I own a lot of e-books) about a similar feature. Eventually, it was confirmed that such a feature is currently being developed.

If you have no Dropbox account yet, you can support this blog by following this referrer signing up for a free account.

Understanding Average Performance Counter in .NET

For the current project I am working on, I recently had to implement a way of easy adding and using Performance Counters in .NET. While working on the code base, I implemented various counters as examples how to use the new infrastructure and how to implement counters in the code base.

While investigating in performance counters, I’ve seen quite a series of posts and articles describing the usage of the AverageTimer32 and AverageTimer64 classes. However, all the examples there seemed to be wrong. One of these examples was a question I have answered on stackoverflow.com, leading to this post.

Basically, all the examples I have seen propose to throw a set of measurements into the mentioned expecting that the counter provides the average of these measurements. The AverageTimer32/64, however, does not calculate the average of all measurements you perform. Instead it provides the ration of your measurements to the number of operations you provide.

To understand how the AverageTimer32/64 works, it might be helpful to understand the formula behind it. This also answers why one needs an AverageBase to use an AverageTimer32/64.

The formula the AverageTimer32/64 is based on is as following:

((N1 - N0) / F) / (B1 - B0)

given
N1 current reading at time t (provided to the AverageTimer32/64)
N0 reading before, at t – 1 (provided to the AverageTimer32/64)
B1 current counter at t (provided to the AverageBase)
B0 counter before, at t – 1 (provided to the AverageBase)
F Factor to calculate ticks/seconds

In a nutshell the formula takes the current time in ticks and subtracts the previous one provided. The result divided by the factor F gives you the time you operation run since the last measurement taken at t-1. Usually, this factor should be 10.000.000 ticks per second.

Now you divide this by the current base counter minus the previous base counter provided. Usually, this might be one. As a result you have the average time of your operation for a single measurement.

Using the AverageBase you now can step over various measurement points. Think of a case where you can set the counter only every tenth operation you perform. Since your last measurement you would increment the AverageTimer32/64 by the new time measurement for all ten operations while incrementing the AverageBase by ten. Eventually, you will receive the average time for one operation (even if you have measured over all ten operation calls).

In most examples, a set of timespans are provided  for this counter to calculate an average value. Let this be a series of numbers like 10, 9, 8, 7 ,6 while increasing the AverageBase by 1 every time providing one of these figures.

For the second measurement you will receive the following result:

(9 – 10) / F / (1 – 0) = -1 / F / 1

With F being 1 for simplicity you will get -1 as result. Given measurements that provide most of the time similar results, for a large number of experiments you will end up with am average value near zero.

Based on the previous example, the correct values to submit, however should be 10, 19, 27, 34, 40.  Again the same example we will show a different result.

(19 – 10) / F / (1 – 0) = 9 / F / 1

With F being 1 again, you will have an average time of 9 for your second measurement. As you can see from the formula, the every value measured needs to be greater than the previous one to avoid the effect previously showed.

You might use a global Stopwatch to achieve this goal. Instead of starting it new, you might use use Start() – not Restart() for each measurement. As seen above, the counter will calculate the difference time internally. That way you will get correct measurements.

public void Compute()
{
_stopwatch.Start(); // do not restart the Stopwatch used for average counters


// code to be measured
// ...


_stopwatch.Stop();


_avgTimeCounter.IncrementBy(_stopwatch.ElapsedMilliseconds);
_avgTimeCounterBase.Increment();
}

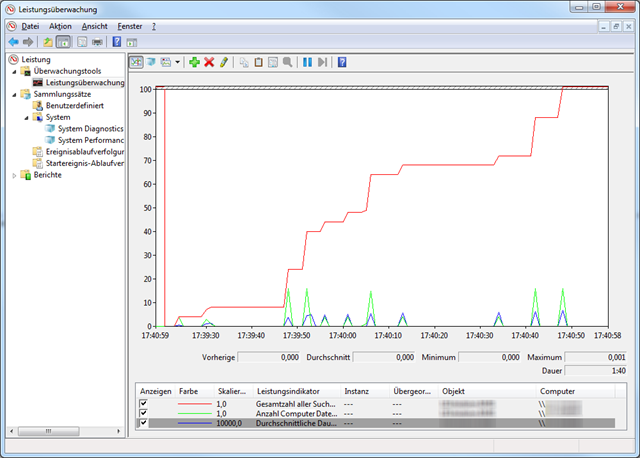
PerformanceCounterDe

Even if called AverageTimer32/64, this type of counter is not strictly restricted to time. You can think of using this counter for a variety of measurements. For example 404 responses in relation to the total number of HTTP requests,  disk transfer rations  and so on.

The GPHWStatus Hack for the WWAN 5520 on a Dell D830

I just got a new (old) WWAN 5520 3G/UMTS card/modem for my Dell D830. Eventually, the card did not work out of the box without a hack. In the following  I will show what you need to do, if you want to get the card running in your Dell D830 (or maybe also any other older Dell Latitude or XPS machines).

WWAN 5520 First you need the card of course. Your Dell Latitude D830 (and many other older Dells) already has an empty slot for this card. Opening the cover (i.e. removing the keyboard) will reveal the slot for the card on the lower left of the case. The antenna cables should be already there, probably with a small protection on their end. It took me a few moments to realize which cable to plug where. One is marked white and the other is marked black, and the connectors show a large white and black arrow (actually, this was so obvious that I haven’t realized this right away).

Plug it in, close the lid and turn the computer on again (hopefully you did shut it down before). After starting Windows (if you read this blog you know we area talking about Windows 7 64-bit), Windows Update will take over – or at least it will try and glorious fail in finding any drivers.

Driver Software Installation

Never give up, never surrender as we are talking about Dell here. And as I learned recently about the missing touchpad driver, there might be a driver for everything else as well. Once again we go for a 64-bit driver for Windows Vista. In this case the Wireless Mobile Broadband MiniCard driver for Windows Vista 64-bit will do the job.

SNAGHTML7fabea

At Dell’s download site for communication drivers, there is a whole bunch of carrier specific drivers (Vodafone, Cingular, Telus and other carriers, I have never heard about before). It is not related to any carrier, so ignore anything with a carrier name in it.  Just to be sure, the driver we are looking for here is R159896.EXE.

The SIM card lives directly in the battery slot as you can see at Dell’s D830 Service Manual. Make sure the cut off corner goes the correct orientation and if you are using a contact (pay monthly) card, make sure the card is protected by a PIN. The battery slot is not secured, and if you don’t watch your laptop all the time… well, you never know. Maybe worth to know, the SIM in your Dell does not support hot-swapping, i.e. unlike e.g. the iPhone 3GS, you have to shut down your laptop before you insert the card.

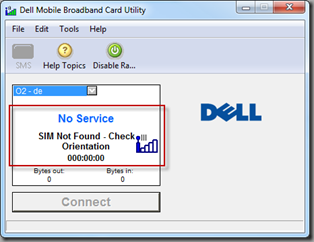
Once built in, installed and inserted every bits and pieces, the Dell Mobile Broadband Card Utility will let you know:

No Service
SIM Not Found – Check Orientation

No, don’t turn off the laptop again, the orientation probably is right. There is a (not so obvious) solution to that.

No Service

Start the Registry Editor (regedit.exe) and navigate to

ComputerHK_LOKAL_MACHINESOFTWAREWow6432NodeNovatel WirelessNextGenCommon

and change GPSHWStatus to 1. This means, the GPS chip on the card gets activated. For whatever reason, the chip is deactivated by the Dell drivers by default. However, if you activate the GPS chip, the entire card will be activated. It might be interesting to dig a bit deeper here, but for now it’s enough to know that it works.

GPSHWStatus Hack

Either reboot, or just quite and start the Broadband Card Utility again.

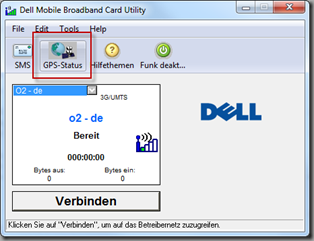
GPS-Status

By applying this GPHWStatus hack, not only the 3G card/model will now work, also the GPS hardware will be enabled and should available from the tool.

Dell D830 – The Missing Touchpad Driver

Since moving forward to Windows 7 x64 on my Dell Latitude D830, I had to live with the default behavior of the Touchpad and Pointing Stick of the D830 as there are no 64-bit drivers for Windows 7.

Finally, I found the right drivers for my system. You can pick it up at the Dell drivers and download page for the Dell Latitude D430. The is no explicit Windows 7 driver, however, the 64-bit driver for Windows Vista worked fine for me.

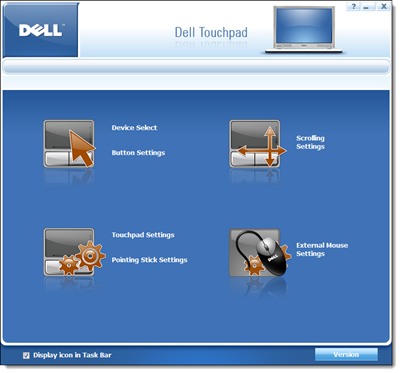
Dell Touchpad on D830 with  Windows 7 x64

To make sure you oick up the right driver, the file name is R157047. The driver gives you full access to the Touchpad and Pointing Stick functionality, including the click feature of the stick.

R157047.exe - 64-bit Driver working on Windows 7

Download: Drivers & Downloads for Latitude D430

Migrating dasBlog to WordPress

Over the last couple of years, I run my blog using the dasBlog engine. As I started hosting the blog in 2004 on my own server, I choose dasBlog as it did not need any database on the backend, saved everything in XML and did a great job on the full text search over the XML content. Beside that, a blog engine running on ASP.NET seemed the right choice being familiar with the technology. Eventually, I did several fixes and hacks on my installation over the last few years. Unfortunately, there was no new release since March 2009. As I like playing with alternative technologies from time to time and WordPress comes with a rich set of features I miss at dasBlog, I decided to migrate to WordPress. In this article I will describe the steps moving forward to WordPress hosted on a Windows Server 2008.

Overview

Moving forward to the new platform includes several steps. First of all the server has to be prepared to host the new platform. After the new blog engine is set up, the content needs to be migrated. Finally, the old engine needs to be shut down and the server needs to be set up to forward requests to the old engine to the new one.

Installing WordPress

Installing WordPress should be relatively easy as it is available through the Microsoft Web Platform Installer 2.0. However, you might encounter issues during the process on machines running IIS 7 as the required Windows Update KB980363 causes the installation process to hang. The update process only hangs when started from within the Web Platform Installer, so pick it from the Microsoft Download Page and install the hotfix beforehand. Before installing WordPress you need to install PHP on the server. In addition to the instructions how to configure PHP on IIS 7, Ruslan Yakushev provides a very good tutorial how to set up FastCGI on Windows Server 2008.

Migrating from dasBlog to WordPress

Originally, I planned to use BlogML to migrate the content from dasBlog to Worpress. Instead I found dasBLogML which is a simple GUI wrapper around the original BLogML. First you download the content of the old blog to your local machine.

dasBlogML

To import the BlogML data, you might want to follow Edgardo Vega’s article. In order to avoid potential problems during the import, also have a look at Daniel Kirstenpfad’s tip about replacing all   occurrences in the XML file. Using the BLogML Importer plug-in you can finally import the previously exported XML file.

Import BlogML

Redirecting dasBlog

In the final step I had to redirect the requests from the old blog to the new one. There are several issues to think about: First of all, all binaries are still referred from the old blog. Consequently it is not possible to just shut it down. Furthermore, there are many entries that are linked from several places all over the web.

My solution is to create a IIS module using managed code, and the ASP.NET server extensibility APIs. First of all I had a look at the schemes of the permalinks or URIs I have chosen for the old blog

http://www.blog.old/yyyy/mm/dd/articletitle.aspx

and the new one

http://www.blog.new/yyyy/mm/dd/article-title/

Consequently the HTTP module has to perform several steps: Replace the domains, remove the technology specific information in form of the .aspx file extension (technology specific information isn’t good practice anyway based on Tim Berner-Lee’s article about cool URIs) and finally add some hyphens. While the later is an somehow impossible task, there is an easy workaround. The scheme for permalinks I have chosen in WordPress will list all articles on a given day if you omit the article title in the URI. Consequently, the requested URI will be rewritten by the module to

http://www.blog.new/yyyy/mm/dd/

and sent back in the response with HTTP status code 301 (moved permanently) base on RFC 2616:

“The requested resource has been assigned a new permanent URI and any future references to this resource SHOULD use one of the returned URIs. Clients with link editing capabilities ought to automatically re-link references to the Request-URI to one or more of the new references returned by the server, where possible. This response is cacheable unless indicated otherwise.

The new permanent URI SHOULD be given by the Location field in the response. Unless the request method was HEAD, the entity of the response SHOULD contain a short hypertext note with a hyperlink to the new URI(s).“

Additional URIs that need to be processed are in the form of

http://www.blog.old/CategoryView,category,categoryname.aspx

Also this one is relatively easy as WordPress expects the category in form of

http://www.blog.new/category/categoryname/

Finally, the selection from the calendar in dasBlog looks like

http://www.blog.old/default,date,yyyy-mm-dd.aspx

and needs to be transformed into

HttpApplication application = (HttpApplication)sender;
HttpContext context = application.Context;

context.Response.StatusCode = 301;
context.Response.RedirectLocation = GetRedirectLocation(context.Request);
context.Response.Cache.SetCacheability(HttpCacheability.Public);

if (!context.Request.Equals("HEAD"))
{
    ...
}

To create the redirect locations I use a set of Regex objects that cover the most important URI types.

Regex singleUriPattern
  = new Regex("http://" + OLD_DOMAIN
  + "/[0-9]{4}/[0-9]{2}/[0-9]{2}/([\w-_\%+]+)*.aspx");
Regex categoryUriPattern
  = new Regex("http://" + OLD_DOMAIN
  + "/CategoryView,category,([\w-_\%+]+)*.aspx");
Regex dateUriPattern
  = new Regex("http://" + OLD_DOMAIN
  + "/default,date,[0-9]{4}-[0-9]{2}-[0-9]{2}.aspx");

Now everything beside the content can be deleted from the old dasBlog installation. In order to avoid any requests not covered by the previously deployed module, the custom error page for status code 404 is set to the corresponding URI on the news blog.

After deploying the module (into the bin folder of the dasBlog installation) it needs to be added to the web.config. Therefore you just have to add it to the httpModules section.

<httpModules>
  <add name="UriRedirector" type="RedirectModule" />
</httpModules>

Edit Custom Error Page Dialog

If the application pool is running in Classic mode, the custom error pages do not cover any ASP.NET content. Therefore add the customError section into to web.config file. Now all requests that do not request any content from the old blog or which a are not redirected by your module are covered by the new WordPress blog.

<customErrors mode="On">
     <error statusCode="404" redirect="http://www.blog.new/404/" />
</customErrors>

Conclusion

Now the content from the old dasBlog instance are displayed on the new WordPress blog, the most important links to your old dasBlog pages are covered by the URI redirection to the new blog and all the rest is caught by the WordPress blog as well. You might want to extend the redirect module with further regular expressions (e.g. to cover CommentView.aspx or other dasBlog pages).

Adobe PDF Preview for Windows 64-bit

Microsoft’s Windows 7, Outlook 2007 and Adobe’s Acrobat just do not play well together on 64-bit systems. After receiving a PDF document via email, Outlook usually cannot display the PDF.

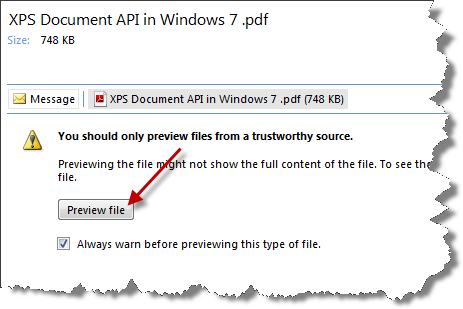
Outlook PDF Preview

When selection Preview File, you will simply get the message PDF Preview Handler for Vista (Vista!?) caused an error.

Outlook PDF Preview Handler for Vista


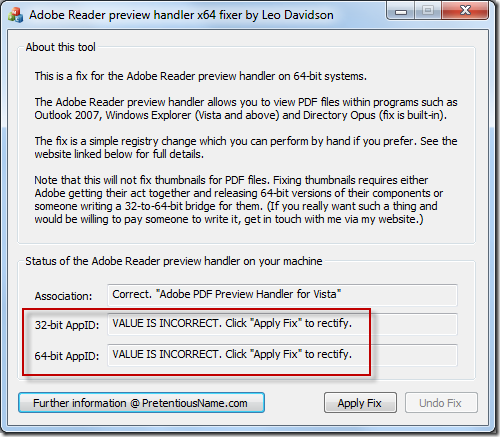
For now, the only way to view the PDF file is to open it in an external PDF reader. Leo Davidson provides a fix that finally solves this issue. Just get the fix, and run the Adobe Reader preview handler x64 fixer.exe which is included in the file.

Leo Davidson's Preview Handler Fix

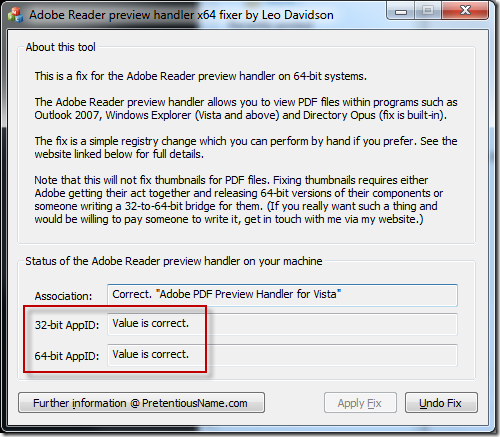
After applying the fix, both, the 32-bit AppID as well as the 64-bit AppID will show the value as correct.

Leo Davidson's Preview Handler Fix

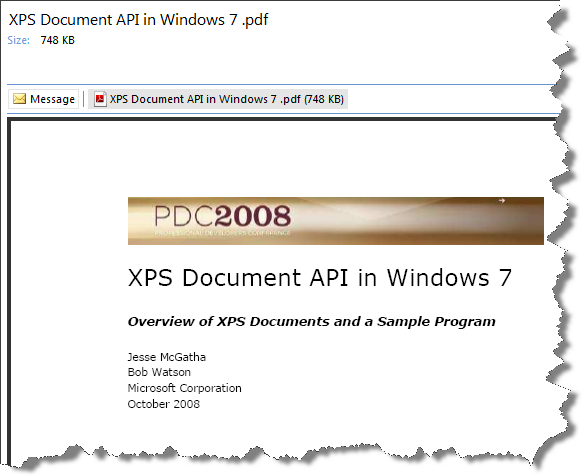
No reboot required, just go back to Outlook (worked even without restarting the application) and et voilà.

Fixed Outlook PDF Preview

Thanks to Leo Davidson, who provides this outstanding fix. Well played.

Broken VMware Workstation Network Adapter

After upgrading Windows Vista to Windows 7 you might encounter an issue with VMware Workstation and its network adapter.

VMware Workstation Error Message


When setting up a NAT or bridged network connection in VMware Workstation it shows a message telling

The virtual network drivers on the host are incompatible with the installed VMware application. Expected version 5. Please reinstall the product. Failed to connect virtual device Ethernet0.

Make sure all your virtual machines are powered off and quit VMware Workstation. Open a command shell as administrator and follow the steps below.

First cd %windir%system32drivers, check for the file vmnetadapter.sys, right-click it, select Details and check its version. It should be 4.0.2.0. If the file is not there,

cd “%ProgramFiles(x86)%VMwareVMware Workstation”

rundll32 setupapi,InstallHinfSection VMnetAdapter1.Install 128 %CD%netadapter.inf

vnetlib — install devices

This will install the required adapters and devices. Do again a cd %windir%system32drivers and check for the First cd %windir%system32drivers, check for the file vmnetadapter.sys file.

vmnetadapter.sys

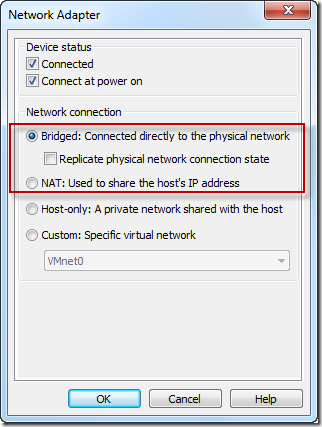
After a reboot of the host system, the NAT settings for the VMware network adapters should work again. Switching to bridged mode will probably result in another message.

VMware Workstation Error Message

Reason for the message saying

The network bridge on device VMnet0 is not running. The virtual machine will not be able to communicate with the host or with other machines on your network.
Failed to connect virtual device Ethernet0.

might be the missing VMware Bridge Protocol on the according host network adapter.

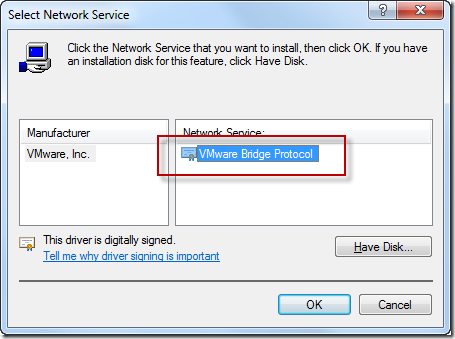
Got to Network and Sharing Center and select Change adapter settings. Choose the network connection you want to use with your VMware network adapter, right-click, select Properties, Install, Service and finally Add. This will allow you to select the VMware Bridge Protocol. In case the entry is not listed, select Have Disk… and navigate to %ProgramFiles(x86)%VMwareVMware Workstation.

VMware Bridge Protocol

After installing the VMware Bridge Protocol restart the VMware Workstation and choose the bridged mode for the network adapter.

VMware Network Adapter

The Ultimate Windows Server 2003 Media Hack

Doh, if you are going to use your Windows Server 2003 as a streaming server for your Xbox 360, you might be in trouble. For a while I went with a rather sophisticated solution, running a Windows XP Media Center within a Virtual Server on my Windows Server 2003. The solution is not the desired one and as Windows Media Center and the Media Center Extender within Xbox 360 have some trouble in streaming h.264 encoded movies files, I had to dig a bit deeper.

Before you go one, please be aware of the following disclaimer:

The following is given under a “works on my machine” premise. The proposed approach is based on my very personal attempts and comes a”as is”. If you try to attempt the following steps, you do it on your own risk. It is not supported by Microsoft, and hey, in case you brick your box don’t expect any support from Microsoft. Don’t blame it to me either as you did it on your own risk, but let me know as it could be fun, tough.

There are several ways to share media with your Xbox 360. The easiest ways is to check out http://www.xbox.com/pcsetup/. After determining your OS, you will be guided through the best way to share media. Bad luck if you work on a Windows Server 2003, though. Not supported, you will be told.

The easiest way is to share media over Windows Media Player 11. Windows Server 2003 comes with Windows Media Player 10. But as we know the core of Windows Server 2003 is somehow Windows XP and therefore there must be away to install WMP 11 on Windows Server 2003. If you google for it, you will come along a dozen hacks and workarounds and most of them won’t work.  Recently, this guy called C:Amie posted some awesome hack C:Amie provided a new link to install Windows Media player 11 on Windows Server 2003. If you have time, go through it, if you are in a hurry, do it that way:

  1. Make sure your box is fully patched and Service Pack 2 is installed.
  2. Download Windows the Windows Media Player 11 installer for Windows XP.
  3. Download the automatic installer from C:Amie’s website.
  4. Run the automatic installer and extract it to any folder on your Windows Server 2003 box.
  5. Copy the previously downloaded wmp11-windowsxp-x86-enu.exe into the same directory.
  6. Go to the folder and run the INSTALL.CMD file.
  7. Follow the onscreen instructions.INSTALLER.CMDThe script creates a temporary folder on your C: drive called C:wmp11. There you have to change the compatibility mode of two files to Windows XP. Go to C:wmp11update1. and right click the update.exe file. Chose the Compatibility tab and check the Compatibility mode for Windows XP. Make the same for the update.exe file in c:wmp11update2.
    update.exe Properties Dialog
  8. Now go back to the command line window and press a key to continue and the simply wait.
  9. The software updater wills start after some time and after some more time you will end up with the UPnP for Windows Server 2003 dialog.UPnP for Windows Server 2003
    Check the Universal Plug and Play checkbox and select Next and then Finish.
  10. If everything went well, you will end up with Windows Media Player 11 on a Windows Server 2003. Hurray.Everything OK

But you remember that we want to stream h.264 encoded files to our Xbox 360, right? The good news is that Windows 7 will support h.264 natively. The bad news is that we work on a Windows Server 2003 right now.  With some work however, we can teach our Windows Server 2003 also to deal with h.264 encoded .mp4 files. All we have to do is to install some codecs and to apply some registry hacks.

  1. For the sake of simplicity, I took the K-Lite Mega Codec pack. It took the mega pack instead of the standard pack because Dirty Harry is using a .44 and not a .375. This might be reason enough.
  2. During installation select Profile 2. It’s the default profile without the players (you remember we want to stream anyway). Feel free to experiment with other profiles and custom settings.K-Lite Mega Codec Pack Setup Dialog
  3. When you come along the Select Additional Task step, don’t forget to scroll down and to check Make thumbnail generation possible for the following types. This will create the thumbnails in the Windows explorer and within the Windows Media Player 11.
    K-Lite Mega Code Pack Setup Dialog - Additional Tasks

At this point your Windows Media Player can play h.264 encoded files but your server is still not capable to share any kind of .mp4 files. They won’t show up in the folders monitored by Media Player until we apply some tweaks to the registry.

On my crusade I came along two registry patches. It seems that they did not work for everybody, however, nobody tried on Windows Server 2003. It worked for me after I installed bot
h of them.

  1. Download the first registry patch, rename to .reg and install it.
  2. Download the second registry patch, rename to .reg and install it.
  3. Reboot to apply the registry changes.

Now, out Windows Server 2003 is capable to stream h.264 encoded media files. The previous patches will now cause that Windows Media Player 11 will add all kinds of .mp4 or .m4a files within the monitored folders. Adding these folders to be streamed is straight forward.

  1. Go to  Libary /Add to Library…Windows Media Player 11 - Library Menu
  2. Add all kinds of folders that should be streamed to your Xbox 360. The media types will be organized automatically, so movies, music files and images will be shown in the corresponding tabs in the NXE.Add to Library Dialog
  3. In some rare cases (and I know what I am talking about as I encountered this rare case) all your mp4 files won’t show up in the movie folders. In this case select Library / Other and check if the files are shown there.Windows Media Player 11 - Other  MediaIf you find all your files here, something went terrible wrong with your media library. Calm down, there is a easy workaround (FWIW: if you already share media, stop sharing as the following won’t work).Go to C:Documents and Settings[YouProfileName]Local SettingsApplication DataMicrosoft and delete the Media Player folder. This will wipe out the whole media library for this computer. Restart from 1. and everything should be green now.Media Player Library

Now, where everything is nicely organized, indexed and monitored, we are ready to share our media with the Xbox 360.

  1. Turn on your Xbox 360.No kidding, you won’t be able to turn on sharing if the 360 is not on at that point of time.
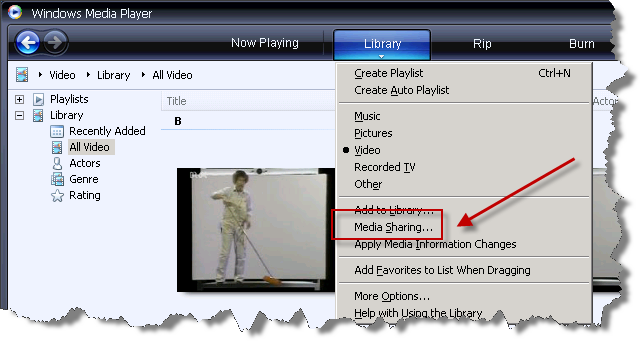
  2. Go to Library / Media Sharing…Media Sharing
  3. Now it’s straight forward:a) Check Share my media to b) Select your Xbox 360c) Click AllowMedia Sharing Dialog
  4. Finally, don’t forget to check out the Customize button which will open a dialog for some more fine tuning (what kinds of media to share, what ratings to share, etc.)

Now got to your Xbox 360 and enjoy your h.264 streamed media.

There are a few point’s I haven’t found out how to resolve, yet.

  1. The registry hacks don’t include .mkv file extensions. Also both hacks could be combined into one. I simply haven’t spend time in this yet.
  2. The 360 won’t show any thumbnails for the h.264 encoded files. Not sure if this is related to the XNE or the Media Player. This might worth some more investigation.
  3. The 360 does not show the length of the media file. It does so for .avi files, so this might be automatically answered once 2. is answered.