For quite a time, I monitored the openHAB project. Eventually, I found some time to test it out and tried to set up some of my existing home automation hardware with openHAB.
Therefore, I decided to set up my EZControl XS1 as a very first testbed.
Learning it the Hard Way
Before digging into the details, I’d like to share some of my experience during my very first hours with openHAB.
First of all, the contributors (currently counting 38) have done a great job in documenting the project. Installation and configuration does work quite well. The same for the basic setup of the development environment (e.g. in the case you want to implement an own binding).
Unfortunately, there are many details you need to know to get the system up and running, not being offered at a glance. You have to dig into groups, the wiki, demo files and perform a lot of trying, experience a lot of frustrating errors. Once you figured out how it works, it is not hard to remember. Done once, some of the issues are that simple, that it is clear why they are not mentioned in the wiki at all. Unfortunately, if you haven’t dealt with openHAB before, you have to learn it the hard way.
Not to forget, here’s a list of sources you definitely need to check in case you stuck with your very first setup:
Definitely, do not miss the last one. Many of your questions will be answered in the examples wiki, though. Still, some details might be missing, but that’s the place to check first.
Said that, there’s no critics about the documentation. It’s great, you just see it’s written by those who implemented it. And as such, one sometimes forgets about the trivial bits and bytes one need to know to start.
Setting up the EZControl XS1
Most devices I run on my EZControl are sensors from the ELV FHZ 1×00 System and intertechno wireless receivers.
For my convenience, I uploaded the configuration app to my internal web server though.
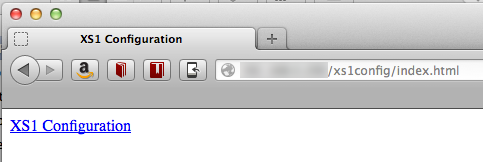
For now, I am only interested in the sensors available at the sensors tab.
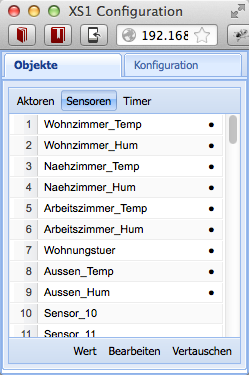
Iwanted to be independent from the data structure to set up the XS1 with openHAB. Therefore, the only thing you need to know, is how you named the sensors, though.
Switches
Before starting, make sure the HTTP binding is installed as it is used both, for switches as well as for sensors.
To address switches, you can use the REST interface of the XS and address the switches directly, you simply need to know the number of the switch being used within the query parameters such as number=2 within your *.items configuration file..
Switch Switch_Balcony_gBalcony "Balkon" (gBalcony) {http=">[ON:GET:http://192.168.0.242/control?cmd=set_state_actuator&number=2&function=1] >[OFF:GET:http://192.168.0.242/control?cmd=set_state_actuator&number=2&function=2]" }
Sensors
Sensors can be fetched from the ES1 using HTTP binding as well. Therefore, I pick up the XML output from the ESZ, in my case provided at http://192.168.0.242/xml.
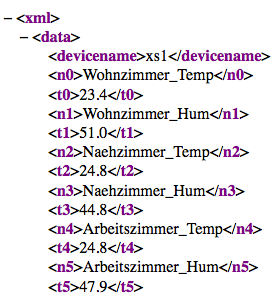
To pick a corresponding value of a sensor, I’ve created a XSL transformation
<?xml version="1.0" encoding="UTF-8" standalone="no"?>
<xsl:stylesheet xmlns:xsl="http://www.w3.org/1999/XSL/Transform" version="1.0">
    <xsl:output indent="yes" method="xml" encoding="UTF-8" omit-xml-declaration="yes"/>
    <xsl:template match="/">
        <xsl:value-of select="xml/data/*[text()='Arbeitszimmer_Temp']/following-sibling::node()"/>
    </xsl:template>
</xsl:stylesheet>
The XSL is quite simple, picking up he value from the next node after the node with the given sensor name. That way, structural changes in the XS1 setup or even a replacement of a sensor do not affect the openHAB configuration.
Create a XSL for each sensor value, you plan to use within openHAB and place them into the transform folder under configurations in the openHAB folder structure.

Again in the *.items configuration file, using the HTTP binding, I pick up the XML for each node and apply the transformation provided, resulting in a single value.
Number Temp_gOffice "Temperatur [%.1f °C]" (gOffice) { http="%lt;[http://192.168.0.242/xml:10000:XSLT(Arbeitszimmer_Temp.xsl)]"}
Number Hum_gOffice "Feuchtigkeit [%.1f %%]" (gOffice) { http="<[http://192.168.0.242/xml:10000:XSLT(Arbeitszimmer_Hum.xsl)]"}
While this works quite well, the XML is fetched from the XS1 for each value node. Looking forward for version 1.3 of openHAB, there is planned to provide a cache, so the XML would be fetched only once while the binding would fetch the data from the cache.

Done once, adding new sensors or switched using the XS1 takes just a few minutes. Changing the .*items configuration by adding new HTP bindings, copying and modifying the XSLT and adding of course adding the sensors and switches to the XS1.
