I do not want to see this web content on Yosemite

For a couple of weeks I now this really annoying message during the start up  of my Yosemite installation.

To view this web content, you need to install the Java Runtime Environment.

If I do follow the instructions of the pop up, I usually land on the Java site.
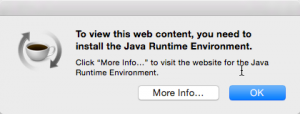
To view this web content, you need to install the Java Runtime Environment.As I develop on a regular base, I have the latest version of Java already installed (right no it should be version 8u25). Therefore, nothing to do.

I case you thought of installing Apple’s Java version for Mac. That’s  IMHO not the way to solve the issue. You might cure the symptoms, however, you will not fix the root cause for this issue.

To get rid of the message, you need the find the root cause. In my case it was the attempt to try Facebook’s video chat some weeks ago. That was the only one installation I performed since I receive this message. Even though, I disabled the add-on in Firefeox, the message kept showing at start up.

To get finally rid of the message head straight to the terminal and enter

launchctl list

In case you wonder that launchctl does, check the manpage which says

launchctl interfaces with launchd to load, unload daemons/agents and generally control launchd. launchctl supports taking subcommands on the command line, interactively or even redirected from standard input. These commands can be stored in $HOME/.launchd.conf or /etc/launchd.conf to be read at the time launchd starts.

Anyway, you shot not get a list of off all jobs loaded into launchd. There ckeck if you can find com.facebook.videochat.{username}.updater in this list. Wondering what this is? It’s some kind of Facebook-collects-your-data thing. Honestly, I don’t want to know much more about what it does, I just want to get rid of it.

com.facebook.videochat updater

Check out

ls ~/Library/LaunchAgents/ | grep facebook

You should get something like com.facebook.videochat.{username}.plist.
Now run

launchctl unload ~/Library/LaunchAgents/com.facebook.videochat.{username}.plist

followed by

launchctl remove ~/Library/LaunchAgents/com.facebook.videochat.{username}.plist

You might want to run the following command instead

launchctl remove com.facebook.videochat.{username}.updater

You now can delete the property list file

rm ~/Library/LaunchAgents/com.facebook.videochat.{username}.plist

Now check for the FacebookUpdate application  via

ls ~/Library/Internet\ Plug-Ins/ | grep Facebook

Again, you should fine something like FacebookVideoCalling.bundle. Send it to /dev/null via

rm ~/Library/Internet\ Plug-Ins/FacebookVideoCalling.bundle

Now there still something to get rid of by calling

rm -R ~/Library/Application\ Support/Facebook/

Et voiá, your are done. The cause for the message should be gone by now.

To get rid of the JAR file itself use Spotlight to looking for FacebookVideoCalling. You should find something like FacebookVideoCalling_v1.6.jar. Use Finder then to get rid of it.
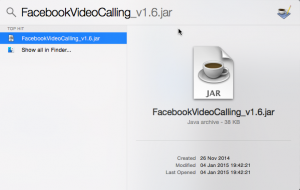
Finding FacebookVideoCalling_v1.6.jar That is, by the way, the only thing Facebook suggest to uninstall the videochat. Not only, the sort of infect you with the above updater, they also do not provide useful information for uninstalling the stuff.

The fact, Facebook’s add-on installed this nasty updater is quite annoying. Adding a job to the launchd for an Firefox add-on is quite questionable. Even more annoying that this one slipped through the cracks.
How to get the favicon.ico from any Page

Recently, I was in the need of retrieving the favicon.ico file from a website. As I had to process the file programmatically and render it on a website, it would have been quite a lot of manual work to get the .ico file and make sure the browser does render it in the correct way. After digging around, I learned about a secret URI probably provided once by Google’s social bookmarking service Google Shared Stuff. While Google Shared Stuff was launched in 2007,  it was already discontinued in 2009. However, this one URI seems to work perfectly maybe because it is still used within Google extensively.

The Secret

To get the favicon.ico file from any arbitrary page you simply have to use an URI using the following pattern:

http://www.google.com/s2/favicons?domain=www.example.org

Eventually, this URI will provide you the following image: Image retrieved using http://www.google.com/s2/favicons?domain=www.example.org

How it Works

Some More examples to see how it works:

  • Facebook
  • TechChrunch
  • aheil blog
  • Google
  • dotnetpro Magazine
  • heise.de
  • Google+

As most of the sites do keep their favicon.ico file right in the root of the web site, others like Google don’t. Actually, you might find Google’s plus icon located at

https://ssl.gstatic.com/s2/oz/images/faviconr2.ico

While this is probably not a problem retrieving the favicon.ico file using the standard URI at all, the secret URI provides one major advantage: you’ll get the icon as a nice 16×16 PNG file, ready to be rendered in any <img> tag right away.

The Risk

As every time building up on a Google service as I did before, it might disappear tomorrow without notice leaving your site with quite a bunch of 404s though. Even worse, as it seems there is no official support for this URI, there won’t be any notice or deprecation period until switched of as done for other services like Feedburner.

Visual Studio 2012 Upper Case Menus

I am probably the last person in the .NET community who figured out how to disable the Visual Studio 2012 Metro design upper case menus. I haven’t had a chance to work a lot with Dev11 yet, so I was not bothered too much by the new design. After working a couple of hours with the new IDE, I was quite annoyed by the new upper case menus.

Visual Studio 2012 Upper Case Menus

It seems that Richard Blanks was the first who figured out how to disable the upper case menus in VS 2012, looking nice and capitalized.

Visual Studio 2012 Capitalized Menus

As I love to do things automatically when possible and hate to fiddle with the Registry Editor, I set up the registry key to change in a small script. Just rename it to .reg and double click the file.

Windows Registry Editor Version 5.00
[HKEY_CURRENT_USER\Software\Microsoft\VisualStudio\11.0\General]
"SuppressUppercaseConversion"=dword:1

If you create the file manually, keep mind to save it in ANSI encoding, as Unicode scripts are not merged at all.

Deutsche Rechtschreibung im Windows Live Writer

Windows Live Writer dürfte auf der Windows Plattform derzeit eines der beliebtesten Blogging-Tools sein. Mit Anbindung an die meisten Blogging-Plattformen und zahlreichen Plug-Ins lässt das Tool kaum wünsche offen. Allerdings ist bisher keine deutsche Rechtschreibprüfung vorhanden. Anstelle dessen konnten unterschiedlichste English-Derivate (es gibt eben Englisch und Englisch) ausgewählt werden. Die Möglichkeit die deutsche Rechtschreibkorrektur zu aktivieren oder eine zusätzliche Sprache hinzuzufügen fehlt bisher gänzlich.

Die Lösung ist recht jedoch einfach. Vorausgesetz auf der betreffenden Maschine ist Office 2010 (32-bit) mit deutscher Rechtschreibkorrektur installiert. Ein Blick in den Ordner

C:\Program Files (x86)\Microsoft Office\Office14\PROOF

sollte Gewissheit verschaffen. Hier gilt es die Dateien

MSSP7GE.DLL
MSSP7GE.dub
MSSP7GE.LX

in den Ordner

C:\Program Files (x86)\Windows Live Writer\Dictionaries

zu kopieren. Nach einem Neustart von Windows Live Writer sollte nun unter Options / Spelling auch der Eintrag German (Reform).

Deutsche Rechtschreibung im Windows Live Write aktivieren

The GPHWStatus Hack for the WWAN 5520 on a Dell D830

I just got a new (old) WWAN 5520 3G/UMTS card/modem for my Dell D830. Eventually, the card did not work out of the box without a hack. In the following  I will show what you need to do, if you want to get the card running in your Dell D830 (or maybe also any other older Dell Latitude or XPS machines).

WWAN 5520 First you need the card of course. Your Dell Latitude D830 (and many other older Dells) already has an empty slot for this card. Opening the cover (i.e. removing the keyboard) will reveal the slot for the card on the lower left of the case. The antenna cables should be already there, probably with a small protection on their end. It took me a few moments to realize which cable to plug where. One is marked white and the other is marked black, and the connectors show a large white and black arrow (actually, this was so obvious that I haven’t realized this right away).

Plug it in, close the lid and turn the computer on again (hopefully you did shut it down before). After starting Windows (if you read this blog you know we area talking about Windows 7 64-bit), Windows Update will take over – or at least it will try and glorious fail in finding any drivers.

Driver Software Installation

Never give up, never surrender as we are talking about Dell here. And as I learned recently about the missing touchpad driver, there might be a driver for everything else as well. Once again we go for a 64-bit driver for Windows Vista. In this case the Wireless Mobile Broadband MiniCard driver for Windows Vista 64-bit will do the job.

SNAGHTML7fabea

At Dell’s download site for communication drivers, there is a whole bunch of carrier specific drivers (Vodafone, Cingular, Telus and other carriers, I have never heard about before). It is not related to any carrier, so ignore anything with a carrier name in it.  Just to be sure, the driver we are looking for here is R159896.EXE.

The SIM card lives directly in the battery slot as you can see at Dell’s D830 Service Manual. Make sure the cut off corner goes the correct orientation and if you are using a contact (pay monthly) card, make sure the card is protected by a PIN. The battery slot is not secured, and if you don’t watch your laptop all the time… well, you never know. Maybe worth to know, the SIM in your Dell does not support hot-swapping, i.e. unlike e.g. the iPhone 3GS, you have to shut down your laptop before you insert the card.

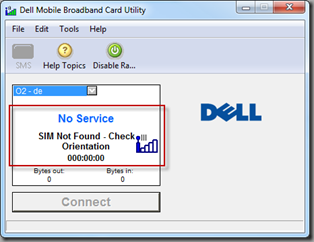
Once built in, installed and inserted every bits and pieces, the Dell Mobile Broadband Card Utility will let you know:

No Service
SIM Not Found – Check Orientation

No, don’t turn off the laptop again, the orientation probably is right. There is a (not so obvious) solution to that.

No Service

Start the Registry Editor (regedit.exe) and navigate to

ComputerHK_LOKAL_MACHINESOFTWAREWow6432NodeNovatel WirelessNextGenCommon

and change GPSHWStatus to 1. This means, the GPS chip on the card gets activated. For whatever reason, the chip is deactivated by the Dell drivers by default. However, if you activate the GPS chip, the entire card will be activated. It might be interesting to dig a bit deeper here, but for now it’s enough to know that it works.

GPSHWStatus Hack

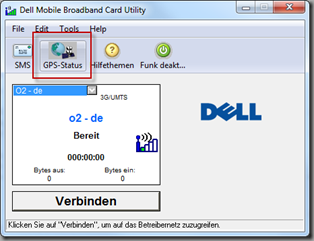
Either reboot, or just quite and start the Broadband Card Utility again.

GPS-Status

By applying this GPHWStatus hack, not only the 3G card/model will now work, also the GPS hardware will be enabled and should available from the tool.

Fixing Wrong USB Devices in Windows 7

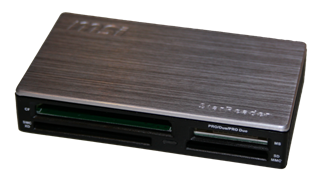
If you experience issues with a USB device not being recognized under Windows 7, there might be a simple solution to solve this. For example the MSI USB 2.0 All IN 1 Card Reader aka MSI StarReader is recognized as eHome Infrared Receiver (USBCIR) using Windows 7. The device works great using Windows Vista or even the Windows 7 pre-release versions. Unfortunately, with the final Windows 7 the device just won’t work.

MSI USB 2.0 All IN 1 Card Reader A quick look into the Device Manager will show that the device is recognized as eHome Infrared Receiver (USBCIR). When connecting the first time Windows 7 won’t give any notice that the installation of the driver failed or that the device is not ready to use. It will simply not work.
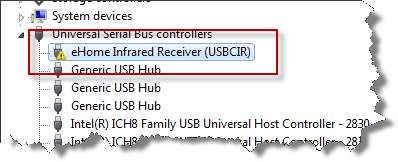
Device Manager

This seems to be known problem, however, there is no need to wait for a Software Update from Microsoft. The solution is to manually choose the device.

  1. Start Device Manager
  2. Right-click the eHome Infrared Receiver (USBCIR) entry
  3. Select Update Driver Software
  4. Choose Browse my computer for driver software
  5. Choose Let me pick from a list of device drivers on my computer
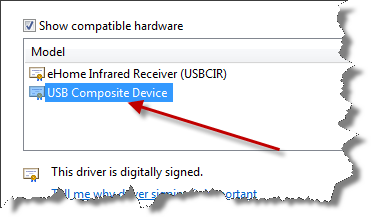
  6. Make sure the Show compatible hardware box is checked
  7. Select the USB Composite Device and you are done

Show compatible hardware

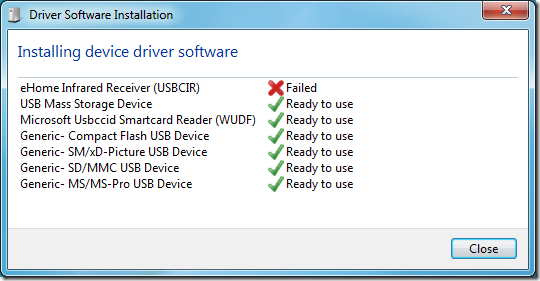
After a few seconds the driver should be installed and the device should be ready.

Driver Software Installation

Broken VMware Workstation Network Adapter

After upgrading Windows Vista to Windows 7 you might encounter an issue with VMware Workstation and its network adapter.

VMware Workstation Error Message


When setting up a NAT or bridged network connection in VMware Workstation it shows a message telling

The virtual network drivers on the host are incompatible with the installed VMware application. Expected version 5. Please reinstall the product. Failed to connect virtual device Ethernet0.

Make sure all your virtual machines are powered off and quit VMware Workstation. Open a command shell as administrator and follow the steps below.

First cd %windir%system32drivers, check for the file vmnetadapter.sys, right-click it, select Details and check its version. It should be 4.0.2.0. If the file is not there,

cd “%ProgramFiles(x86)%VMwareVMware Workstation”

rundll32 setupapi,InstallHinfSection VMnetAdapter1.Install 128 %CD%netadapter.inf

vnetlib — install devices

This will install the required adapters and devices. Do again a cd %windir%system32drivers and check for the First cd %windir%system32drivers, check for the file vmnetadapter.sys file.

vmnetadapter.sys

After a reboot of the host system, the NAT settings for the VMware network adapters should work again. Switching to bridged mode will probably result in another message.

VMware Workstation Error Message

Reason for the message saying

The network bridge on device VMnet0 is not running. The virtual machine will not be able to communicate with the host or with other machines on your network.
Failed to connect virtual device Ethernet0.

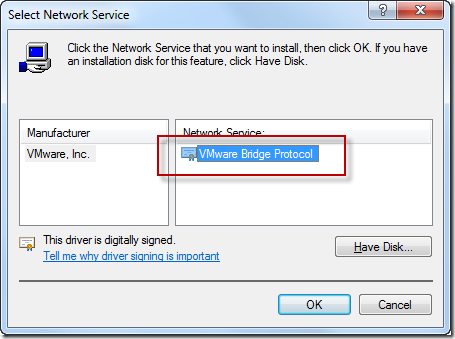
might be the missing VMware Bridge Protocol on the according host network adapter.

Got to Network and Sharing Center and select Change adapter settings. Choose the network connection you want to use with your VMware network adapter, right-click, select Properties, Install, Service and finally Add. This will allow you to select the VMware Bridge Protocol. In case the entry is not listed, select Have Disk… and navigate to %ProgramFiles(x86)%VMwareVMware Workstation.

VMware Bridge Protocol

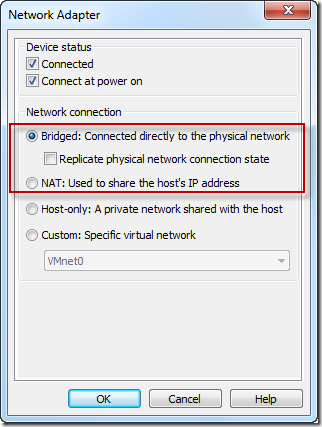
After installing the VMware Bridge Protocol restart the VMware Workstation and choose the bridged mode for the network adapter.

VMware Network Adapter

The Ultimate Windows Server 2003 Media Hack

Doh, if you are going to use your Windows Server 2003 as a streaming server for your Xbox 360, you might be in trouble. For a while I went with a rather sophisticated solution, running a Windows XP Media Center within a Virtual Server on my Windows Server 2003. The solution is not the desired one and as Windows Media Center and the Media Center Extender within Xbox 360 have some trouble in streaming h.264 encoded movies files, I had to dig a bit deeper.

Before you go one, please be aware of the following disclaimer:

The following is given under a “works on my machine” premise. The proposed approach is based on my very personal attempts and comes a”as is”. If you try to attempt the following steps, you do it on your own risk. It is not supported by Microsoft, and hey, in case you brick your box don’t expect any support from Microsoft. Don’t blame it to me either as you did it on your own risk, but let me know as it could be fun, tough.

There are several ways to share media with your Xbox 360. The easiest ways is to check out http://www.xbox.com/pcsetup/. After determining your OS, you will be guided through the best way to share media. Bad luck if you work on a Windows Server 2003, though. Not supported, you will be told.

The easiest way is to share media over Windows Media Player 11. Windows Server 2003 comes with Windows Media Player 10. But as we know the core of Windows Server 2003 is somehow Windows XP and therefore there must be away to install WMP 11 on Windows Server 2003. If you google for it, you will come along a dozen hacks and workarounds and most of them won’t work.  Recently, this guy called C:Amie posted some awesome hack C:Amie provided a new link to install Windows Media player 11 on Windows Server 2003. If you have time, go through it, if you are in a hurry, do it that way:

  1. Make sure your box is fully patched and Service Pack 2 is installed.
  2. Download Windows the Windows Media Player 11 installer for Windows XP.
  3. Download the automatic installer from C:Amie’s website.
  4. Run the automatic installer and extract it to any folder on your Windows Server 2003 box.
  5. Copy the previously downloaded wmp11-windowsxp-x86-enu.exe into the same directory.
  6. Go to the folder and run the INSTALL.CMD file.
  7. Follow the onscreen instructions.INSTALLER.CMDThe script creates a temporary folder on your C: drive called C:wmp11. There you have to change the compatibility mode of two files to Windows XP. Go to C:wmp11update1. and right click the update.exe file. Chose the Compatibility tab and check the Compatibility mode for Windows XP. Make the same for the update.exe file in c:wmp11update2.
    update.exe Properties Dialog
  8. Now go back to the command line window and press a key to continue and the simply wait.
  9. The software updater wills start after some time and after some more time you will end up with the UPnP for Windows Server 2003 dialog.UPnP for Windows Server 2003
    Check the Universal Plug and Play checkbox and select Next and then Finish.
  10. If everything went well, you will end up with Windows Media Player 11 on a Windows Server 2003. Hurray.Everything OK

But you remember that we want to stream h.264 encoded files to our Xbox 360, right? The good news is that Windows 7 will support h.264 natively. The bad news is that we work on a Windows Server 2003 right now.  With some work however, we can teach our Windows Server 2003 also to deal with h.264 encoded .mp4 files. All we have to do is to install some codecs and to apply some registry hacks.

  1. For the sake of simplicity, I took the K-Lite Mega Codec pack. It took the mega pack instead of the standard pack because Dirty Harry is using a .44 and not a .375. This might be reason enough.
  2. During installation select Profile 2. It’s the default profile without the players (you remember we want to stream anyway). Feel free to experiment with other profiles and custom settings.K-Lite Mega Codec Pack Setup Dialog
  3. When you come along the Select Additional Task step, don’t forget to scroll down and to check Make thumbnail generation possible for the following types. This will create the thumbnails in the Windows explorer and within the Windows Media Player 11.
    K-Lite Mega Code Pack Setup Dialog - Additional Tasks

At this point your Windows Media Player can play h.264 encoded files but your server is still not capable to share any kind of .mp4 files. They won’t show up in the folders monitored by Media Player until we apply some tweaks to the registry.

On my crusade I came along two registry patches. It seems that they did not work for everybody, however, nobody tried on Windows Server 2003. It worked for me after I installed bot
h of them.

  1. Download the first registry patch, rename to .reg and install it.
  2. Download the second registry patch, rename to .reg and install it.
  3. Reboot to apply the registry changes.

Now, out Windows Server 2003 is capable to stream h.264 encoded media files. The previous patches will now cause that Windows Media Player 11 will add all kinds of .mp4 or .m4a files within the monitored folders. Adding these folders to be streamed is straight forward.

  1. Go to  Libary /Add to Library…Windows Media Player 11 - Library Menu
  2. Add all kinds of folders that should be streamed to your Xbox 360. The media types will be organized automatically, so movies, music files and images will be shown in the corresponding tabs in the NXE.Add to Library Dialog
  3. In some rare cases (and I know what I am talking about as I encountered this rare case) all your mp4 files won’t show up in the movie folders. In this case select Library / Other and check if the files are shown there.Windows Media Player 11 - Other  MediaIf you find all your files here, something went terrible wrong with your media library. Calm down, there is a easy workaround (FWIW: if you already share media, stop sharing as the following won’t work).Go to C:Documents and Settings[YouProfileName]Local SettingsApplication DataMicrosoft and delete the Media Player folder. This will wipe out the whole media library for this computer. Restart from 1. and everything should be green now.Media Player Library

Now, where everything is nicely organized, indexed and monitored, we are ready to share our media with the Xbox 360.

  1. Turn on your Xbox 360.No kidding, you won’t be able to turn on sharing if the 360 is not on at that point of time.
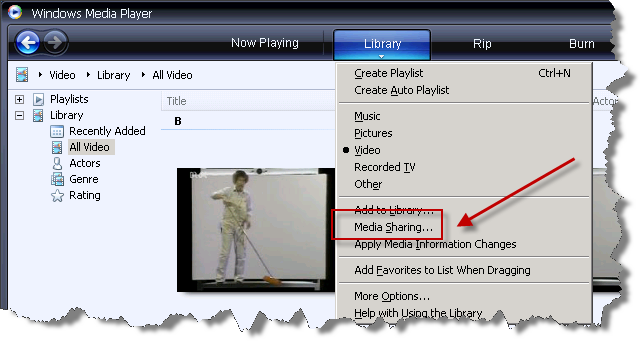
  2. Go to Library / Media Sharing…Media Sharing
  3. Now it’s straight forward:a) Check Share my media to b) Select your Xbox 360c) Click AllowMedia Sharing Dialog
  4. Finally, don’t forget to check out the Customize button which will open a dialog for some more fine tuning (what kinds of media to share, what ratings to share, etc.)

Now got to your Xbox 360 and enjoy your h.264 streamed media.

There are a few point’s I haven’t found out how to resolve, yet.

  1. The registry hacks don’t include .mkv file extensions. Also both hacks could be combined into one. I simply haven’t spend time in this yet.
  2. The 360 won’t show any thumbnails for the h.264 encoded files. Not sure if this is related to the XNE or the Media Player. This might worth some more investigation.
  3. The 360 does not show the length of the media file. It does so for .avi files, so this might be automatically answered once 2. is answered.

High-Res Skype

Go and get some good webcam (I use the Microsoft LifeChat NX-6000), navigate to the Skype user settings

 C:\Program Files\Users\[YourWindowsProfile]\AppData\Roaming\Skype\[YourSkypeProfile]

open config.xml and follow the instruction by Phillip Torrone, seeking for the <Video> tag. I am using Skype version 3.6.0.248 and the configuration file looks quite different now. However, adding the <CaptureWidth> and <CaptureHeight> tag works fine as well with this version since it was especially introduced with version 3.6. At the end your configuration file should look similar to this one.

Skype High-Res Hack

I re-started Skype and it looks like the other side can see me in 640×480 now.

WRT54GSV4 Wireless Bridge

After switching from WEP to WPA2, of course I had to update several XP and Vista machines. However, the 360 made most trouble since I used a D-Link 700AP before which was configured as a wireless bridge. Since I run a Linksys WRT54GS as gateway, it seemed to be the easiest way to get a second device of the same kind to be set up as wireless bridge being flashed with an alternative firmware. However, I realized that there is a endless number of devices in this series. After getting the device, I had to figure out, the new device is version 7. Due to an change in the manufacturer firmware, the ROM size of the device was continuously reduced. At this time I thought about the fact, getting a WRT54G (which is the old hardware factor and Linux based) might have been the better choice. Now I simply replaced the existing device with version 4 with the new one. and the old one providing 4 MB of RAM became the wireless gateway.

There are a couple of alternative firmware projects for the WRT54GS. After reading though a couple of posts in various forums, it seemed that OpenWrt is the best choice. In addition, X-Wrt seemed to be suitable for easy setup. During the setup of OpenWrt, I encountered several problems ending up in my router being bricked. So I had to recover the device using TFTP and the original firmware.

After several failures and digging a bit more I found more and much better documentation on DD-WRT including documentation for setting up wireless bridges. While v23 does only support WPA2-mixed mode, I switched over to v24 RC4 which finally supports WAP2 Personal.