Crosspost WLW Plug-In

Looking around for some cross-post plug-in for a while, I came along this plug-in for Windows Live Writer. Nice idea, but it actually does not load in WLW.

WLW Cross-Post Plugin

Right now, it is the only plug-in I found so far. I filed the bug and now I am waiting for any response. If nothing happens I have to have a look myself. Thanks for putting it under Ms-PL. If anybody get this plug-in working, let me know.

Distributed Version Control at the DSS Evaluation Phase

This post will give some insight into the distributed version control ad the Distributed and Self-organizing Systems Group. Usually, I am keen about trying out new things, e.g. distributed version control systems such as GIT, Mercurial or Bazaar. However, currently the group’s infrastructure is set up with Subversion as internal revision control system.

For the next few months we will start an evaluation phase with the students, working on the WebComposition/DGS approach, based on a distributed version control concept. Core components of the WebComposition project are branched into a dedicated student branch where all students can commit changes. Based on this branch each student creates his or her private branch for local changes.

The coordinator (usually some DSS staff) takes care of regular forward integration of the core components into the student branch. Each student in turn is responsible for forward integration into his or her own branch.

Changes can be submitted after testing and evaluation back into the central student branch by each student performing backward integration. The group working on the project has to agree in the LAKS meeting on the change before backward integrating the updates.

The coordinator finally takes care if these changes are also backward integrated into the original project trunk.

Distributed Version Control at the DSS

Step 1: Create a local working copy

First, look for a place where to checkout the working copy. Create a folder, e.g. branchesstudents and use Tortoise to checkout a working copy.

Initial Checkout

Select the student branch and the local folder where to store the working copy to start the checkout.

Branch

After the checkout is finished, you should will have a local working copy of the student branch.

Checkout Complete

Step 2. Create a private branch

Select ‘Branch/tag’ from the context menu of your working copy.

Branch

Use the path of your private project within the repository to create the branch.

Copy (Branch/Tag)

Step 3: Forward integrate changes from the student branch

When the student branch was updated you might be interested in getting these updates into your private branch. To forward integrate these changes into your private branch, select the folder where your local working copy lives, and use the Tortoise context menu to select ‘Merge…’.

Merge Branches

Select the repository folder you want to forward integrate Probably this will be the student branch – the paths in the screenshot below will thus differ from yours. Select the revision from where the forward integration should start. Now select the revision where it should end. Usually, this will be the head revision. After merging submit the changes of your working copy to the repository and you are done.

Merge

To get some more information on Subversion, or to learn how to perform the steps above on command line, refer the Subversion book.

Working on the WebComposition/DGS Documentation

These days I won’t have much time for blogging since I am working on the refresh for the WebComposition/DGS web site. The final site is not online, yet. However, I can give you a first glance how the new site will look like. Stay tuned.

WebComposition Refresh

The documentation will cover the most vital design aspects of the WebComposition/DGS approach as well as all necessary information to write your own extension for the service. I am working hard to make the live demos available as soon as possible as part of the site.

Got Root #4

It is finally done. After some exiting days I moved my web site, blog and domain to my new server. A few seconds ago, I was informed about the succeeded the domain transfer. Now I am just waiting that all the DNS entries are updated. Since everything is already set up and prepared for the domain name, the overall project is accomplished.

In to make sure such a relocation goes off without a hitch, just follow a few simple rules

  1. Terminate the contract with our current provider, best in written form or by fax
  2. Inform your current provider about the domain transfer
  3. Request the domain transfer with your new provider
  4. Set up your Web applications on the new site – test it!
  5. Make the site listening to the domain name to be moved.
  6. Make sure you have some mail server set up already listening to the domain name being moved.

That’s all.

Got Root #3

In this article I provide the final steps how to virtualize a Windows Server 2008 installation.

Install Windows Server 2008

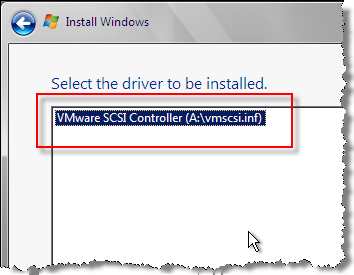
You probably run into the same problem that Windows Server 2008 won’t be able to recognize the virtual hard disk you have planned to installed it on. Get the corresponding SCSI drivers as floppy image from the VMware site. Select the image and connect the drive.

Mounted SCSI Drivers

Now say ‘Browse‘ and choose drive ‘A:‘ – don’t forget: After selecting the .flp image you also have to connect the drive. Otherwise Windows cannot read the device.

VMware SCSI Drivers

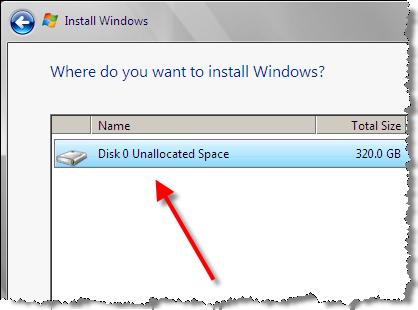
Click on ‘Next‘ and after a few seconds the hard disk will be found. The currently available drivers for Windows Server 2003 seem to work fine also for Windows Server 2008.

Virtual HDD for Windows Server 2008

Installing the VMware Tools might be a good idea. You can find the image at /usr/lib/vmware/isoimages/windows.iso or just install them from the VMware management console’s menu. While the image is mounted go to ‘Device Manager‘ and install the drivers for the network adapter which probably does not work yet.

Installed Network Drivers

Got Root #2

In a previous post, I told about he first steps in virtualizing a Windows Server 2008. In this article I describe how to proceed after, the request for my own RIPE subnet was approved. Now I can concentrate on the next point: Installing VMware. Since I want to set up this machine for visualization, I have to perform a few steps first. That way, this post will be mostly about my fight with Debian Linux which is the host system.

After logging in, I just realize that updating the package database might be not the worst idea. Consequently, I do so and install some Norton Commander like tool for real men

apt-get update
apt-get install mc

This actually makes things much easier.

Now, I have to activate IP forwarding in /etc/sysctl.conf by the adding

net.ipv4.ip_forward=1

and bringing the additional IP on the host system by adding

up ip add 192.168.1.1/29 dev eth0

to /etc/network/interfaces. Additionally, I have to add some host-route (by using my gateway 192.168.0.1) so my new subnet is reachable by adding

pointopoint 192.168.0.1 

to eth0 in /etc/network/interfaces. Installing iproute by a

apt-get install iproute 

restarting the interface by calling

/etc/init.d/network restart

finally makes my IP ping-able. Quite a fight so far if you don’t do this on a regular base. Additionally I installed the powersave package and reconfigured several settings to increase the performance in /etc/powersave.

I just got the tip to put my virtual machines to the separate disc. Since I have one spare 400GB disc. I have to create some partition and to format it.

cfdisk /dev/sdb mkfs -t ext3 /dev/sdb1

Let’s create some directory for the virtual machines and mount the disc

mkdir VMs
mount -t ext3 /dev/sdb1 /Vms

Now some final tweak at /etc/fstab by adding

/dev/sdb1 /VMs et3 defaults 0 0 

and I am done.

Finally I start installing the VM. I was pointed to some German How-To written by Till Brehm which is includes quite detailed instructions.

Some prerequisites are required before I start. I do the required 220 MB update by

apt-get install linux-headers-`uname -r` libx11-6 libx11-dev x-window-system-core x-window-system xspecs libxtst6 psmisc build-essential

VMware can be downloaded from http://www.vmware.com/download/server/. I skip the management console since I will use it on my Windows workstation and focus only on the server and management interface binaries using:

wget http://download3.vmware.com/... tar xvz VMware-server-*.tar.gz cd vmware-server-distrib ./vmware-install.pl

Now, I simply accept the defaults for the following installation. only at one point I had to tell the script that my virtual machines will be located at /VMs. No I have to continuing with the management interface

tar xvfz VMware-mui-*.tar.gz
cd vmware-mui-distrib
./vmware-install.pl

The Web-based management interface seems to work perfectly after installing.

VMware Management Interface

After installing the management console on Windows I run into some trouble. During compilation of the corresponding modules, the VMware script was not able to start the inetd service. Therefore, I was not able to connect to the VMware server. After restarting the service manually it worked perfectly and I set up my virtual machine.

VMware Management Console

Now, I have to copy the installation files for the Windows Server 2008.


High-Res Skype

Go and get some good webcam (I use the Microsoft LifeChat NX-6000), navigate to the Skype user settings

 C:\Program Files\Users\[YourWindowsProfile]\AppData\Roaming\Skype\[YourSkypeProfile]

open config.xml and follow the instruction by Phillip Torrone, seeking for the <Video> tag. I am using Skype version 3.6.0.248 and the configuration file looks quite different now. However, adding the <CaptureWidth> and <CaptureHeight> tag works fine as well with this version since it was especially introduced with version 3.6. At the end your configuration file should look similar to this one.

Skype High-Res Hack

I re-started Skype and it looks like the other side can see me in 640×480 now.

Got Root #1

Today, I finally got my root server. this article will be the first one in a series of articles showing how to virtualize a Windows Server 2008 on a remote system.

Got Root

My very first action was to request a new RIPE subnet. Unlike in your private LAN, you cannot simply assign randomly some IP to any machine. Nothing else I can do until the subnet is assigned.