Quickstart with AWStats and IIS 7

AWStats is a free, Perl-based analyzer for log files. To get results quickly on a Windows Server 2008 with IIS 7 you only have to follow a few steps. These are not well documented in the AWStats documentation and require some time of research. This post will show you how to set up AWStats with IIS7 in only a few minutes.

  1. Install Perl, e.g. ActivePerl. There are 32-bit and 64-bit versions available. Make sure that Perl is added to your PATH environmental variable. The ActivePerl installer usually provides this option during the installation.
  2. Install AWStats. Remember the path AWStats is installed. Paths used below are based on the installation folder of AWStats. In this example we use c:awstats.
  3. Run the configuration script at c:\awstatstoolsawstats_configration.pl. Follow the on screen instructions. This will create a default configuration file in c:\awstatswwwrootcgi-bin e.g. called awstats.www.example.org.config. The site name www.example.org depends on whatever site name was provided while running the script. When asked for the Apache Web server path type in none.AWStats Configuration File
  4. Open the configuration file awstats.www.example.org.config with any text editor of your choice.
  5. AWStats already supports IIS, however, it is required to tweak the config file. First change the entry for LogFile. Log files for IIS might be found at c:inetpublogsLogFilesW3SVCNNN where NNN is a different number for each web site, IIS creates log files for. Change the entry toLogFile=”c:awstatstoolslogresolvemerge.pl c:inetpublogsLogFilesW3SVC1*.log |”

    This will merge all log files for a site provided by IIS. Adjust the paths corresponding to your installations and desired log file folders.

  6. The AWStats configuration file offers the possibility to set the LogFormat to IIS (LogFormat=2), however, the log entries provided by a standard installation of IIS 7 won’t match. The AWStats documentation recommends to change the settings of IIS. The change will take effect only after restarting the Web site and is only valid for entries after that particular moment. Consequently, this is not an option if you are going to analyze the logs of the last 12 months where the original settings were used. To make AWStats work with the standard log format of IIS 7 change the LogFormattoLogFormat=”%time2 %other %method %url %other %query %other %host %other %code % %other %other %bytesd”
  7. Change SiteDomain and HostAliases to meet the settings of your site.
  8. Change to c:awstatswwwrootcgi-binand runawstats.pl -config=www.example.org

    This will build the statistics database for AWStats.

  9. To create output runawstats.pl -config=www.example.org –output –staticlinks > …example_org_stats.html
  10. Not that example_org_stats.html is created one folder up. In case you do miss this, the output will not work correctly until you adapt the entries for DirCgi and DirIcons in the configuration file.
  11. The output file is now located in c:awstatswwwroot. You might want to create a Virtual Directory or set up a Web site to view the reports via the Web or your Intranet.AWStats Output

Repeat steps 3-7 fore each site you want to create reports for. Repeat step 8 and 9 every time you want to create a new report.

External Applications in MWPSK

My Web Page Starter Kit is a lightweight content management system, entirely written in ASP.NET 2.0. It comes with a wide range of components that can be easily arranged and set up. However, it seems there is no possibility to include external application into the navigation structure of MWPSK.

In the following example you will learn how to integrate a application using the URI http://blog.example.org into a website using MWPSK at http://www.example.org.

Log into the site and navigate to select Administration / Pages and Navigation. Select New Page to create a new

My Web Page Starer Kit - New Page

Choose a virtual path such as blog. This will allow you to use a new URI in the form of http://www.example.org/blog.aspx.

Now open the global.asax file located in the root folder of your MWPSK installation and add the following method.

void Application_BeginRequest(object sender, EventArgs e)
{
    if (HttpContext.Current.Request.Url.ToString().ToLower().Contains
         ("www.example.org/blog.aspx"))
    {
        HttpContext.Current.Response.Status = "301 Moved Permanently";
        HttpContext.Current.Response.AddHeader("Location",
            Request.Url.ToString().ToLower().Replace(
                "www.example.org/blog.aspx",
                "blog.example.org/"));
    }
}

This will cause an URL rewrite of the HTTP-request, which is then sent to the external application at http://blog.example.org.

Broken VMware Workstation Network Adapter

After upgrading Windows Vista to Windows 7 you might encounter an issue with VMware Workstation and its network adapter.

VMware Workstation Error Message


When setting up a NAT or bridged network connection in VMware Workstation it shows a message telling

The virtual network drivers on the host are incompatible with the installed VMware application. Expected version 5. Please reinstall the product. Failed to connect virtual device Ethernet0.

Make sure all your virtual machines are powered off and quit VMware Workstation. Open a command shell as administrator and follow the steps below.

First cd %windir%system32drivers, check for the file vmnetadapter.sys, right-click it, select Details and check its version. It should be 4.0.2.0. If the file is not there,

cd “%ProgramFiles(x86)%VMwareVMware Workstation”

rundll32 setupapi,InstallHinfSection VMnetAdapter1.Install 128 %CD%netadapter.inf

vnetlib — install devices

This will install the required adapters and devices. Do again a cd %windir%system32drivers and check for the First cd %windir%system32drivers, check for the file vmnetadapter.sys file.

vmnetadapter.sys

After a reboot of the host system, the NAT settings for the VMware network adapters should work again. Switching to bridged mode will probably result in another message.

VMware Workstation Error Message

Reason for the message saying

The network bridge on device VMnet0 is not running. The virtual machine will not be able to communicate with the host or with other machines on your network.
Failed to connect virtual device Ethernet0.

might be the missing VMware Bridge Protocol on the according host network adapter.

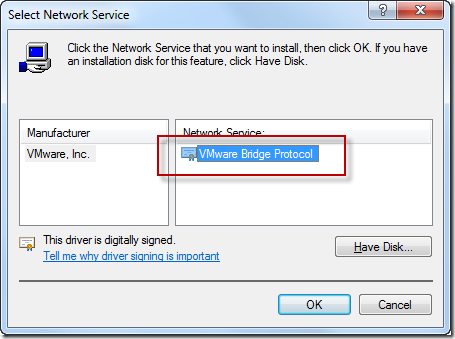
Got to Network and Sharing Center and select Change adapter settings. Choose the network connection you want to use with your VMware network adapter, right-click, select Properties, Install, Service and finally Add. This will allow you to select the VMware Bridge Protocol. In case the entry is not listed, select Have Disk… and navigate to %ProgramFiles(x86)%VMwareVMware Workstation.

VMware Bridge Protocol

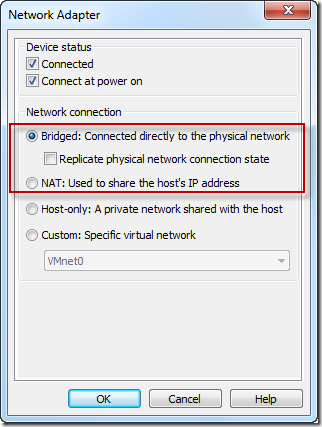
After installing the VMware Bridge Protocol restart the VMware Workstation and choose the bridged mode for the network adapter.

VMware Network Adapter

The Ultimate Windows Server 2003 Media Hack

Doh, if you are going to use your Windows Server 2003 as a streaming server for your Xbox 360, you might be in trouble. For a while I went with a rather sophisticated solution, running a Windows XP Media Center within a Virtual Server on my Windows Server 2003. The solution is not the desired one and as Windows Media Center and the Media Center Extender within Xbox 360 have some trouble in streaming h.264 encoded movies files, I had to dig a bit deeper.

Before you go one, please be aware of the following disclaimer:

The following is given under a “works on my machine” premise. The proposed approach is based on my very personal attempts and comes a”as is”. If you try to attempt the following steps, you do it on your own risk. It is not supported by Microsoft, and hey, in case you brick your box don’t expect any support from Microsoft. Don’t blame it to me either as you did it on your own risk, but let me know as it could be fun, tough.

There are several ways to share media with your Xbox 360. The easiest ways is to check out http://www.xbox.com/pcsetup/. After determining your OS, you will be guided through the best way to share media. Bad luck if you work on a Windows Server 2003, though. Not supported, you will be told.

The easiest way is to share media over Windows Media Player 11. Windows Server 2003 comes with Windows Media Player 10. But as we know the core of Windows Server 2003 is somehow Windows XP and therefore there must be away to install WMP 11 on Windows Server 2003. If you google for it, you will come along a dozen hacks and workarounds and most of them won’t work.  Recently, this guy called C:Amie posted some awesome hack C:Amie provided a new link to install Windows Media player 11 on Windows Server 2003. If you have time, go through it, if you are in a hurry, do it that way:

  1. Make sure your box is fully patched and Service Pack 2 is installed.
  2. Download Windows the Windows Media Player 11 installer for Windows XP.
  3. Download the automatic installer from C:Amie’s website.
  4. Run the automatic installer and extract it to any folder on your Windows Server 2003 box.
  5. Copy the previously downloaded wmp11-windowsxp-x86-enu.exe into the same directory.
  6. Go to the folder and run the INSTALL.CMD file.
  7. Follow the onscreen instructions.INSTALLER.CMDThe script creates a temporary folder on your C: drive called C:wmp11. There you have to change the compatibility mode of two files to Windows XP. Go to C:wmp11update1. and right click the update.exe file. Chose the Compatibility tab and check the Compatibility mode for Windows XP. Make the same for the update.exe file in c:wmp11update2.
    update.exe Properties Dialog
  8. Now go back to the command line window and press a key to continue and the simply wait.
  9. The software updater wills start after some time and after some more time you will end up with the UPnP for Windows Server 2003 dialog.UPnP for Windows Server 2003
    Check the Universal Plug and Play checkbox and select Next and then Finish.
  10. If everything went well, you will end up with Windows Media Player 11 on a Windows Server 2003. Hurray.Everything OK

But you remember that we want to stream h.264 encoded files to our Xbox 360, right? The good news is that Windows 7 will support h.264 natively. The bad news is that we work on a Windows Server 2003 right now.  With some work however, we can teach our Windows Server 2003 also to deal with h.264 encoded .mp4 files. All we have to do is to install some codecs and to apply some registry hacks.

  1. For the sake of simplicity, I took the K-Lite Mega Codec pack. It took the mega pack instead of the standard pack because Dirty Harry is using a .44 and not a .375. This might be reason enough.
  2. During installation select Profile 2. It’s the default profile without the players (you remember we want to stream anyway). Feel free to experiment with other profiles and custom settings.K-Lite Mega Codec Pack Setup Dialog
  3. When you come along the Select Additional Task step, don’t forget to scroll down and to check Make thumbnail generation possible for the following types. This will create the thumbnails in the Windows explorer and within the Windows Media Player 11.
    K-Lite Mega Code Pack Setup Dialog - Additional Tasks

At this point your Windows Media Player can play h.264 encoded files but your server is still not capable to share any kind of .mp4 files. They won’t show up in the folders monitored by Media Player until we apply some tweaks to the registry.

On my crusade I came along two registry patches. It seems that they did not work for everybody, however, nobody tried on Windows Server 2003. It worked for me after I installed bot
h of them.

  1. Download the first registry patch, rename to .reg and install it.
  2. Download the second registry patch, rename to .reg and install it.
  3. Reboot to apply the registry changes.

Now, out Windows Server 2003 is capable to stream h.264 encoded media files. The previous patches will now cause that Windows Media Player 11 will add all kinds of .mp4 or .m4a files within the monitored folders. Adding these folders to be streamed is straight forward.

  1. Go to  Libary /Add to Library…Windows Media Player 11 - Library Menu
  2. Add all kinds of folders that should be streamed to your Xbox 360. The media types will be organized automatically, so movies, music files and images will be shown in the corresponding tabs in the NXE.Add to Library Dialog
  3. In some rare cases (and I know what I am talking about as I encountered this rare case) all your mp4 files won’t show up in the movie folders. In this case select Library / Other and check if the files are shown there.Windows Media Player 11 - Other  MediaIf you find all your files here, something went terrible wrong with your media library. Calm down, there is a easy workaround (FWIW: if you already share media, stop sharing as the following won’t work).Go to C:Documents and Settings[YouProfileName]Local SettingsApplication DataMicrosoft and delete the Media Player folder. This will wipe out the whole media library for this computer. Restart from 1. and everything should be green now.Media Player Library

Now, where everything is nicely organized, indexed and monitored, we are ready to share our media with the Xbox 360.

  1. Turn on your Xbox 360.No kidding, you won’t be able to turn on sharing if the 360 is not on at that point of time.
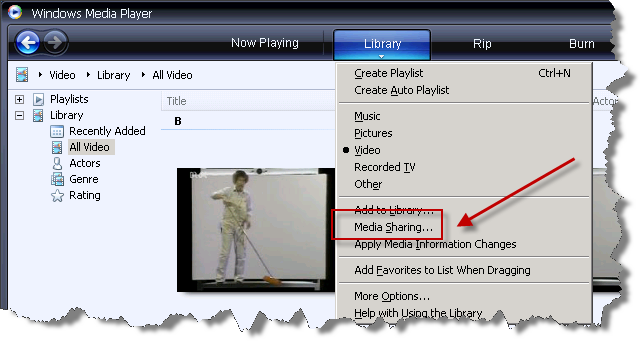
  2. Go to Library / Media Sharing…Media Sharing
  3. Now it’s straight forward:a) Check Share my media to b) Select your Xbox 360c) Click AllowMedia Sharing Dialog
  4. Finally, don’t forget to check out the Customize button which will open a dialog for some more fine tuning (what kinds of media to share, what ratings to share, etc.)

Now got to your Xbox 360 and enjoy your h.264 streamed media.

There are a few point’s I haven’t found out how to resolve, yet.

  1. The registry hacks don’t include .mkv file extensions. Also both hacks could be combined into one. I simply haven’t spend time in this yet.
  2. The 360 won’t show any thumbnails for the h.264 encoded files. Not sure if this is related to the XNE or the Media Player. This might worth some more investigation.
  3. The 360 does not show the length of the media file. It does so for .avi files, so this might be automatically answered once 2. is answered.

f.lux Compensator

Not really a productivity tool, but apparently some tool that makes working all day long on the screen much more convenient.

“f.lux makes your computer screen look like the room you’re in, all the time. When the sun sets, it makes your computer look like your indoor lights. In the morning, it makes things look like sunlight again”

f.lux adjusts the color temperature of your display to the time of the day. It ranges from 6500 Kelvin during daylight to 3400 Kelvin during the night. Give it a try, downloads are available for Windows XP/Vista, Mac OS X and Linux (glibc6).

f.lux

ZoomIt

ZoomIt (by Mark Russinovich), a classic tool for presenting. Quite lightweight with few but good options. The zoom capability allows you to zoom into the area of the screen where the mouse points to. The draw and type capability allows to draw and type on your screen. Way cool if you are using a Tablet PC, though. Finally, the Break function is a countdown. Nice for speakers this one comes with a few nifty functions such as playing a sound and displaying a custom background image.

ZoomIt

And no, it’s not a tool only for evangelists giving talks in large lecture theaters. It also comes quite handy in meetings and presentations within the team and in front of customers.

Visual Studio XAML View

For a while, I am working on a project where I use WPF to its limits. Unfortunately, Visual Studio has its limitations in rendering the stuff we do here.

We started with Visual Studio 2005, without any native support for XAML in Visual Studio doing a lot of the work in Notepad2, using one CTP after another including Visual Studio 2008 Beta 2 up to the final version of Visual Studio 2008. Things became better over time, however, I wished simply to switch off the Design view in in Visual Studio.

Hidden in the Visual Studio settings, there is this switch A hidden jewel for anybody working a lot with the WPF markup language in Visual Studio.

You’ll find it at: Tools / Options… / Text Editor / XAML / Miscellaneous

Open XAML always in XAML view in Visual Studio

Put your own Search Providers into Internet Explorer 7

Another nice feature, unrevealed in Internet Explorer 7: Adding your own search providers is quite easy. When you select the drop down menu at your search box, you can select your currently installed search providers.

Search Providers Menu

To add more, select Find More Providers… from the menu.

Add Search Providers to Internet Explorer

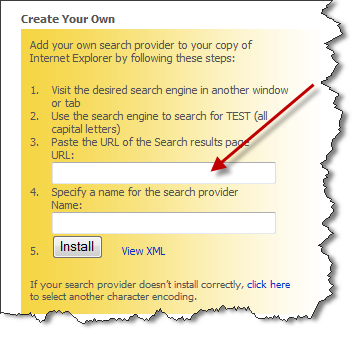
Now, go to your favorite search engine and perform a search for TEST. I did this for the Beolingus translation provider. Paste the URL from the previous source and specify a name for your new search provider.

Create your own Search Provider

That’s the XML used for the installation. Press install and can directly access this search provider using the search box in IE 7.

<OpenSearchDescription xmlns="http://a9.com/-/spec/opensearch/1.1/">
  <ShortName>Beolingus</ShortName>
  <Description>Beolingus provider</Description>
  <InputEncoding>UTF-8</InputEncoding>
  <Url type="text/html" template="http://dict.tu-chemnitz.de/dings.cgi?lang=en&service=deen&opterrors=0&optpro=0&query={searchTerms}&iservice=&comment=" />
</OpenSearchDescription>

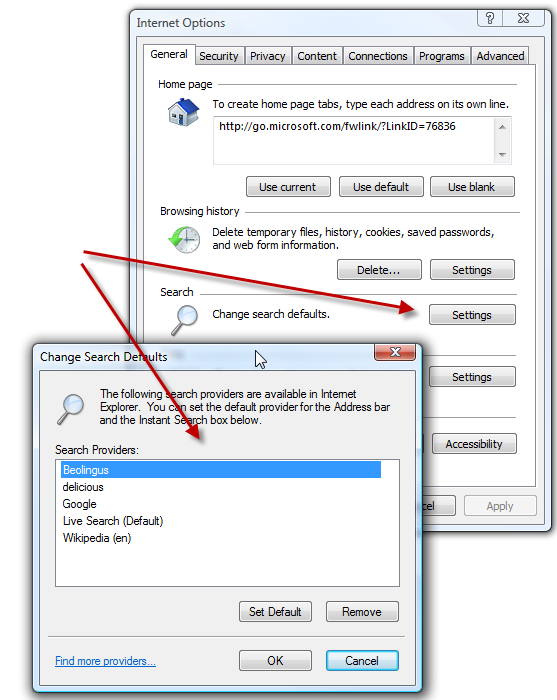
If you want to modify the settings later, you can do so using Tools / Internet Options / Change Search Defaults Settings.

It was the first time I played with these settings of Internet Explorer and I am quite surprised in a positive way about it.

Change Search Defaults Dialog

Web Activities in Windows Live


Windows Live becomes more open to other Web-based platforms. Maybe this was there already before, however, I haven’t seen it, yet. Windows Live is able to consume further events from platforms. Among the supported ones you will find TripIt, Flickr, Twitter and others.

Windows Live Web activities

Adding the applications is quite easy. Sometimes (e.g. for TripIt) you have to sign in and to confirm.

Share your activity on Windows Live

Looking forward to find even more supported activities in the future. It looks definitely like a step towards the right direction.

Data Mikgration Kit for Xbox 360 60GB HDD

We just spend this afternoon trying to upgrade a Xbox 360 to a 60GB HDD with a friend, called “The-one-without-a-Web-presence”. Without success, yet. Somewhat frustrated, I started doing some research on this to understand. Some background information might be helpful.

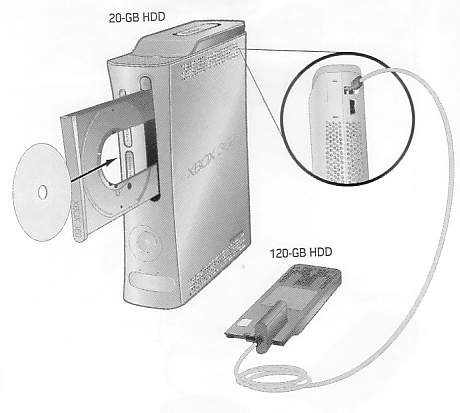
I just upgraded my Xbox 360 to 120GB. That went quite well. After fighting an epic battle with the blister box, I obtained three essential pieces as reward: the HDD, some kind of odd cable and a green CD/DVD. One end of the cable to the Xbox, the other one to the back of the Xbox. There is only way how it fits, so its quite idiot-proof. Then you insert the disc.

Data Migration Kit

The next few steps are shown on the screen. Confirm the transfer and, depending on the amount of data on your old hard disc, the transfer might take up to 1 hours 30 minutes from the 20 GB disc. Transfer works from one way only. This means, once the transfer is completed, your old disc will be wiped out. It will be a plain disc, just with the XNE (or dashboard if not updated, yet) on it. No profiles, no save games.

The trasfer seems to work only from a smaller to a larger disc. This means

20GB –> 60GB
20GB –> 120GB
60GB –> 120GB

I was also told that the the same size of a HDD is supported. This means the following might also work (not confirmed):

20GB –> 20GB
60GB –> 60GB
120GB –> 120GB

Said that, my friend “The-one-without-a-Web-presence” bought the 60GB Live Starter Kit. That’s a quite fair deal including a 60GB HDD, a head set and three months of gold subscription and a Ethernet cable. He was never live before, so the three months of gold subscription was a reason to buy this kit as he wants to start playing live (Do you get it? Live Starter Kit? For those who want start being live?). Besides this, he gains much more reward for fighting the blister box.

What’s not included in this package is a Data Migration Kit (containing the odd cable as well as the CD/DVD). So he asked me, if we could use my kit. After several attempts we finally figured out: Yes, we could use my kit, however, it does not work. What went wrong at the end? Everything was connected properly, we tried several permutations in connection orders and we read through a whole bunch of support articles.

The simplest way is contacting Microsoft Support and asking for the Data Migration Kit. To do so you simply have to follow the steps indicated in this support article. Obviously we already have an Data  Migration Kit from my 120GB disc that does not work.

The answer seems pretty simple: At the time when the 120GB disc was released, there was no 60GB disc available.  That way, the software does only support the copy process to a 120GB disc. It seems this as a known issue and meanwhile Microsoft released a newer software that also supports this process to 60GB discs.

this means, the software only can process the following transfers:

20GB –> 60GB
20GB –> 120GB
60GB –> 120GB

However, you might be not in luck and you end up with a old software version indeed. Having a newer version this will be no problem at all. How can you tell what version you have?

Hard Disc Transfer Disc

Check out the number on the right bottom of the green CD/DVD being part of your Data Migration Kit. Does it end with “–01”?  Bad luck then. That’s the old version only supporting 120GB discs. Give a call to your local Microsoft support and ask for a newer version or ask your friends if anybody has the newer version. Now you should be able to identify the right disc.

Personally, I would recommend to ask if anybody of your friends has the disc and the odd cable. You’ll need this cable/software only once and ordering it for a single transfer is a waste of resources. As there is no way back now cable will be of no use after the transfer other than giving it to a friend.

Why this confusion? The 60GB Live Starter Kit does not include a cable/software as it is meant to be for Xbox 360 Arcade users who want to migrate. So It might be called “Xbox 360 Arcade 60GB Upgrade Kit” to avoid some confusion for those how want start with Xbox live using the “Xbox 60GB Live Starter Kit”.