Fish’n’Chips No More

Following All Good Things… it was the day I choose to leave Microsoft Research in Cambridge for the sake of new challenges and adventures. England is not that bad, considering the weather, the living conditions, the food and the traffic…

The last five years with Microsoft Research have been very intense, exciting but also quite exhausting. Our dev team went twice to the Microsoft TechFest showing the Microsoft Computational Science Studio in 2008 even to the press.I met Alan Alda, known as Capt. Benjamin Franklin “Hawkeye” Pierce from the TV drama M*A*S*H, meanwhile presenting us TV show Scientific American Frontiers.

Ein Highlight bei der Entwicklung des Microsoft Computational Science Studio war zweifelsohne die Präsentation durch Craig Mundie während der Microsoft College Tour 2009. Nicht nur dass Craig Mundie hier meinen Code in den Händen hielt, er musste ihn auch gleich an einigen der Top-Universitäten in den USA vorzeigen (u.a. Cornell und Harvard). Das ist einmal eine ganz neue Art von Druck, bedenkt man, dass es sich dabei um einen Forschungsprototypen handelte. Auch hier gab es den einen oder anderen Artikel in der Presse, beispielsweise in der Seattle Times. Überraschend kam dann noch ein Channel 9 Video von dem niemand wirklich wusste, bis es plötzlich online war.

image

Nachdem ich für Coding4Fun 2005 bereits das erste Mal auf der PDC05 mit einem eigenen Stand vertreten war, konnten wir 2009 wir dann auch mit Vedea auf der PDC09 punkten.

Beide in Cambridge entwickelten Prototypen konnte ich Mitte diesen Jahres nochmals im kleinen Kreis bei der .NET User Group in Karlsruhe vorzeigen und habe mich dabei sehr über die interessanten Diskussionen gefreut. Zwei Mal auf der PDC, zwei mal auf dem TechFest ist keine üble Bilanz, die  mit einer Danksagung im Artikel Predictive Models of Forest Dynamics im Fachmagazin Science (Science, vol 30, 13. Juni 2008) noch “aufgewertet” wurde.

Zwischendurch gab es sogar ein Besuch von Bill Gates, dem einige der (Forschungs-) Arbeiten vorgestellt wurden (ich saß in dem Stuhl in dem Bill Gate saß). Aber auch das tägliche Leben ließ sich nicht Lumpen, ob eine Diskussion mit Don Syme (einer der brillantesten Köpfe und bekannt für Generics und F#) oder ein morgendliches “Hi Tony” zu Tony Hoare (jedem Informatikstudent aus dem ersten Semester aufgrund von Quicksort und dem Hoare-Kalküls wohlbekannt), das hat man nicht überall.

Letztendlich konnten wir die eine oder andere Entwicklung an verschiedene Produktgruppen in Redmond weitergeben, und so findet sich vielleicht manch Zeile Code bald wieder in einem der zukünftigen Microsoft-Produkte.

Stacking Using

A few days ago, Benjamin pointed me to a feature in C#, I was not aware of, yet. You can stack using statements. In the following I will show an example where this might come in very handy.

I recently worked on a project where we had to process large text files (with large I mean 14GB each). In a pre-processing step we cleaned up the files, processed each line, validated it against a set of rules and then either wrote it back to a output file or a temporary which required further processing steps. Due to the complexity of the validation we decided to go with a small C# program that does the job.

A fast and convenient way was utilizing a set of StreamReaders and StreamWriters and applying using statements a to read and write the files. As Anoop pointed out, not using usings is one of a common mistakes .NET developers should avoid. Eventually, the code looked similar to the following example by cascading the using statements.

using (StreamReader reader = new StreamReader(@"c:input.txt"))
{
    using (StreamWriter successWriter = new StreamWriter(@"c:success.txt"))
    {
        using (StreamWriter failWriter = new StreamWriter(@"c:fail.txt"))
        {
            // all the magic happens here
        }
    }
}

That would be the way many developers would write the code, and if you have a look at the MSDN documentation about using statements  this seems to be the way to do it. But the C# 4.0 Language Specification does give you an hint that there is more you could do.

For a using statement stmt of the form:

using ( resource-acquisition ) embedded-statement

The definite assignment state of v at the beginning of resource-acquisition is the same as the state of v at the beginning of stmt.

The definite assignment state of v on the control flow transfer to embedded-statement is the same as the state of v at the end of resource-acquisition.

What’s not obvious here, is the fact that you can stack using statements utilizing one code block. In this case you embedded-statement is another using statement. In fact that’s not different how most of us use cascading for and foreach loops. In fact, this is not a new feature of C# but something you might not have considered before.

using (StreamReader reader = new StreamReader(@"c:input.txt"))
using (StreamWriter successWriter = new StreamWriter(@"c:success.txt"))
using (StreamWriter failWriter = new StreamWriter(@"c:fail.txt"))
{
    // all the magic happens here
}

Writing the code like this reduces a lot of noise and indentation in your code, keeps the resource acquisition tight and might be definitely worth keeping in mind.

The GPHWStatus Hack for the WWAN 5520 on a Dell D830

I just got a new (old) WWAN 5520 3G/UMTS card/modem for my Dell D830. Eventually, the card did not work out of the box without a hack. In the following  I will show what you need to do, if you want to get the card running in your Dell D830 (or maybe also any other older Dell Latitude or XPS machines).

WWAN 5520 First you need the card of course. Your Dell Latitude D830 (and many other older Dells) already has an empty slot for this card. Opening the cover (i.e. removing the keyboard) will reveal the slot for the card on the lower left of the case. The antenna cables should be already there, probably with a small protection on their end. It took me a few moments to realize which cable to plug where. One is marked white and the other is marked black, and the connectors show a large white and black arrow (actually, this was so obvious that I haven’t realized this right away).

Plug it in, close the lid and turn the computer on again (hopefully you did shut it down before). After starting Windows (if you read this blog you know we area talking about Windows 7 64-bit), Windows Update will take over – or at least it will try and glorious fail in finding any drivers.

Driver Software Installation

Never give up, never surrender as we are talking about Dell here. And as I learned recently about the missing touchpad driver, there might be a driver for everything else as well. Once again we go for a 64-bit driver for Windows Vista. In this case the Wireless Mobile Broadband MiniCard driver for Windows Vista 64-bit will do the job.

SNAGHTML7fabea

At Dell’s download site for communication drivers, there is a whole bunch of carrier specific drivers (Vodafone, Cingular, Telus and other carriers, I have never heard about before). It is not related to any carrier, so ignore anything with a carrier name in it.  Just to be sure, the driver we are looking for here is R159896.EXE.

The SIM card lives directly in the battery slot as you can see at Dell’s D830 Service Manual. Make sure the cut off corner goes the correct orientation and if you are using a contact (pay monthly) card, make sure the card is protected by a PIN. The battery slot is not secured, and if you don’t watch your laptop all the time… well, you never know. Maybe worth to know, the SIM in your Dell does not support hot-swapping, i.e. unlike e.g. the iPhone 3GS, you have to shut down your laptop before you insert the card.

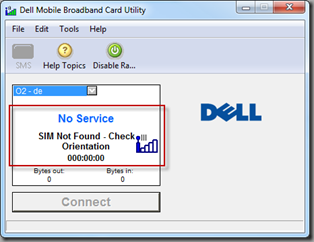
Once built in, installed and inserted every bits and pieces, the Dell Mobile Broadband Card Utility will let you know:

No Service
SIM Not Found – Check Orientation

No, don’t turn off the laptop again, the orientation probably is right. There is a (not so obvious) solution to that.

No Service

Start the Registry Editor (regedit.exe) and navigate to

ComputerHK_LOKAL_MACHINESOFTWAREWow6432NodeNovatel WirelessNextGenCommon

and change GPSHWStatus to 1. This means, the GPS chip on the card gets activated. For whatever reason, the chip is deactivated by the Dell drivers by default. However, if you activate the GPS chip, the entire card will be activated. It might be interesting to dig a bit deeper here, but for now it’s enough to know that it works.

GPSHWStatus Hack

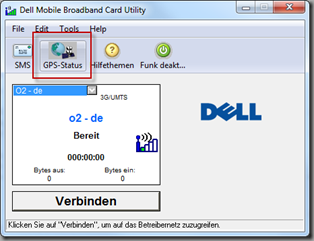
Either reboot, or just quite and start the Broadband Card Utility again.

GPS-Status

By applying this GPHWStatus hack, not only the 3G card/model will now work, also the GPS hardware will be enabled and should available from the tool.

Unit Testing CheatSheet

I am a big fan of cheat sheets. Some time a go I created a cheat sheet for test driven development (TDD) unit testing. Recently I looked at it and thought it might be worth sharing it. It covers the Right-BICEP, CORRECT and A-TRIP principles introduced in Pragmatic Unit Testing by Andrew Hunt and David Thomas.

Ilker pointed out, that the TDD cheat sheet is quite misleading. That’s right and if you see the cheat sheet is called Pragmatic Unit Testing CheatSheet. To keep consistency, I tried to remove TDD as good as possible, even from the file names.

image

Download:  PDF or XPS (zipped)

Dell D830 – The Missing Touchpad Driver

Since moving forward to Windows 7 x64 on my Dell Latitude D830, I had to live with the default behavior of the Touchpad and Pointing Stick of the D830 as there are no 64-bit drivers for Windows 7.

Finally, I found the right drivers for my system. You can pick it up at the Dell drivers and download page for the Dell Latitude D430. The is no explicit Windows 7 driver, however, the 64-bit driver for Windows Vista worked fine for me.

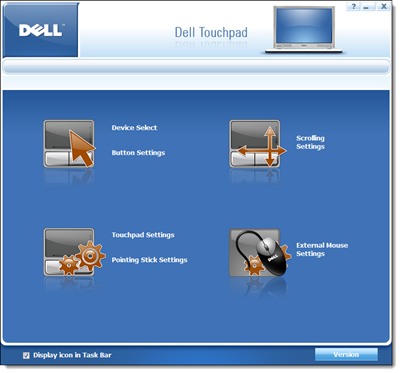
Dell Touchpad on D830 with  Windows 7 x64

To make sure you oick up the right driver, the file name is R157047. The driver gives you full access to the Touchpad and Pointing Stick functionality, including the click feature of the stick.

R157047.exe - 64-bit Driver working on Windows 7

Download: Drivers & Downloads for Latitude D430

Huge Visual Studio Find and Replace Dialogs

Every time I reopend the Find and Replace dialog box (CTRL+H) in Microsoft Visual Studio 2010,  the width of the dialog box grew by several pixels. I was looking through various settings in Visual Studio, however, I haven’t thought of a bug in Visual Studio at all.

Finally, Alex Zeitler pointed me to a hotfix  for this issue. The Knowledge Base entry KB2268081 explains the issue in details. The issue affects the following products:

  • Microsoft Visual Studio 2010 Shell (Integrated)
  • Microsoft Visual Studio 2010 Shell (Isolated)
  • Microsoft Visual Studio 2010 Ultimate
  • Microsoft Visual Studio 2010 Professional

In case you use the Find and Replace dialog quite often, you might download and install the hotfix from the connect site.

Master Pages and XHTML

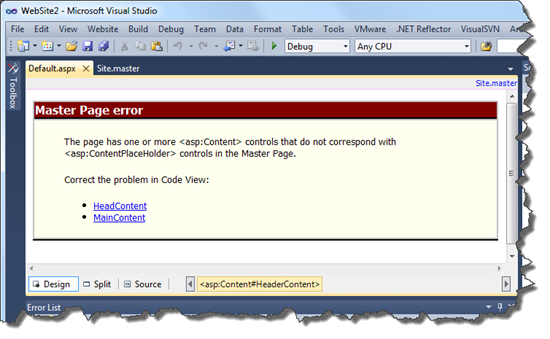
Today, we encountered a really interesting issue with Visual Studio 2010, ASP.NET and Master Pages. Actually Visual Studio denied the design view for all of the pages within the solution except to the master page.

The page has one or more <asp:Content> controls that do not correspond with <asp:ContentPlaceHolder> controls in the Master Page.

No doubt you would check all the pages as well. After verifying that all pages have been correct, the ID as well as the ConteptPlaceHolderID tags are set correctly, you might see that the issue is till persistent.

Master Page Error

In this case check your HTML source code of the Master Page. In particular check for all HTML tags with self closing syntax. Referring the W3C Recommendation for XHTML section C.3 there are some tags that should be not used with self closing syntax.

Given an empty instance of an element whose content model is not EMPTY (for example, an empty title or paragraph) do not use the minimized form (e.g. use <p> </p> and not <p />).

Eventually, you now will review again your source code for any XHTML tags in their minimized form.

<html xmlns="http://www.w3.org/1999/xhtml" xml:lang="en">
<head runat="server">
    <title />
    <link href="~/Styles/Site.css" rel="stylesheet" type="text/css" />
    <asp:ContentPlaceHolder ID="HeadContent" runat="server">
    </asp:ContentPlaceHolder>
</head>
...

In the example above change the title tag to

<title></title>

and the issue will be fixed. Even better would be of course to give your page a title.

While most browsers are quite forgiving here, the Visual Studio designer quits his job. Unfortunately, the error displayed is misleading and you might waste some time in reviewing Master Pages and ASP.NET controls that are obviously correct. Whether this is a bug or Visual Studio designer doing the right job and failing just for those tags based on the W3C Recommendation – it does of course not help a lot if Visual Studio does provide a misleading error message to the developer.

Migrating dasBlog to WordPress

Over the last couple of years, I run my blog using the dasBlog engine. As I started hosting the blog in 2004 on my own server, I choose dasBlog as it did not need any database on the backend, saved everything in XML and did a great job on the full text search over the XML content. Beside that, a blog engine running on ASP.NET seemed the right choice being familiar with the technology. Eventually, I did several fixes and hacks on my installation over the last few years. Unfortunately, there was no new release since March 2009. As I like playing with alternative technologies from time to time and WordPress comes with a rich set of features I miss at dasBlog, I decided to migrate to WordPress. In this article I will describe the steps moving forward to WordPress hosted on a Windows Server 2008.

Overview

Moving forward to the new platform includes several steps. First of all the server has to be prepared to host the new platform. After the new blog engine is set up, the content needs to be migrated. Finally, the old engine needs to be shut down and the server needs to be set up to forward requests to the old engine to the new one.

Installing WordPress

Installing WordPress should be relatively easy as it is available through the Microsoft Web Platform Installer 2.0. However, you might encounter issues during the process on machines running IIS 7 as the required Windows Update KB980363 causes the installation process to hang. The update process only hangs when started from within the Web Platform Installer, so pick it from the Microsoft Download Page and install the hotfix beforehand. Before installing WordPress you need to install PHP on the server. In addition to the instructions how to configure PHP on IIS 7, Ruslan Yakushev provides a very good tutorial how to set up FastCGI on Windows Server 2008.

Migrating from dasBlog to WordPress

Originally, I planned to use BlogML to migrate the content from dasBlog to Worpress. Instead I found dasBLogML which is a simple GUI wrapper around the original BLogML. First you download the content of the old blog to your local machine.

dasBlogML

To import the BlogML data, you might want to follow Edgardo Vega’s article. In order to avoid potential problems during the import, also have a look at Daniel Kirstenpfad’s tip about replacing all &nbsp; occurrences in the XML file. Using the BLogML Importer plug-in you can finally import the previously exported XML file.

Import BlogML

Redirecting dasBlog

In the final step I had to redirect the requests from the old blog to the new one. There are several issues to think about: First of all, all binaries are still referred from the old blog. Consequently it is not possible to just shut it down. Furthermore, there are many entries that are linked from several places all over the web.

My solution is to create a IIS module using managed code, and the ASP.NET server extensibility APIs. First of all I had a look at the schemes of the permalinks or URIs I have chosen for the old blog

http://www.blog.old/yyyy/mm/dd/articletitle.aspx

and the new one

http://www.blog.new/yyyy/mm/dd/article-title/

Consequently the HTTP module has to perform several steps: Replace the domains, remove the technology specific information in form of the .aspx file extension (technology specific information isn’t good practice anyway based on Tim Berner-Lee’s article about cool URIs) and finally add some hyphens. While the later is an somehow impossible task, there is an easy workaround. The scheme for permalinks I have chosen in WordPress will list all articles on a given day if you omit the article title in the URI. Consequently, the requested URI will be rewritten by the module to

http://www.blog.new/yyyy/mm/dd/

and sent back in the response with HTTP status code 301 (moved permanently) base on RFC 2616:

“The requested resource has been assigned a new permanent URI and any future references to this resource SHOULD use one of the returned URIs. Clients with link editing capabilities ought to automatically re-link references to the Request-URI to one or more of the new references returned by the server, where possible. This response is cacheable unless indicated otherwise.

The new permanent URI SHOULD be given by the Location field in the response. Unless the request method was HEAD, the entity of the response SHOULD contain a short hypertext note with a hyperlink to the new URI(s).“

Additional URIs that need to be processed are in the form of

http://www.blog.old/CategoryView,category,categoryname.aspx

Also this one is relatively easy as WordPress expects the category in form of

http://www.blog.new/category/categoryname/

Finally, the selection from the calendar in dasBlog looks like

http://www.blog.old/default,date,yyyy-mm-dd.aspx

and needs to be transformed into

HttpApplication application = (HttpApplication)sender;
HttpContext context = application.Context;

context.Response.StatusCode = 301;
context.Response.RedirectLocation = GetRedirectLocation(context.Request);
context.Response.Cache.SetCacheability(HttpCacheability.Public);

if (!context.Request.Equals("HEAD"))
{
    ...
}

To create the redirect locations I use a set of Regex objects that cover the most important URI types.

Regex singleUriPattern
  = new Regex("http://" + OLD_DOMAIN
  + "/[0-9]{4}/[0-9]{2}/[0-9]{2}/([\w-_\%+]+)*.aspx");
Regex categoryUriPattern
  = new Regex("http://" + OLD_DOMAIN
  + "/CategoryView,category,([\w-_\%+]+)*.aspx");
Regex dateUriPattern
  = new Regex("http://" + OLD_DOMAIN
  + "/default,date,[0-9]{4}-[0-9]{2}-[0-9]{2}.aspx");

Now everything beside the content can be deleted from the old dasBlog installation. In order to avoid any requests not covered by the previously deployed module, the custom error page for status code 404 is set to the corresponding URI on the news blog.

After deploying the module (into the bin folder of the dasBlog installation) it needs to be added to the web.config. Therefore you just have to add it to the httpModules section.

<httpModules>
  <add name="UriRedirector" type="RedirectModule" />
</httpModules>

Edit Custom Error Page Dialog

If the application pool is running in Classic mode, the custom error pages do not cover any ASP.NET content. Therefore add the customError section into to web.config file. Now all requests that do not request any content from the old blog or which a are not redirected by your module are covered by the new WordPress blog.

<customErrors mode="On">
     <error statusCode="404" redirect="http://www.blog.new/404/" />
</customErrors>

Conclusion

Now the content from the old dasBlog instance are displayed on the new WordPress blog, the most important links to your old dasBlog pages are covered by the URI redirection to the new blog and all the rest is caught by the WordPress blog as well. You might want to extend the redirect module with further regular expressions (e.g. to cover CommentView.aspx or other dasBlog pages).

Cleaning Up the Explorer ‘New’ Menu

If you are using your Windows machine for a while, it is inevitable that you install a whole bunch of Software. Especially a developer machine might end up with a lot of application and tools, you use for work or evaluation. This is the first article in a series of steps how to clean up your Windows machine, and to optimize your personal workflow.

Some tool that come with support for a particular file extension might extend the Windows Explorer ‘New’ sub menu. In my case I currently ended up with about 20 entries, while I regularly use only two or three of them. Most if them I barely touch. To minimize noise and to speed up your personal workflow you might want to get rid of some of them and renaming others. E.g. all Office documents are usually prefixed with ‘Microsoft’ while you might just want to see them as ‘Word Document’  or ‘Excel Document’.

Insert New Menu


To modify these entries, you eventually would use the Registry Editor. Each entry is located in the registry using its own key at:

HKEY_CLASSES_ROOT.[fileExtension]ShellNew

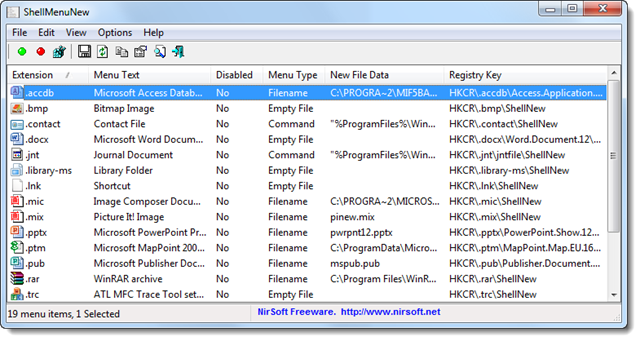
However, maintaining this list is rather time-consuming task and no fun at all.  After some investigation I found a very nice freeware tool called ShellMenuNew from NirSoft that eventually does the job for you. It’ is a small tool which does not need to be installed and can be used straight away.

ShellMenuNew

By right-clicking any of the entries you can select ‘Disable Selected Menu Items’. Once you open up the ‘New’ submenu in Windows Explorer the menu should be look much tidier.

In case you change your mind, you can always start ShellMenuNew again and enable the file extensions again. The tool worked nicely on my x64 Windows 7. Regarding the author’s website it should also work on Windows 2000, Windows XP, Windows Server 2003/2008, and Windows Vista. Solved this task,  the renaming of the entries is still pending.

Modified Windows Explorer 'New' File Menu

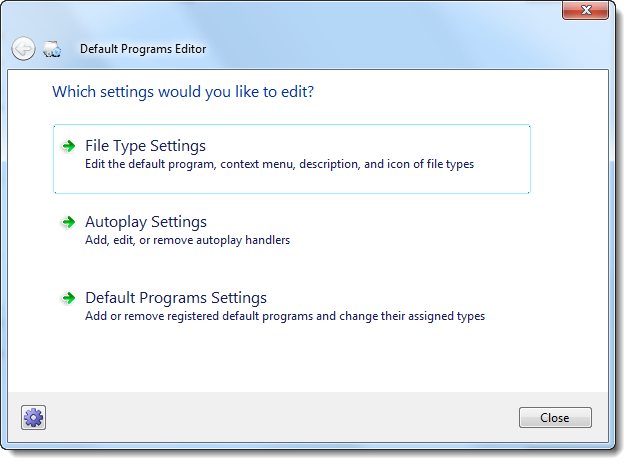
Also here a small freeware tool comes in handy. Default Programs Editor provides a set of functionality to edit file type settings, autoplay settings and default programs settings. Also this tool can be sued straight away and does not need any installation.

Default Programs Editor

Default Programs Editor lets you easily change any kinds of associations with respect to files extension. Using the ‘File Type Settings’ you can select the ‘Description’, search for the file type you want to rename and finally change the file type description.

Using those two tools it is possible to minimize noise in your working environment without hacking the registry manually.

KB967723 vs Windows Server 2008

I recently experienced issue installing security update KB967723 for Windows Update on a Windows Server 2008 (32-bit). This seems to be a very common issue with Windows Server 2008 resulting in a error code 80070490.

KB967723 important update was not installed

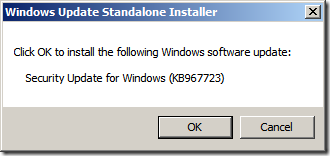
The easiest way is getting the update from the Microsoft Download Center for 32-bit or for 64-bit directly. Once you get the update you can execute the standalone installer to install the security update manually. This should do the job.

KB967723 Standalone Installer

Once installed you can start Windows Update again, it should now show Windows being up to date. Let me know if this worked for you.

Windows up to date