KB967723 vs Windows Server 2008

I recently experienced issue installing security update KB967723 for Windows Update on a Windows Server 2008 (32-bit). This seems to be a very common issue with Windows Server 2008 resulting in a error code 80070490.

KB967723 important update was not installed

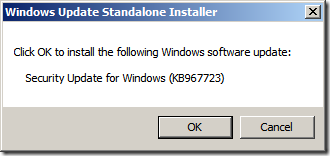
The easiest way is getting the update from the Microsoft Download Center for 32-bit or for 64-bit directly. Once you get the update you can execute the standalone installer to install the security update manually. This should do the job.

KB967723 Standalone Installer

Once installed you can start Windows Update again, it should now show Windows being up to date. Let me know if this worked for you.

Windows up to date

Error TF30224 – The First Project on TFS 2010 is the hardest

While setting up Microsoft Team Foundation Server 2010 Beta 2 one might into an non obvious issue with user rights. The error observed would look the following:

New Project TFS Error TF30224

The TFS installation considered is a single machine installation with SQL Server Reporting and Analysis services and SharePoint Services installed during the TFS installation.

The full descriptions of the error is:

Error
TF30224: Failed to retrieve projects from the report server. Please check that the SQL Server Reporting Services Web and Windows services are running and you have sufficient privileges for creating a project.

Explanation
The Project Creation Wizard encountered a problem while creating reports on the SQL Server Reporting Services on http://coruscant/ReportServer/ReportService2005.asmx. The reason for the failure cannot be determined at this time. Because the operation failed, the wizard was not able to finish creating the SQL Server Reporting Services site.

User Action
Contact the administrator for the SQL Server Reporting Services on http://coruscant/ReportServer/ReportService2005.asmx to confirm that the SQL Server Reporting Services server is running and you have sufficient privileges to create a project . Your user account on SQL Server Reporting Services must have Content Manager permission to create a new project. Also, you might find additional helpful information in the project creation log. The log shows each action taken by the wizard at the time of the failure and may include additional details about the error.

A wild guess might be checking all rights for SQL Server, SharePoint sites, SQL Server Reporting Services etc. Pat Ramadass comes up with the right hint that origins from the previous TFS version.

First of all do not look for the Reporting Service Configuration Manager. Go straight to http://localhost/Reports/ (logged in on your TFS server machine with administrator rights). You will get the SQL Server Reporting Services site. Select the Properties page and click on New Role Assignment.

SQL Server Repoting Services - Home

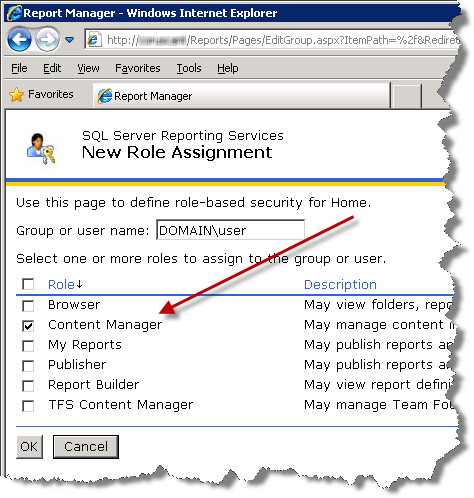
Now add exactly the user (or group) you tried creating the TFS Team Project with. Select at least Content Manager and confirm by pressing OK.

SQL Server Reporting Services - New Role Assignment

Go back to you local machine and try to create the TFS Team Project again. The users should now have sufficient rights to create the project.

How to use Google Calendar Sync with Microsoft Outlook on Windows 7

There is an urban legend that Google Calendar Sync would not run on Windows 7. Indeed, if you follow the installation instructions Google Calendar Sync will first ask you for your credentials and consequently fail to connect to Google Calendar. In the following you’ll find an solution how to use Google Calendar Sync with Microsoft Outlook 2007 on a Windows 7 system that that is provided under a works on my machine premise.

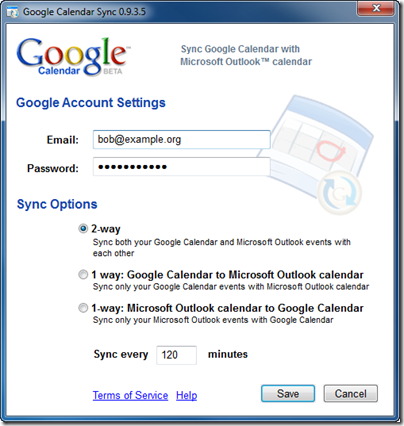
Google Calendar Sync 0.9.3.5

Once saved, Google Calendar Sync will try to connect but fail with error 2006. There is not many information about this error beside various frustrated users ranting about this and some statements that the current version of Google Calendar Sync (0.9.3.5) is not supported under Windows 7 yet.

Google Calendar Sync Error 2006

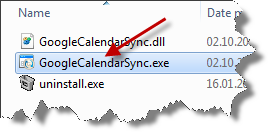
In the current case we will even run Google Calendar Sync on a Windows 7 64-bit system. Before you continue, make sure you exit Google Calendar Sync. First of all open a Explorer window and navigate to C:Program Files (x86)GoogleGoogle Calendar Sync or C:Program FilesGoogleGoogle Calendar Sync on a 32-bit Windows 7 system.

GoogleCalendarSync.exe

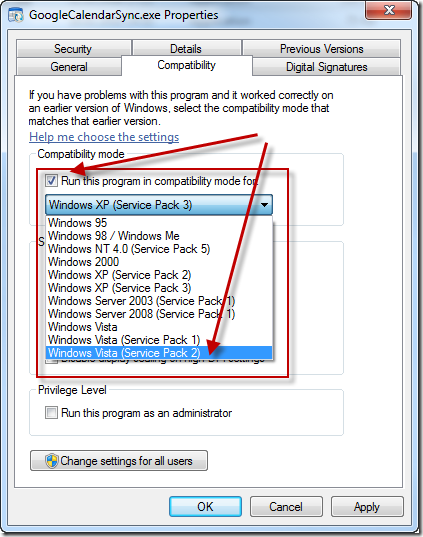
Right click on GoogleCalendarSync.exe and select Properties. Now select the Compatibility tab, check the Run this program in compatibility mode for and choose Windows Vista (Service Pack 2) from the drop down list. Click on OK and restart Google Calendar Sync either from your desktop icon or from the start menu entry.

GoogleCalndarSync.exe Properties - Compatibility Tab

Once restarted you can happily sync Google Calendar with Microsoft Outlook 2007 on (even a 64-bit) Windows 7 system.

Google Calendar Sync running on Windows 7

The Compatibility mode of Windows is a great feature to make usage of legacy programs that have not been or will never bee updated to the latest Windows version. Since Windows 7 even mode modes (including Windows Server) back to Windows 95 are supported. The number of supported versions might vary depending on the Windows 7 version you use, however, the Vista and XP mode should always be available.

Fixing Wrong USB Devices in Windows 7

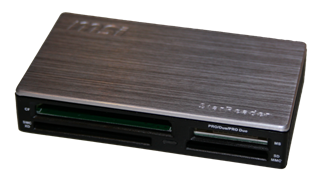
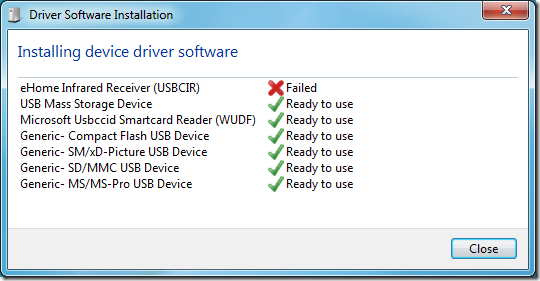
If you experience issues with a USB device not being recognized under Windows 7, there might be a simple solution to solve this. For example the MSI USB 2.0 All IN 1 Card Reader aka MSI StarReader is recognized as eHome Infrared Receiver (USBCIR) using Windows 7. The device works great using Windows Vista or even the Windows 7 pre-release versions. Unfortunately, with the final Windows 7 the device just won’t work.

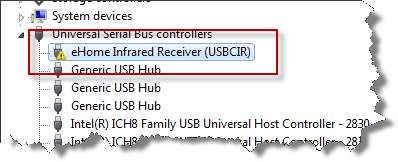
MSI USB 2.0 All IN 1 Card Reader A quick look into the Device Manager will show that the device is recognized as eHome Infrared Receiver (USBCIR). When connecting the first time Windows 7 won’t give any notice that the installation of the driver failed or that the device is not ready to use. It will simply not work.

Device Manager

This seems to be known problem, however, there is no need to wait for a Software Update from Microsoft. The solution is to manually choose the device.

  1. Start Device Manager
  2. Right-click the eHome Infrared Receiver (USBCIR) entry
  3. Select Update Driver Software
  4. Choose Browse my computer for driver software
  5. Choose Let me pick from a list of device drivers on my computer
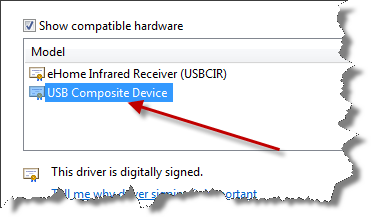
  6. Make sure the Show compatible hardware box is checked
  7. Select the USB Composite Device and you are done

Show compatible hardware

After a few seconds the driver should be installed and the device should be ready.

Driver Software Installation

Data Mikgration Kit for Xbox 360 60GB HDD

We just spend this afternoon trying to upgrade a Xbox 360 to a 60GB HDD with a friend, called “The-one-without-a-Web-presence”. Without success, yet. Somewhat frustrated, I started doing some research on this to understand. Some background information might be helpful.

I just upgraded my Xbox 360 to 120GB. That went quite well. After fighting an epic battle with the blister box, I obtained three essential pieces as reward: the HDD, some kind of odd cable and a green CD/DVD. One end of the cable to the Xbox, the other one to the back of the Xbox. There is only way how it fits, so its quite idiot-proof. Then you insert the disc.
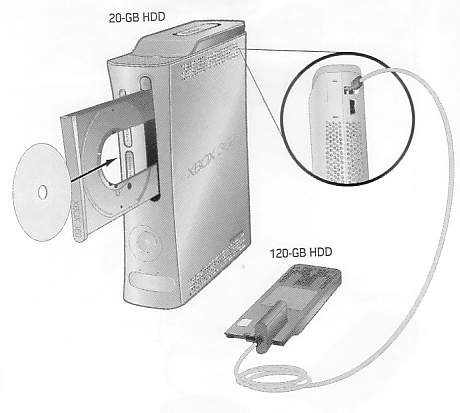
Data Migration Kit

The next few steps are shown on the screen. Confirm the transfer and, depending on the amount of data on your old hard disc, the transfer might take up to 1 hours 30 minutes from the 20 GB disc. Transfer works from one way only. This means, once the transfer is completed, your old disc will be wiped out. It will be a plain disc, just with the XNE (or dashboard if not updated, yet) on it. No profiles, no save games.

The trasfer seems to work only from a smaller to a larger disc. This means

20GB –> 60GB
20GB –> 120GB
60GB –> 120GB

I was also told that the the same size of a HDD is supported. This means the following might also work (not confirmed):

20GB –> 20GB
60GB –> 60GB
120GB –> 120GB

Said that, my friend “The-one-without-a-Web-presence” bought the 60GB Live Starter Kit. That’s a quite fair deal including a 60GB HDD, a head set and three months of gold subscription and a Ethernet cable. He was never live before, so the three months of gold subscription was a reason to buy this kit as he wants to start playing live (Do you get it? Live Starter Kit? For those who want start being live?). Besides this, he gains much more reward for fighting the blister box.

What’s not included in this package is a Data Migration Kit (containing the odd cable as well as the CD/DVD). So he asked me, if we could use my kit. After several attempts we finally figured out: Yes, we could use my kit, however, it does not work. What went wrong at the end? Everything was connected properly, we tried several permutations in connection orders and we read through a whole bunch of support articles.

The simplest way is contacting Microsoft Support and asking for the Data Migration Kit. To do so you simply have to follow the steps indicated in this support article. Obviously we already have an Data  Migration Kit from my 120GB disc that does not work.

The answer seems pretty simple: At the time when the 120GB disc was released, there was no 60GB disc available.  That way, the software does only support the copy process to a 120GB disc. It seems this as a known issue and meanwhile Microsoft released a newer software that also supports this process to 60GB discs.

this means, the software only can process the following transfers:

20GB –> 60GB
20GB –> 120GB
60GB –> 120GB

However, you might be not in luck and you end up with a old software version indeed. Having a newer version this will be no problem at all. How can you tell what version you have?

Hard Disc Transfer Disc

Check out the number on the right bottom of the green CD/DVD being part of your Data Migration Kit. Does it end with “–01”?  Bad luck then. That’s the old version only supporting 120GB discs. Give a call to your local Microsoft support and ask for a newer version or ask your friends if anybody has the newer version. Now you should be able to identify the right disc.

Personally, I would recommend to ask if anybody of your friends has the disc and the odd cable. You’ll need this cable/software only once and ordering it for a single transfer is a waste of resources. As there is no way back now cable will be of no use after the transfer other than giving it to a friend.

Why this confusion? The 60GB Live Starter Kit does not include a cable/software as it is meant to be for Xbox 360 Arcade users who want to migrate. So It might be called “Xbox 360 Arcade 60GB Upgrade Kit” to avoid some confusion for those how want start with Xbox live using the “Xbox 60GB Live Starter Kit”.

Bluetooth Hotchpotch

I literally fought an epic battle with my Toshiba m400 since the first day I got it. For that reason I was not surprised when my colleague Frank Prengel from Microsoft Germany had some trouble with his m400 while preparing a demo with the Microsoft Robotics Studio (MSRS).

His first idea was about some issues with the April CTP 1.5 of the MSRS. Indeed, he got some errors like

<?xml version="1.0" encoding="utf-8" ?>
 <s:Fault xmlns:wsa="http://schemas.xmlsoap.org/ws/2004/08/addressing" xmlns:d=http://schemas.microsoft.com/xw/2004/10/dssp.html xmlns:s="http://www.w3.org/2003/05/soap-envelope">
 <s:Code> 
 <s:Value>s:Receiver</s:Value> 
 <s:Subcode>
  <s:Value>d:OperationFailed</s:Value>
  </s:Subcode> 
 </s:Code> 
 <s:Reason>
 <s:Text>Unabled to configure Lego NXT</s:Text>
 </s:Reason>
</s:Fault>

Indeed, the error is a unfortunate result of a unhappy soft- and hardware combination. So, let’s see what we already have

  • A Toshiba m400
  • Windows Vista
  • Microsoft Robotics Studio 1.5 April CTP installed
  • A Lego NXT

Actually, the NXT documentation tells the NXT requires the Bluetooth stack from Widcomm or XP SP2. However, I know my m400 much much better than the people from Lego. Maybe you will realise that after installing the Lego software (either for RCX or NXT) you’ll get a message that the Lego software does not work with the Toshiba BT stack!? I.e. there is something special about the Toshiba BT stack… Fortunately, using the MSRS you don’t need any drivers or software to run the NXT. The build-in services provided by the MSRS are the one and only bits to run the NXT.

  1. Un-install the Microsoft Bluetooth Stack
  2. Install the latest Toshiba m400 BIOS
  3. Install the Toshiba BT Stack for Windows Vista
  4. Install the Toshiba BT Monitor.

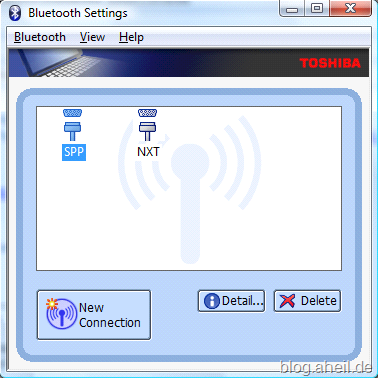
Now you can easily pair your BT capable devices with your m400. In the following you can see a iRobot Create and a Lego NXT paired with my m400.

Toshiba Blootooth Settings

Frank confirmed that after following the steps above his demo now “works as a charm”.

SearchIndexer.exe makes my laptop being a Hairdryer

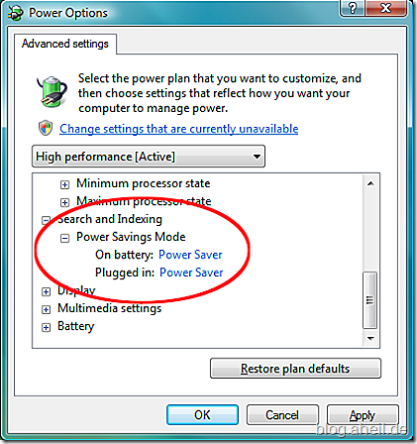
SearchIndexer.exe does all the indexing stuff on your Vista machine. Not bad at all it is not possible to schedule when the indexer is running as it was able using MSN Desktop Search. E.g., there you have been able to send the indexer to sleep for a 10, 20 or 60 minutes or to avoid running the indexer whilst working on the machine. it looks like the only way to calm the machine down is by switching of the service at all. Another work around I am trying right now is to got to Control Panel / Power Options and choosing the High Performance Change power plan settings. There chose Change advanced power settings Search and Indexing values to Power Saver or Balanced. This should lower the indexing effort of the Vista Search significantly.

Search and indexing Power Options

Bluetooth ActiveSync Issue

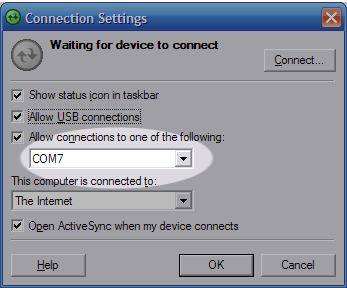
Due to some unknown reasons, Windows told me synchronizing with my Windows Mobile device was not able anymore. The error message told me some issues with the COM port. For some reason the COM port in ActiveSync was rest to port 3. Using the Toshiba Bluetooth Manager on my m200 I have to reset the port to 7.

Connection Settings

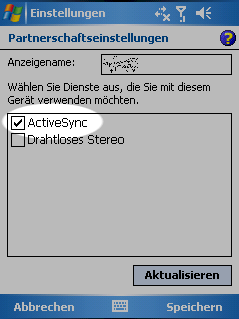
Afterwards, I had to update the partnership on my mobile device. After checking ActiveSync in the Bluetooth settings dialog for the specific device, the Bluetooth connection worked again.

Partnerschaftseinstellungen

Towards UMTS

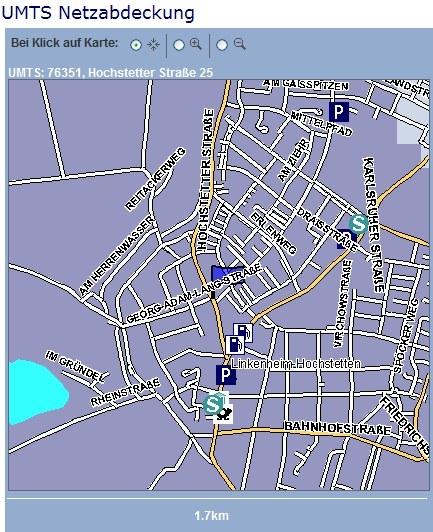
Since I have the new XDA Trion am willing to investigate into UMTS. The first the UMTS coverage – as one can see, the right top corner appears in light blue and seems to be not covered.

3G Coverage

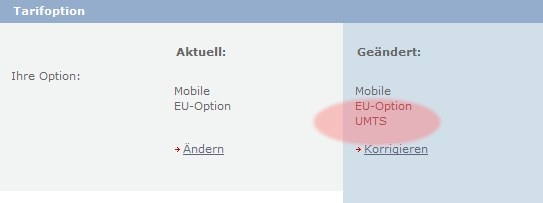
There was some trouble in activating the UMTS with O2. Actually they send a new SIM card with the phone. Until this card is activated, you can’t change the options (including UMTS). Activating the new card would lead to the deactivation of my multi cards. After asking the support (that’s the advantage being a “pay monthly” customer) it took only a few minutes to cancel the new card’s activation. Just adding the UMTS option within the portal is the secret.

Activation

Finally, it is not as easy as I thought: adding the UMTS option includes a pair of new UMTS enabled SIM cards. Even if your old ones support already UMTS. Now I have to wait until the new cars are activated.