.NET Core on Mac OS X

After MSFT started to open source .NET Core, it eventually found its way on my Mac OS as well.

The easiest way seams to be installing the .NET Execution Environments using Homebrew based the instruction given at Github.

sudo brew tap aspnet/dnx
sudo brew update
sudo brew install dnvm
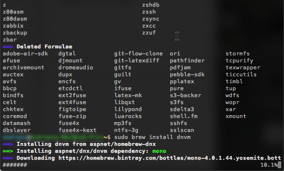
Installation von .NET Core via Homebrew

Afte registering dmvm via

source dnvm.sh

one now should be abel to install .NET core using the following dnvm commands

dnvm upgrade -u
sudo dnvm install latest -r coreclr -u

For whatever reason I permanently run into issues such as

Installing to /Users/andreas/.dnx/runtimes/dnx-mono.1.0.0-beta6-12004
find: /Users/andreas/.dnx/runtimes/dnx-mono.1.0.0-beta6-12004/bin/: No such file or directory
chmod: /Users/andreas/.dnx/runtimes/dnx-mono.1.0.0-beta6-12004/bin/dnx: No such file or directory

First of all, I tried tried to update dmvm itself and again run into issueS:

foo@mac-pr:~/.dnx$ dnvm update-self
~/.dnx/dnvm/dnvm.sh doesn't exist. This command assumes you have installed dnvm in the usual location and are trying to update it. If you want to use update-self then dnvm.sh should be sourced from ~/.dnx/dnvm 
andreas@mac-pro:~/.dnx$ 

Trying so create the missing folders and links manually

sudo mkdir ~/.dnx/dnvm; 
sudo ln -s /usr/local/Cellar/dnvm/1.0.0-dev/bin/dnvm.sh ~/.dnx/dnvm/dnvm.sh

as well as sourcing dnvm.sh directly from the ~/.dnx/dnvm location did not help.

Every time running

dmvm update-self 

ended up in something like

Downloading dnvm.sh from https://raw.githubusercontent.com/aspnet/Home/dev/dnvm.sh 
Warning: Failed to create the file /Users/andreas/.dnx/dnvm/dnvm.sh: 
Warning: Permission denied

As very last attempt, I tried to run all these stuf as su. Unlike on Linux systems, root is not enabled by default on MAC OS though. Therefore it was necessary to enable the root user following these steps.

Now you can run su in any terminal, though.
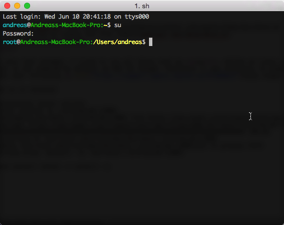
su on Mac OS

Determining latest version
Latest version is 1.0.0-beta6-12004 
Downloading dnx-mono.1.0.0-beta6-12004 from https://www.myget.org/F/aspnetvnext/api/v2
Download: https://www.myget.org/F/aspnetvnext/api/v2/package/dnx-mono/1.0.0-beta6-12004
######################################################################## 100.0%
Installing to /var/root/.dnx/runtimes/dnx-mono.1.0.0-beta6-12004
Adding /var/root/.dnx/runtimes/dnx-mono.1.0.0-beta6-12004/bin to process PATH
Setting alias 'default' to 'dnx-mono.1.0.0-beta6-12004'

Eventually, you now can run and successfully complete

dnvm install latest -r coreclr -u

and write and run your first .NET application on Mac.

Unfortunately, all bits installed are only available for root once you followed the above instructions.

The Right Moment to start over with Visual Studio and .NET

Yesterday, Somasegar, corporate vice president of the Developer Division at Microsoft announced Microsoft is going to open source the .NET platform. Since I left Microsoft in 2011, this is one of the moments I am most stunned. There is a fully featured community edition of Visual Studio, Android emulator, .NET open sourced under the MIT License, support for Linux and Mac OS X. Further background information can be found on my former colleague Immo’s post over here.

I went from Windows to Mac once I left, dug into Python, Java, a lot of Apache projects and somewhat C++ and JavaScript, developing for the new Jolla and Sailfish OS and contributing to the IoT project  OpenHAB. Anyway, I never really was that overwhelmed by the dev ecosystem as I was with Microsoft.

It does not look like the Microsoft I left at all, however, with these major changes, I will be definitely one of the first nailing .NET on my Mac OS X.  I am looking forward for this. For today, I will install the new Visual Studio Community 2013 on my virtual Windows, though.

Understanding Average Performance Counter in .NET

For the current project I am working on, I recently had to implement a way of easy adding and using Performance Counters in .NET. While working on the code base, I implemented various counters as examples how to use the new infrastructure and how to implement counters in the code base.

While investigating in performance counters, I’ve seen quite a series of posts and articles describing the usage of the AverageTimer32 and AverageTimer64 classes. However, all the examples there seemed to be wrong. One of these examples was a question I have answered on stackoverflow.com, leading to this post.

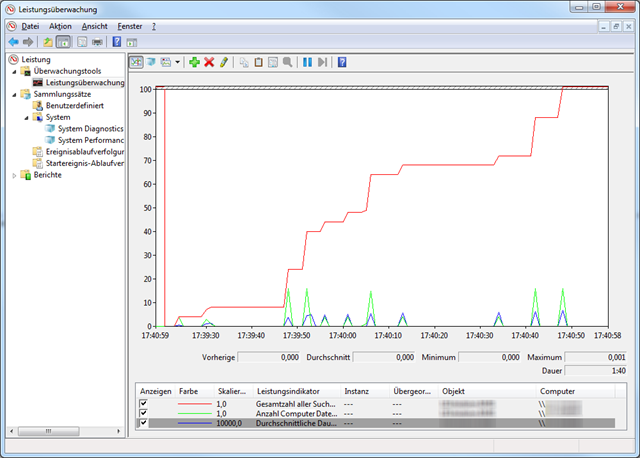
Basically, all the examples I have seen propose to throw a set of measurements into the mentioned expecting that the counter provides the average of these measurements. The AverageTimer32/64, however, does not calculate the average of all measurements you perform. Instead it provides the ration of your measurements to the number of operations you provide.

To understand how the AverageTimer32/64 works, it might be helpful to understand the formula behind it. This also answers why one needs an AverageBase to use an AverageTimer32/64.

The formula the AverageTimer32/64 is based on is as following:

((N1 - N0) / F) / (B1 - B0)

given
N1 current reading at time t (provided to the AverageTimer32/64)
N0 reading before, at t – 1 (provided to the AverageTimer32/64)
B1 current counter at t (provided to the AverageBase)
B0 counter before, at t – 1 (provided to the AverageBase)
F Factor to calculate ticks/seconds

In a nutshell the formula takes the current time in ticks and subtracts the previous one provided. The result divided by the factor F gives you the time you operation run since the last measurement taken at t-1. Usually, this factor should be 10.000.000 ticks per second.

Now you divide this by the current base counter minus the previous base counter provided. Usually, this might be one. As a result you have the average time of your operation for a single measurement.

Using the AverageBase you now can step over various measurement points. Think of a case where you can set the counter only every tenth operation you perform. Since your last measurement you would increment the AverageTimer32/64 by the new time measurement for all ten operations while incrementing the AverageBase by ten. Eventually, you will receive the average time for one operation (even if you have measured over all ten operation calls).

In most examples, a set of timespans are provided  for this counter to calculate an average value. Let this be a series of numbers like 10, 9, 8, 7 ,6 while increasing the AverageBase by 1 every time providing one of these figures.

For the second measurement you will receive the following result:

(9 – 10) / F / (1 – 0) = -1 / F / 1

With F being 1 for simplicity you will get -1 as result. Given measurements that provide most of the time similar results, for a large number of experiments you will end up with am average value near zero.

Based on the previous example, the correct values to submit, however should be 10, 19, 27, 34, 40.  Again the same example we will show a different result.

(19 – 10) / F / (1 – 0) = 9 / F / 1

With F being 1 again, you will have an average time of 9 for your second measurement. As you can see from the formula, the every value measured needs to be greater than the previous one to avoid the effect previously showed.

You might use a global Stopwatch to achieve this goal. Instead of starting it new, you might use use Start() – not Restart() for each measurement. As seen above, the counter will calculate the difference time internally. That way you will get correct measurements.

public void Compute()
{
_stopwatch.Start(); // do not restart the Stopwatch used for average counters


// code to be measured
// ...


_stopwatch.Stop();


_avgTimeCounter.IncrementBy(_stopwatch.ElapsedMilliseconds);
_avgTimeCounterBase.Increment();
}

PerformanceCounterDe

Even if called AverageTimer32/64, this type of counter is not strictly restricted to time. You can think of using this counter for a variety of measurements. For example 404 responses in relation to the total number of HTTP requests,  disk transfer rations  and so on.

Heavy WPF Commands – Part I

Recently, I had a conversation about how much logic a WPF command in .NET might provide and how few implementation it should contain. Basically, this conversation was triggered by different understanding of the semantics of WPF commands. I realized that there is a lot misunderstanding how to implement and use commands in WPF that causes trouble in understanding the program flow and hard to maintain code in the long term. Therefore, I decided this is definitely worth some research on WPF commands and their usage. This is the first articles in a series, I will focus on the usage of WPF commands, their meaning, various implementations and best practices.

The intention of commands are pretty clear described in the Commanding Overview MSDN article:

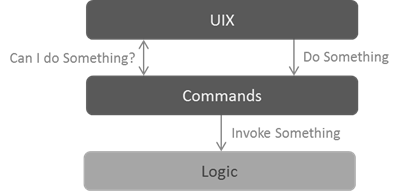
The first purpose is to separate the semantics and the object that invokes a command from the logic that executes the command.

Therefore, commands allow you to reuse parts of your application logic for different targets of of application while separating this logic from the actual user experience (UIX). Regardless whether implementing the logic using the code behind approach in WPF with RoutedCommands, following the MVVM pattern using RelayCommands or building composite applications using DelegateCommands and CompositeCommands, the concept behind commands stays always the same.

All this is made possible by the ICommand interface with its two method declarations CanExecute and Execute. Basically, this allows your UIX to ask if a certain action can be performed and of course to trigger this action. The one who asks for this is called command source. If the command tells it cannot execute this action, is usually disables itself.

The Idea behind WPF Commands

Which logic to perform is not within the concern of the command source. The command maps the “Do Something” call from the command source to the actual logic and invokes this logic on behalf of the command source. Consequently, the logic to be invoked should not be implemented at an instance of the command itself. Any command serves simply as a protocol between application logic and UIX and allows you to separate both from each other.

In a following articles, I will focus on various best practices how to implement commands before having a look in the different possibilities how to use them in common WPF as well as in composite applications.

Stacking Using

A few days ago, Benjamin pointed me to a feature in C#, I was not aware of, yet. You can stack using statements. In the following I will show an example where this might come in very handy.

I recently worked on a project where we had to process large text files (with large I mean 14GB each). In a pre-processing step we cleaned up the files, processed each line, validated it against a set of rules and then either wrote it back to a output file or a temporary which required further processing steps. Due to the complexity of the validation we decided to go with a small C# program that does the job.

A fast and convenient way was utilizing a set of StreamReaders and StreamWriters and applying using statements a to read and write the files. As Anoop pointed out, not using usings is one of a common mistakes .NET developers should avoid. Eventually, the code looked similar to the following example by cascading the using statements.

using (StreamReader reader = new StreamReader(@"c:input.txt"))
{
    using (StreamWriter successWriter = new StreamWriter(@"c:success.txt"))
    {
        using (StreamWriter failWriter = new StreamWriter(@"c:fail.txt"))
        {
            // all the magic happens here
        }
    }
}

That would be the way many developers would write the code, and if you have a look at the MSDN documentation about using statements  this seems to be the way to do it. But the C# 4.0 Language Specification does give you an hint that there is more you could do.

For a using statement stmt of the form:

using ( resource-acquisition ) embedded-statement

The definite assignment state of v at the beginning of resource-acquisition is the same as the state of v at the beginning of stmt.

The definite assignment state of v on the control flow transfer to embedded-statement is the same as the state of v at the end of resource-acquisition.

What’s not obvious here, is the fact that you can stack using statements utilizing one code block. In this case you embedded-statement is another using statement. In fact that’s not different how most of us use cascading for and foreach loops. In fact, this is not a new feature of C# but something you might not have considered before.

using (StreamReader reader = new StreamReader(@"c:input.txt"))
using (StreamWriter successWriter = new StreamWriter(@"c:success.txt"))
using (StreamWriter failWriter = new StreamWriter(@"c:fail.txt"))
{
    // all the magic happens here
}

Writing the code like this reduces a lot of noise and indentation in your code, keeps the resource acquisition tight and might be definitely worth keeping in mind.

Extension Method Naming Conventions Best Practices

With .NET Framework 3.5 Extension Methods were introduced to .NET developers. The concept of extension methods allows you to

“[… ] ‘add’ methods to existing types without creating a new derived type, recompiling, or otherwise modifying the original type.”

While the most common use for extension methods are LINQ standard query operators, extension methods provide aplenty of new possibilities. One issue one comes along is the correct naming if extension methods and their corresponding classes.

The signature of a extension method differs slightly from a common signature as the first parameter is preceded by the this modifier:

public static int WordCount(this string that)

I haven’t found much about naming conventions, most about naming the methods itself, how to organize them or what you should not do with them. If you have read through Robert C. Martin’s Clean Code you might know that naming is an essential foundation of clean code. I’ve read through a lot of code outside and inside of Microsoft, however, I haven’t seen anybody following global guidelines. There might be group specific conventions but nothing that seems to be applied by the majority of developers.

1. Name the type parameter that

This seems to be very odd, but naming the type parameter that has quite some charm. When reading the signature you immediately see the type parameter, when reading through the method body you always know that that is the type parameter the extension is written for. When reading through many extension methods I found it very pleasant to read those methods following this convention.

public static int WordCount(this string that)

2. Create dedicated static classes for each type

No matter whether you put the extension methods in a separate library, in a specific sub-folder within your project or somewhere random

a) Do create separate files for each class containing extension methods.
b) Do create separate classes for each set of extension methods for a certain type.

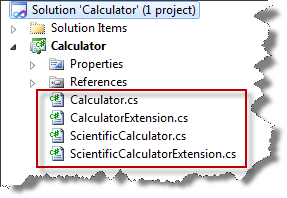
Once you follow these simple rules you can think straight forward about naming of classes containing extension methods. If you collect all extension methods within a single class (or file) you might end ob with a lot of obsolete code while your application evolves. Due to rewriting your code and refactoring your application same extensions might become obsolete or some classes you extend do not exists anymore in your project. Using dedicated files make maintaining your code base much more easy.

Classes for Extension Methods

3. Use the Extension suffix

During our day job we realized that naming the class with the suffix Extension provide good semantics of the class. This indicates clearly that you are dealing with a collection of extensions. For example, while using the using the Visual Studio Object Browser you can easily identify those classes providing extension methods.

public static class StringExtension
{
    public static int CountWords(this string that)
    {
        ...
    }
}

4. Name what is being extended

It seems to be a good practice to name classes after what they extend. If you follow the previous two guidelines this should be a straight forward job. In addition your code is good to read and easy to understand. In practice we came along various conflicts with already existing naming guidelines. Anyway extensions are a relatively new concepts and one would expect that there might be conflicts with already existing naming conventions. The following will illustrate one of those conflicts:

Naming conventions for Extension Methods

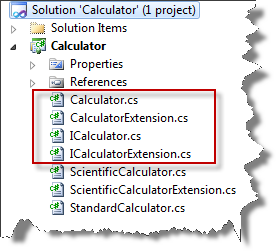
By convention interface names should start with a capitalized ‘I’. So odes ICalculator. Following the above guidelines you might consider naming the corresponding class providing extension methods for the interface ICalculator type CalculatorExtension. In this case it seems reasonable to neglect the convention for interfaces:

Consequently, ICalculatorExtension provides extension methods for the ICalculator type, CalculatorExtension provides extension methods for the type Calculator. This approach will not only increase the maintainability of your codebase, I will also allow new team members to orientate quickly in your codebase.

There are various reasons for and against naming conventions for extension methods. Once writing Reactive Extensions for .NET this might get even more complicated as you will write a lot of extension methods for dedicated purposes. However, for common codebases the provided guidelines might help to develop easy to read and maintain, clean code.

ReSharper 5.0 can Visual Studio 2010 Metadata View

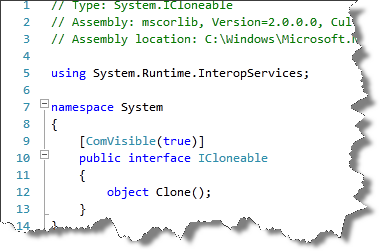
One major drawback of ReSharper 4.5 was the fact if one navigates back to a compiled class, ReSharper always opened the Visual Studio Object Bowser. However, personally I prefer the Metadata View of Visual Studio:
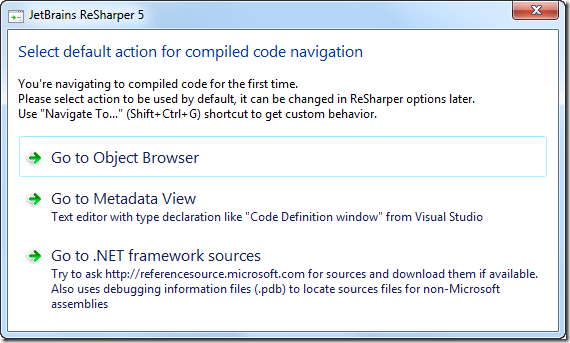
Visual Studio Metadata ViewWith version 5.0, ReSharper (currently available as EAP) comes a major improvement: The first time you navigate to a pre-compiled class, ReSharper offers you to choose your favorite view: Object Browser, Metadata View or directly the .NET framework sources.
JetBrains ReSharper 5.0

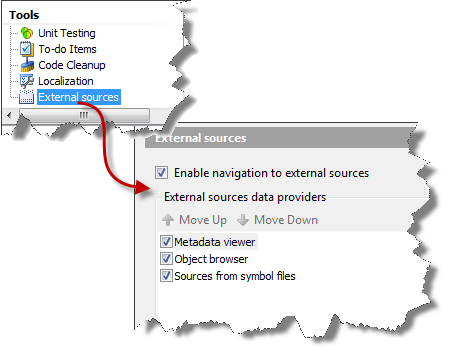
In case your change your mind (or the selected sources are not available) you might define the order for the code navigation within Visual Studio at the ReSharper options from ReSharper / Options… / Tools / External sources:

ReSharper Options: External sources

NETCFv35.Messages.EN.wm.cab!?

Today, I run into a quite annoying error message while developing a application for Windows Mobile 6.1.

“An error message is available for this exception but cannot be displayed because these messages are optional and are not currently installed on this device. Please install ‘NETCFv35.Messages.EN.wm.cab’ for Windows Mobile 5.0 and above or  ‘NETCFv35.Messages.EN.cab’ for other platforms. Restart the application to see the message.”

The required files are located at C:Program Files (x86)Microsoft.NETSDKCompactFrameworkv3.5 WindowsCEDiagnostics, assuming you have installed the Windows Mobile SDK. I copied the file NETCFv35.Messages.EN.wm.cab to my device and run the installation. So far it worked fine, until the same exception popped up again.

Using the .NET CF Logger, from Power Toys for .NET Compact Framework 3.5, I was able to track it down to the following error:

“Failed to load [System.SR, Version=3.5.0.0, Culture=neutral, PublicKeyToken=969DB8053D3322AC]”

To do so, you choose the device you want to log and select which logging options you want. The log files can be found then in your application folder on the mobile device.

.NET CF Logging Options

With this new input, I found Martijn Hoogendoorn’s blog entry. He came across the same issue some time ago and provided a solution to this miracle. If you have a look inside the .cab file, check the _setup.xml file.

 NETCFv35.Messages.EN.wm.cab _setup.xml

Extract and rename the file SYCCFA~1.001 to System.SR.dll and include it into your project. Rebuild, deploy and debug it – it should work fine.