The Ultimate Windows Server 2003 Media Hack
Doh, if you are going to use your Windows Server 2003 as a streaming server for your Xbox 360, you might be in trouble. For a while I went with a rather sophisticated solution, running a Windows XP Media Center within a Virtual Server on my Windows Server 2003. The solution is not the desired one and as Windows Media Center and the Media Center Extender within Xbox 360 have some trouble in streaming h.264 encoded movies files, I had to dig a bit deeper.
Before you go one, please be aware of the following disclaimer:
The following is given under a “works on my machine” premise. The proposed approach is based on my very personal attempts and comes a”as is”. If you try to attempt the following steps, you do it on your own risk. It is not supported by Microsoft, and hey, in case you brick your box don’t expect any support from Microsoft. Don’t blame it to me either as you did it on your own risk, but let me know as it could be fun, tough.
There are several ways to share media with your Xbox 360. The easiest ways is to check out http://www.xbox.com/pcsetup/. After determining your OS, you will be guided through the best way to share media. Bad luck if you work on a Windows Server 2003, though. Not supported, you will be told.
The easiest way is to share media over Windows Media Player 11. Windows Server 2003 comes with Windows Media Player 10. But as we know the core of Windows Server 2003 is somehow Windows XP and therefore there must be away to install WMP 11 on Windows Server 2003. If you google for it, you will come along a dozen hacks and workarounds and most of them won’t work. Recently, this guy called C:Amie posted some awesome hack C:Amie provided a new link to install Windows Media player 11 on Windows Server 2003. If you have time, go through it, if you are in a hurry, do it that way:
- Make sure your box is fully patched and Service Pack 2 is installed.
- Download Windows the Windows Media Player 11 installer for Windows XP.
- Download the automatic installer from C:Amie’s website.
- Run the automatic installer and extract it to any folder on your Windows Server 2003 box.
- Copy the previously downloaded wmp11-windowsxp-x86-enu.exe into the same directory.
- Go to the folder and run the INSTALL.CMD file.
- Follow the onscreen instructions.
 The script creates a temporary folder on your C: drive called C:wmp11. There you have to change the compatibility mode of two files to Windows XP. Go to C:wmp11update1. and right click the update.exe file. Chose the Compatibility tab and check the Compatibility mode for Windows XP. Make the same for the update.exe file in c:wmp11update2.

- Now go back to the command line window and press a key to continue and the simply wait.
- The software updater wills start after some time and after some more time you will end up with the UPnP for Windows Server 2003 dialog.

Check the Universal Plug and Play checkbox and select Next and then Finish. - If everything went well, you will end up with Windows Media Player 11 on a Windows Server 2003. Hurray.

But you remember that we want to stream h.264 encoded files to our Xbox 360, right? The good news is that Windows 7 will support h.264 natively. The bad news is that we work on a Windows Server 2003 right now. With some work however, we can teach our Windows Server 2003 also to deal with h.264 encoded .mp4 files. All we have to do is to install some codecs and to apply some registry hacks.
- For the sake of simplicity, I took the K-Lite Mega Codec pack. It took the mega pack instead of the standard pack because Dirty Harry is using a .44 and not a .375. This might be reason enough.
- During installation select Profile 2. It’s the default profile without the players (you remember we want to stream anyway). Feel free to experiment with other profiles and custom settings.

- When you come along the Select Additional Task step, don’t forget to scroll down and to check Make thumbnail generation possible for the following types. This will create the thumbnails in the Windows explorer and within the Windows Media Player 11.

At this point your Windows Media Player can play h.264 encoded files but your server is still not capable to share any kind of .mp4 files. They won’t show up in the folders monitored by Media Player until we apply some tweaks to the registry.
On my crusade I came along two registry patches. It seems that they did not work for everybody, however, nobody tried on Windows Server 2003. It worked for me after I installed bot
h of them.
- Download the first registry patch, rename to .reg and install it.
- Download the second registry patch, rename to .reg and install it.
- Reboot to apply the registry changes.
Now, out Windows Server 2003 is capable to stream h.264 encoded media files. The previous patches will now cause that Windows Media Player 11 will add all kinds of .mp4 or .m4a files within the monitored folders. Adding these folders to be streamed is straight forward.
- Go to Libary /Add to Library…

- Add all kinds of folders that should be streamed to your Xbox 360. The media types will be organized automatically, so movies, music files and images will be shown in the corresponding tabs in the NXE.

- In some rare cases (and I know what I am talking about as I encountered this rare case) all your mp4 files won’t show up in the movie folders. In this case select Library / Other and check if the files are shown there.
 If you find all your files here, something went terrible wrong with your media library. Calm down, there is a easy workaround (FWIW: if you already share media, stop sharing as the following won’t work).Go to C:Documents and Settings[YouProfileName]Local SettingsApplication DataMicrosoft and delete the Media Player folder. This will wipe out the whole media library for this computer. Restart from 1. and everything should be green now.
Now, where everything is nicely organized, indexed and monitored, we are ready to share our media with the Xbox 360.
- Turn on your Xbox 360.No kidding, you won’t be able to turn on sharing if the 360 is not on at that point of time.
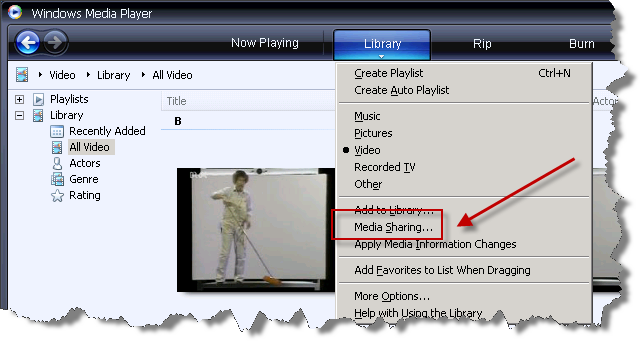
- Go to Library / Media Sharing…

- Now it’s straight forward:a) Check Share my media to b) Select your Xbox 360c) Click Allow

- Finally, don’t forget to check out the Customize button which will open a dialog for some more fine tuning (what kinds of media to share, what ratings to share, etc.)
Now got to your Xbox 360 and enjoy your h.264 streamed media.
There are a few point’s I haven’t found out how to resolve, yet.
- The registry hacks don’t include .mkv file extensions. Also both hacks could be combined into one. I simply haven’t spend time in this yet.
- The 360 won’t show any thumbnails for the h.264 encoded files. Not sure if this is related to the XNE or the Media Player. This might worth some more investigation.
- The 360 does not show the length of the media file. It does so for .avi files, so this might be automatically answered once 2. is answered.

